Projection Video Wall vs LED: The 2026 Exhibitor’s Guide

Projection video wall decisions usually happen when the pressure is already on. Your booth space is booked. The show date is close. Sales wants a crowd. Marketing wants a clean brand presentation. Operations wants no surprises. You’re stuck deciding whether to go with projection or move to direct-view LED.

We’ve seen this decision play out on crowded expo floors, and the wrong choice usually fails in the same places. It doesn’t fail in the brochure. It fails during setup, under show lighting, and when your team is trying to talk to prospects instead of babysitting AV gear.

A projection video wall helped define large-format event visuals. It got the industry here. But for most trade show exhibitors in 2026, it’s the wrong centerpiece.

Choosing Your Booth’s Centerpiece

You’re probably looking at a floor plan right now, trying to answer one practical question. What’s going to stop people in the aisle and make your booth look like it belongs at a major show instead of getting lost in the visual clutter?

That’s where a projection video wall still enters the conversation. It has history, and that history matters. Projection video wall technology first emerged in the early 1980s, and around 1989 Pioneer’s videowall cube put a CRT projector inside an enclosure with a 41-inch diagonal rear projection screen, becoming a familiar sight at trade shows and corporate events for years, as documented in Electrosonic’s history of videowalls.

A businessman in a suit stands in an exhibition booth, thoughtfully looking at a large blank video wall.

The old answer versus the current reality

Projection solved a real problem when display options were limited. Early systems let exhibitors scale visuals beyond what single monitors and projectors could do. That mattered then. It doesn’t settle the question now.

Today, the booth display isn’t just a screen. It’s the visual anchor of the whole exhibit. It has to handle motion graphics, product demos, brand video, live messaging, and the conditions of bright convention halls. It also has to fit your booth without turning installation into a geometry exercise.

Here’s the blunt advice. If you want the display to be the centerpiece, not a technical compromise, judge it by show-floor performance, not nostalgia.

Factor Projection video wall Direct-view LED wall
Image in bright halls Vulnerable to ambient light washout Strong visibility in typical expo lighting
Booth integration Needs screen planning and projection geometry Can become part of walls, columns, or arches
Setup stress Alignment and placement are sensitive Modular systems are easier to deploy
Support risk More points of failure during operation Better suited to fast serviceability
Best fit Controlled environments with room to engineer around it Trade shows where speed, impact, and reliability matter

Projection belongs in environments you can fully control. Trade shows aren’t one of them.

If your team needs a display that looks sharp, goes in fast, and doesn’t create new problems on show day, LED is the smarter call.

Comparing Projection Video Wall Technology and Image Quality

A projection video wall throws light onto a surface. An LED wall creates the image at the pixel level. That difference sounds technical, but the practical result is simple. One fights the room. The other overpowers it.

Trade shows are not kind to projected images. Overhead hall lighting, reflective flooring, neighboring exhibits, and open aisles all work against projection. You can manage some of that in a ballroom. You usually can’t manage it on an expo floor.

What the numbers actually tell you

According to AVIXA’s video wall overview, LED video walls can achieve pixel pitches as fine as 0.6–1.5mm and deliver contrast ratios of 1,000,000:1, while projection systems are around 8,000:1. That gap is why LED holds up far better in high-brightness trade show conditions.

That same difference shows up in close viewing. Booth visitors don’t stand at the back of a theater. They walk by at short distance, glance sideways, stop briefly, and decide in seconds whether your content is worth their time.

Why pixel pitch matters more than most exhibitors realize

Pixel pitch determines how tight and sharp the image looks up close. Smaller pitch means higher resolution at practical trade show viewing distances.

Our practical view: if your wall will be seen from a few feet away, finer pitch wins. Our standard 1.9mm pitch gives a sharper result than the 2.5mm pitch many competitors rely on.

That difference matters for product renders, UI demos, text overlays, and any brand content with detail. If you’re showing a software platform, medical device animation, engineering schematic, or packaging close-up, mushy visuals weaken the presentation immediately.

For exhibitors comparing panel options, review the actual LED wall panel configurations and ask one direct question: how close will attendees be when they first see the content?

Seams, blending, and why projection still looks fragile

Multi-projector systems can work, but they demand careful blending and calibration. If alignment drifts or the surface isn’t ideal, the image looks compromised. You’ll notice it in edge transitions, brightness inconsistencies, or geometry that feels slightly off.

LED doesn’t fight those same battles in the same way. A well-built modular wall gives you a cleaner canvas for motion content and typography. That’s what exhibitors need. Not a heroic setup effort. Just a wall that looks right from the moment the hall opens.

Performance in Real-World Trade Show Conditions

The show floor is where projection video wall plans usually get humbled. Specs look fine in isolation. Then the hall lights come up, the neighboring booth runs bright content, the aisle fills, and your image starts losing the fight for attention.

People looking at a large digital projection wall displaying advertisements for cylindrical electronic devices at a trade show.

Bright halls punish a projection video wall

Projection depends on reflected light. That’s the problem. Convention centers are full of uncontrolled light sources, and they flatten projected content fast. Blacks lift. Contrast drops. Colors lose punch. The wall that looked dramatic in a dark demo becomes forgettable in a live hall.

LED handles this environment far better because the image is emissive. It stays bold enough to cut through the background noise, which is exactly what you need when attendees are scanning dozens of booths in a single aisle.

Low ceilings and awkward booth geometry

A lot of generic projection advice ignores trade show architecture. That’s a mistake. In major markets like CES or InfoComm, low ceilings under 10ft force compromises, and Elite Screens notes that vertical projection angles above 8.5 degrees cause keystoning that digital correction worsens, dropping image quality by up to 20% per pixel shift.

That matters if your booth footprint is tight or your hanging options are limited. Many exhibitors don’t have the luxury of perfect throw distance, perfect projector placement, or ideal ceiling height. They have a standard inline, a peninsula with constraints, or an island that needs sightlines from multiple aisles.

For teams planning around those constraints, it helps to look at how professional LED video wall installation is handled in actual exhibit builds rather than in home theater examples.

Here’s a quick visual on show-floor realities:

Viewing angles decide whether people stop

Attendees rarely approach your booth head-on. They catch your display from the side while moving. If the image falls apart off-axis, you lose the moment before your staff even gets a chance to start a conversation.

Projection is less forgiving in this situation, especially when the screen placement and angles aren’t ideal. LED is better suited to broad, aisle-facing visibility. In trade shows, that’s not a minor advantage. It’s the whole game.

Setup, Shipping, and Booth Integration

A projection video wall can look affordable until install day starts. Then the practical work begins. Projector placement, screen tension, throw calculations, rear clearance, cable management, rigging coordination, and alignment all start competing with your schedule.

That complexity is why exhibitors should stop judging display systems by the rendered booth image alone. Judge them by what your team and labor crews have to do in the hall.

A detailed comparison chart outlining the logistics of setting up and installing projection video walls.

Projection takes more room than most floor plans can spare

Rear projection needs depth. Front projection needs clean sightlines and careful placement. Both demand you think about obstruction, shadows, access, and ventilation. That’s before you account for neighboring booths, utility placement, and the realities of move-in.

As Screen Works explains in its projection versus LED comparison, projection offers theoretical scalability, but its practical use is limited by infrastructure needs like rear projection depth and ambient light control. For trade shows, that limitation is a big deal.

LED works like exhibit architecture, not just display hardware

Modular LED offers a distinct advantage. It doesn’t have to sit awkwardly inside the booth plan. It can become the booth plan.

You can build uninterrupted visual surfaces into structures that projection can’t handle cleanly:

  • Full-height branded walls that double as the visual backdrop and the main traffic stopper.
  • Columns and curves that carry motion content without relying on separate screens.
  • Arches, counters, and islands that turn dead structure into active messaging.

That changes the design conversation. Instead of asking, “Where can we fit a screen?” you ask, “What part of the booth should communicate?”

Shipping and labor matter more than exhibitors want to admit

Shipping isn’t just about getting pieces from one city to another. It’s about road cases, handling, timing, and what happens once freight hits the dock.

If you’re evaluating logistics, look closely at how trade show shipping is managed and whether the display system reduces labor instead of adding to it. Modular magnetic LED systems are easier to stage, easier to assemble, and easier to integrate into exhibit structures without turning install into a fragile sequence of calibrations.

Good booth design reduces dependencies. If your display system demands ideal conditions, it’s not helping your exhibit team.

Comparing Cost Models and Total Investment With a Projection Video Wall

A projection video wall often gets approved because the first number looks manageable. That’s how exhibitors end up comparing the wrong thing.

The smarter comparison isn’t rental quote versus rental quote. It’s total investment, including setup labor, risk exposure, refresh cycles, service calls, and the cost of downtime when the wall doesn’t perform the way the rendering promised.

Cheap upfront can get expensive fast

For frequent exhibitors, lamp life and reliability aren’t background details. They hit the budget directly. According to Rent For Event’s event display guidance, projection bulb life is 2000-5000 hours versus LED’s 100,000+ hours, and projection failure rates spike 25% in humid expo halls.

That matters even if you’re renting. Rental buyers still pay for support, troubleshooting, replacement logistics, delays, and the indirect cost of a booth feature that underperforms during show hours.

Predictable pricing beats “surprise later” pricing

At this point, exhibitors need to ask tougher questions before signing anything:

  • What exactly is included in the quoted number?
  • Who handles setup and dismantle?
  • Is on-site support included, or billed separately?
  • What costs are still coming from the show?
  • Who owns the problem if the display fails during open hours?

We prefer all-in pricing because budgeting for a trade show is hard enough already. The only charges that should sit outside the display provider’s price are the ones the show bills directly, such as electricity and material handling.

If you’re comparing options, review a clear video wall pricing breakdown and push vendors to define every included service in writing.

The right budget question

Don’t ask which option is cheapest. Ask which option gives you a predictable number, cleaner execution, and fewer ways to lose money once the booth is on site.

That’s the core comparison.

Reliability, Maintenance, and On-Site Support for a Projection Video Wall

Most exhibitors don’t worry about support until something breaks during show hours. Then support becomes the only thing that matters.

Projection video wall systems have more ways to create stress in a live event setting. Alignment can drift. A component can fail. A screen can get compromised. A projector issue can affect the image in a way that’s obvious to everyone walking past your booth.

A male technician adjusts the lens on a projector integrated into a large video wall display system.

Trade show reliability is different from permanent install reliability

A permanent installation gets consistency. Trade show gear gets freight movement, dock handling, compressed install windows, crowded floors, and constant operation. That environment punishes delicate systems.

LED is better suited to this reality because modular panels are serviceable in a practical way. If a tile needs attention, the problem is more contained than a projection setup that depends on alignment, optics, and screen conditions all working together.

The support model matters as much as the hardware

A lot of vendors say they offer support. That can mean a phone number. It can mean someone “available if needed.” That isn’t enough during a live show.

What you want is turnkey execution and a person on site who owns the outcome. If you’re exploring trade show rental support options, ask whether the vendor leaves an audiovisual technician on site while the show is open or disappears after setup.

Support standard: white-glove, turnkey service is the only model that makes sense for exhibitors who need to focus on customers. We believe the AV team should handle the wall, the content playback, and any issue resolution while your staff handles meetings and leads.

If something goes wrong, you shouldn’t open a help ticket. You should text or call, and an AV technician should be at the booth within minutes.

Peace of mind is not a luxury line item

It’s operational protection. Your sales team is too expensive to turn into a troubleshooting crew. Your marketing team shouldn’t spend show hours hunting down an installer. If the video wall is central to the booth, support has to be immediate and visible.

That’s why reliability is never just about hardware specs. It’s about whether the system and service model let your team stay focused on the reason they came to the show.

Your Trade Show Projection Video Wall Decision Checklist

If you’re still debating projection video wall versus LED, use this checklist and answer.

Ask yourself these questions

  • Will your booth sit in bright, uncontrolled lighting? If yes, projection starts with a disadvantage.
  • Will attendees see the wall from close range? If yes, image sharpness and pixel pitch matter immediately.
  • Do you have low ceilings, a tight footprint, or an awkward layout? If yes, projection geometry can become a headache fast.
  • Do you want the display integrated into the booth structure itself? If yes, modular LED is the stronger fit.
  • Can your team tolerate technical downtime during show hours? If no, choose the system with the cleaner support path.
  • Do you want a price that’s easier to forecast? If yes, insist on a package that includes everything except what the show bills directly.
  • Do you need your staff selling, not troubleshooting? If yes, on-site technician coverage isn’t optional.

The practical recommendation

Projection video wall technology still has niche uses. If you control the room, can manage light, and have the space to engineer around throw distance and placement, it can work.

Most exhibitors don’t have that environment.

They have a live convention hall, a fixed move-in window, neighboring booths throwing light everywhere, and a sales team that needs the booth to work the minute doors open. In that setting, LED is the better decision because it solves the actual trade show problems, not just the display problem.

Buy for the hall you’re exhibiting in, not the demo room you were sold in.

If your display has to be bright, sharp, structurally flexible, logistically sane, and backed by real support, the answer is straightforward. Choose LED.


If you want a booth that looks sharp, installs cleanly, and comes with true turnkey support, talk to LED Exhibit Booths. We build high-resolution 1.9mm LED video wall booths, while many competitors still use 2.5mm pitch. Our pricing includes everything except the charges the show bills you directly, such as electricity and material handling. We also provide white-glove service with an AV technician on site the entire time the trade show is open, so your team can focus on customers instead of chasing technical fixes.

Tension Fabric Backdrop: An Exhibitor’s Guide for 2026

Tension fabric backdrop decisions usually start the same way. You’re staring at a booth plan, the show date is getting close, and you need something that looks polished without turning setup into a second full-time job.

That’s why a tension fabric backdrop is often the default pick. It’s clean, portable, and familiar. But familiar isn’t always the smartest choice, especially when your real job is to stop traffic, hold attention, and help your team start better conversations.

A lot of exhibitors settle for what feels safe. I think that’s a mistake. Your backdrop isn’t just decoration. It’s the first signal buyers get about whether your brand looks current, credible, and worth a closer look.

The Challenge of Standing Out on the Trade Show Floor

Trade show floors are crowded on purpose. Every booth is trying to solve the same problem at the same time: get noticed fast, explain something quickly, and make the space feel worth entering.

That’s where many teams land on fabric graphics. They want a big branded wall, a smooth setup, and something that won’t look cheap under show lighting. Fair enough. A fabric backdrop can absolutely do that.

But the bigger question is whether it’s the right tool for your goal.

If your goal is to put a logo behind a table, a tension fabric backdrop may be enough. If your goal is to launch a product, run multiple messages during the same event, or look more advanced than the booth next to you, “good enough” starts costing you.

A busy aisle punishes static booths. Attendees scan first, then decide whether to stop.

Before you commit to a printed wall because it’s common, look at what high-performing exhibitors are doing with movement, content flexibility, and cleaner visual storytelling. If you need inspiration before making that call, these trade show booth design ideas are a useful reality check.

What Exactly Is a Tension Fabric Backdrop

A tension fabric backdrop is basically a printed fabric sleeve stretched over a lightweight frame. The easiest way to think about it is this: it works like a pillowcase for a display structure. You build the frame, pull the graphic over it, zip it closed, and the fabric tightens into a smooth branded wall.

tension fabric backdrop

The two parts that matter

The system is simple, and that simplicity is why exhibitors like it.

  • The frame: Most systems use lightweight tubular aluminum. The frame gives the display its shape without adding much weight.
  • The graphic: The printed layer is usually stretch polyester. It slides over the frame and zips into place so the image pulls tight.
  • The finish: Because the fabric surface is matte, it photographs better than glossy alternatives and doesn’t throw as much glare under lights.

That last point matters more than people think. If your booth gets photographed for social, PR, or internal reporting, glare is a real problem.

Why it looks smooth

The fabric is doing the visual heavy lifting. Once stretched over the frame, it creates a wrinkle-resistant face that looks more like a wall than a banner. That’s why you’ll hear exhibitors describe a good tension fabric backdrop as looking “tight as a drum.”

The print method also matters. Dye sublimation embeds color into the fibers instead of sitting on top of the surface. That’s one big reason fabric graphics hold up better visually than many low-cost printed alternatives.

For a broader look at different wall systems, this guide to trade show display walls is worth reviewing before you lock in a format.

Where the technology came from

Tension fabric isn’t some brand-new trick. It’s a mature display method with roots in architectural fabric structures. According to the history of fabric buildings from Legacy Building Solutions, the technology traces back to the 1950s, when German architect Frei Otto pioneered early tension fabric structures after studying tension shapes in soap bubbles. That material science eventually led to modern display applications using polyester fabric and aluminum frames. The same source notes that fiberglass variants reach 3200 MPa tensile strength, over 12 times stronger than structural steel’s 250 MPa, which explains how these systems can stretch taut without sagging.

Here’s a quick look at the basic concept in action:

Weighing the Pros and Cons for Your Exhibit

A tension fabric backdrop became popular for good reasons. It solves several booth problems cleanly. It just doesn’t solve all of them.

Where tension fabric works well

If you want a polished printed presence without hauling heavy hardware, fabric has a lot going for it.

tension fabric backdrop

Here are the main upsides:

  • Cleaner appearance: Fabric gives you a matte surface, and that matters in halls packed with overhead lighting and cameras.
  • Better print durability than vinyl: The dye-sublimation process puts the color into the fibers, so the image holds up better over repeat use.
  • Portable logistics: The frame breaks down and the fabric rolls or folds, so you’re not shipping rigid panels every time.
  • Faster floor execution: In Las Vegas trade shows, exhibitors using fabric systems reported a 40-minute faster setup and higher visual impact than traditional displays, according to Craftsmen Industries.

That setup advantage is real. A lot of teams don’t need their booth to be flashy. They need it to be reliable, lightweight, and quick to get show-ready.

Practical rule: If your message won’t change for months and you only need a branded backdrop, fabric is usually the sensible option.

Where it starts to fall short

This is the part many buyers skip.

A fabric wall is still a static wall. It says one thing, one way, until you pay to change it. That’s fine for a logo backdrop. It’s limiting for product launches, demos, campaigns with multiple verticals, or any booth where different audiences need different messages.

The weak points are practical, not theoretical:

Decision area Tension fabric backdrop reality
Message flexibility You print one graphic and live with it until you order another
Wear over time Repeated packing, handling, and show-floor accidents eventually affect appearance
Content depth Great for branding. Weak for storytelling, motion, and live updates
Interactivity None on its own. It’s a printed surface, not an engagement tool

There’s also a branding issue. If your competitors are using animated content, product visuals, motion backgrounds, or live presentations, a static printed wall can make your booth look dated even when the graphic itself is well designed.

That doesn’t make tension fabric bad. It just means you should buy it for the right reason. Buy it because you need a portable printed environment. Don’t buy it if what you really need is attention, flexibility, and a booth that can change throughout the event.

Setup Teardown and Long-Term Maintenance

One reason exhibitors like a tension fabric backdrop is that setup is refreshingly straightforward. The better systems use numbered tubes, shock-corded poles, and a toolless frame design, so one person can build a standard display without a pile of hardware.

According to Portable Booths, a standard toolless system can be set up by a single person in under 5 minutes, and the compact, lightweight format can reduce drayage and labor costs by 25-30% compared with older pop-up banner systems.

What setup usually looks like

In practice, the process is simple:

  1. Lay out the frame pieces on a clean surface so you don’t drag the fabric across dirt or concrete.
  2. Match the numbered tubes and snap the frame together.
  3. Stand the frame upright and make sure the feet or supports are fully seated.
  4. Pull the graphic over the frame from the top like a sleeve.
  5. Zip it closed so the tension tightens the face and smooths the image.

That’s the upside. Now for the less glamorous part: ownership.

The maintenance people forget to budget for

Fabric looks easy on day one because it is. The maintenance shows up later, between events.

  • Store it dry: Don’t pack fabric that picked up moisture during teardown.
  • Keep it off rough surfaces: Concrete floors, splintered crates, and sharp booth hardware can ruin a good print.
  • Fold loosely or roll when possible: Hard creases are harder to recover from.
  • Clean fast after spills: Coffee, tape residue, and dirty hands are common enemies on show sites.

Pack-down discipline matters. Most fabric damage doesn’t happen during the show. It happens during teardown when everyone is tired and rushing.

If your team is managing multiple events, the labor isn’t just assembly. It’s inspection, cleaning, repacking, storage, and deciding whether the graphic still looks good enough for the next show. That’s why experienced exhibitors should also review the operational side of trade show set up before choosing a display system. The booth you can manage repeatedly is the one that saves you money.

Tension Fabric vs LED Video Walls An Honest Comparison

Let’s get to the main decision.

A tension fabric backdrop usually wins the upfront-price conversation. An LED wall usually wins the long-term-value conversation. If you only compare the initial invoice, you’ll miss the part that affects your program over multiple shows.

tension fabric backdrop

Upfront cost is not the same as total cost

Many articles on fabric backdrops falter here. They tell you fabric is affordable, portable, and easy to set up. That’s true. But they stop there.

The missing question is what happens after show one.

According to Vispronet’s discussion of tension fabric backdrops, tension fabric displays often have a lower upfront cost, but exhibitors attending multiple events still face recurring printing fees, fabric degradation, and storage costs. By contrast, LED video walls use reusable digital content, which removes those repeated print-and-store cycles.

That’s the key comparison. Not cheap versus expensive. Static asset versus reusable media platform.

What fabric gives you and what it doesn’t

A fabric backdrop gives you one polished message at a time. If you’re running a simple booth and your campaign is stable, that can be enough.

But if your team needs to do any of the following, fabric starts showing its limits fast:

  • Switch messaging by audience
  • Feature multiple products in one footprint
  • Run motion graphics or demo loops
  • Update content without ordering a new print
  • Create visual energy from a distance

Those are not edge cases anymore. They’re normal expectations on competitive show floors.

If your booth needs to do more than identify your brand, static fabric starts working against you.

Why LED walls have become the smarter tool

An LED wall turns your booth from a printed background into a live communication surface. That changes how you sell on the floor.

Instead of choosing one headline and locking it in for the entire event, you can rotate product messages, feature customer segments at different times, support presentations, show launch visuals, and adapt content without rebuilding the booth.

Here’s the practical difference:

Decision factor Tension fabric backdrop LED video wall
Visual format Static printed graphic Dynamic digital content
Best use case Branding wall, photo area, simple booth Product launch, demos, campaigns, storytelling
Content changes Requires new printed graphic Done digitally
Storage burden Physical graphics and hardware Digital content updates replace print cycles
Floor impact Professional but fixed More adaptable and more attention-grabbing

Resolution matters more than most exhibitors realize

Not all LED walls are equal. As a result, inexperienced buyers get burned.

Pixel pitch affects how sharp the wall looks, especially at closer trade show viewing distances. We recommend paying attention to that before you compare vendors on price alone. Our view is simple: 1.9 pitch is a stronger choice when many competitors are still offering 2.5 pitch, because the tighter pitch delivers higher resolution and a cleaner image.

That matters at a booth where attendees stand close, not across a stadium. Product visuals, brand video, text treatment, and motion all look more refined when the wall has the resolution to support them.

Service is part of the value, not an add-on

This is the part many exhibitors underweight until something goes wrong onsite.

A fabric wall is simple, which is good. But if you want a modern visual system without operational headaches, service becomes part of the product. We think turnkey matters more than brochure features.

What we look for in a serious LED partner is straightforward:

  • Transparent pricing: Everything should be included except the charges the show bills directly, such as electricity and material handling.
  • White-glove execution: The provider should handle logistics, install, and support instead of leaving your team to coordinate vendors.
  • Onsite technician coverage: If a problem shows up while the floor is open, you should have immediate support, not a phone tree.

That last point is a huge separator. If an audiovisual technician is onsite the entire time the show is open, your staff can stay focused on attendees instead of troubleshooting gear.

My recommendation

If you exhibit occasionally, use one message, and need a straightforward branded wall, a tension fabric backdrop is still a solid choice.

If you exhibit often, launch products, target different buyer groups, or want your booth to feel current instead of merely competent, move to LED. The difference isn’t cosmetic. It changes what your booth can do.

For brands evaluating formats side by side, these video display walls show why digital booth structures are replacing static backdrops in more serious exhibit programs.

Choosing the Right Canvas for Your Brand Story

The right choice comes down to ambition.

If you need a budget-friendly branded backdrop for a basic footprint, a tension fabric backdrop can do the job. It’s practical, portable, and proven. For first-time exhibitors, simple step-and-repeat environments, or one-message booths, it still makes sense.

A businesswoman standing in front of a tension fabric backdrop display featuring branding and marketing concepts.

If you want stronger engagement, faster content updates, and a booth that doesn’t feel locked into one printed moment, go digital. That’s the cleaner long-term play for active exhibitors.

One useful way to frame the decision is this: fabric is a backdrop, LED is a communication system. Those are not the same thing.

If you’re still weighing traditional graphics against more modern display options, this comparison of SEG graphics vs hard panel graphics is also helpful because it sharpens the bigger question of whether static print is still the right medium for your booth strategy.


If you’re ready to move beyond a static backdrop, talk to LED Exhibit Booths. We build turnkey video wall trade show displays with higher-resolution 1.9 pitch options, while many competitors still offer 2.5 pitch. Our pricing includes everything except the charges the show bills you directly, such as electricity and material handling. We also provide white-glove service and keep an AV technician onsite the entire time the trade show is open, so your team can focus on meeting customers instead of managing booth tech.

Trade Show Display Near Me: Your Guide to Top Vendors

If you’re searching trade show display near me, you’re probably already in the messy part of the process. The show date is fixed. Sales wants a booth that pulls people in. Procurement wants a quote that doesn’t explode after union labor, drayage, and last-minute fixes show up. Then Google gives you a page full of banner stands, table throws, and local print shops.

That’s the trap.

Most exhibitors don’t need another backdrop vendor. They need a partner who can handle show-floor logistics, build a booth that stops traffic, and keep the tech running while the event is open. If you’re considering LED video walls, the difference between a printer and a true display partner isn’t small. It’s the difference between a smooth show and a booth-side fire drill.

Why Searching for a ‘Trade Show Display Near Me’ Is Deceptive

Type the phrase into Google and you’ll see what everyone sees. A flood of local companies offering pop-ups, retractables, printed graphics, and modular banner systems. Those products have their place, but they are not the same thing as a high-impact exhibit environment.

trade show display near me

The problem is simple. Search results often reward whoever has a local page and a decent Google profile, not whoever can engineer an LED booth, manage install and dismantle, and support content playback under show conditions. That’s why trade show display near me searches overwhelmingly yield static, modular banner stands and printed graphics providers, while guidance on dynamic LED video walls is hard to find, as noted by Colorado Live Events’ trade show display page.

A printer isn’t a production partner

A local graphics house can print beautiful fabric. That doesn’t mean they can handle:

  • LED wall integration that turns the booth structure itself into display surface
  • Venue coordination with show rules, labor windows, and access times
  • Onsite troubleshooting when content, power, or panel issues appear mid-show
  • Booth flow planning so the screen faces real traffic, not empty aisle space

This distinction matters more than people think. An LED wall booth isn’t just “a screen in a booth.” It’s a system. Hardware, content, rigging logic, cable routing, brightness, service access, and setup speed all affect whether it works.

Why local can still matter

Local support is useful, but only if the vendor is local to the type of work, not just local to your ZIP code. If your shortlist includes companies that mostly sell printed displays, you’re comparing the wrong category.

Practical rule: Ask what they install most often. If the answer is retractable banners and SEG backwalls, they may be solid at graphics and weak at live exhibit technology.

If you want a better starting point, look for partners that specialize in rentals, logistics, and active show support, not just production. A good example of the type of provider to compare against is a company focused on Las Vegas trade show booth rentals, where venue rules, labor, and show-floor speed aren’t optional details.

The search term sounds straightforward. It isn’t. The question isn’t who’s nearby. It’s who can deliver a booth that works under pressure.

Smart Search Tactics to Find a True Trade Show Display Partner Near You

A better search starts when you stop relying on the search bar alone. Good exhibitors don’t just look for vendors. They look for proof that a vendor can survive the realities of the show floor.

trade show display near me

Start with the venue, not the vendor

Pull the exhibitor kit from the event you’re attending. Check the forms, contractor rules, target dates, and any guidance around material handling, labor, electrical ordering, and move-in windows. You don’t need a vendor who merely says “we ship nationwide.” You need one who understands how your specific event works.

Regional conditions aren’t consistent. Trade show attendance recovery has varied sharply by state, with Nebraska at +61% while Nevada declined 48% from pre-pandemic levels, according to 2025 trade show statistics compiled by Giant Printing. That kind of variation affects booth strategy, staffing expectations, and how aggressive you should be with visibility.

Search the people who already know

Google is broad. Industry relationships are narrow, and that’s good. Use LinkedIn to find:

  1. Event marketers at companies that exhibited last year
    Ask who handled their booth and whether that vendor stayed responsive after install.

  2. Freelance exhibit designers and experiential producers
    They usually know which firms are dependable and which ones oversell.

  3. General service contractors and venue contacts
    They won’t always give a formal endorsement, but their reaction tells you a lot.

If you work internationally or across event formats, it’s worth seeing how event suppliers frame service in different markets. A practical example is this guide to event decor in Cape Town, which shows how local sourcing becomes more useful when it includes setup knowledge and event execution, not just inventory.

Use better search phrases

Generic searches produce generic results. Tighten your query. Search for the service you actually need.

Try phrases like:

  • LED video wall booth rental near me
  • trade show video wall rental
  • onsite AV support for trade show booth
  • modular LED booth display rental
  • trade show booth install dismantle with LED wall

You can also search by city plus venue. A vendor that knows your convention center, marshalling yard process, and labor rhythm is more useful than one that merely ships a crate and hopes for the best.

Look for evidence of operational depth

A real partner should be able to discuss more than design. They should be able to explain logistics, risk, and service. That’s why I like reviewing pages that focus on trade show rental programs, because rentals usually expose whether a company has actual processes for transport, setup, support, and reuse.

The best vendor conversations sound operational, not decorative. They talk about timing, labor, access, content testing, and who fixes what when something fails.

Red flags that save you time

Use this quick filter before you request a quote:

Signal What it usually means
Website only shows banner stands and pop-ups Likely a print-first vendor
No mention of install or dismantle You’re probably managing more than you think
No examples of live screens or content integration Tech execution may be outsourced
Vague wording around support Trouble later becomes your problem

A local name on a map listing doesn’t mean local execution strength. Search for a vendor the way a show manager would, not the way a casual buyer would.

Key Questions to Vet Your Next Trade Show Display Provider

Once you have a shortlist, stop asking soft questions. “Can you help us with a booth?” gets you polished sales language and vague quotes. Ask questions that force specifics.

If a vendor can’t answer directly, move on.

Ask about screen resolution first

Start with pixel pitch. That’s the quickest way to separate someone who knows LED from someone reselling it.

Ask: What is the pixel pitch of your LED panels?

Our view is simple. P1.9 beats the more common P2.5 for close-range trade show viewing because the image looks sharper at attendee distance. In a booth, people don’t stand across a parking lot. They stand a few feet away. That’s where finer pitch matters.

If a vendor dodges the question or changes the subject to “high definition” or “great quality,” that’s a warning sign. LED quality isn’t a vibe. It’s a spec.

Ask what’s included, line by line

Here, bad quotes often hide. A lot of vendors quote the wall and leave the painful parts for later.

Ask them to spell out:

  • Design and rendering. Included or extra?
  • Shipping. Included or estimated?
  • Install and dismantle labor. Included, supervised, or passed through?
  • Content formatting. Included or your problem?
  • Onsite support. Remote only, on-call, or physically present?
  • Storage between shows. Available or not?

Here’s the standard I recommend you demand. Everything should be included except the charges the show bills you directly, such as electricity and material handling. If a vendor can’t make that boundary clear, your final invoice won’t be clean.

Ask who is onsite when the doors open

Lots of companies say they offer turnkey service. Ask what that means in real life.

Good follow-up questions:

  • Who is my point of contact on show days?
  • Is an AV technician onsite the entire time the exhibit hall is open?
  • If playback fails, who fixes it and how fast?
  • Do I call a hotline, a project manager, or someone physically in the building?

Setup mistakes aren’t rare. Cable management errors delay 20% of setups, and cluttered displays can lose 80% of passersby, according to Event Marketer’s trade show organizer guidance. A provider with integrated tech and real content guidance reduces both risks.

If support disappears after setup, you didn’t buy turnkey service. You bought delivery.

Ask how the system goes together

You want to know whether the display is built for speed or built for labor invoices.

Ask these questions in one shot:

  • Is the wall modular?
  • Is assembly toolless or tool-heavy?
  • How are power and data handled?
  • What happens if one panel needs service?

This is where magnetic, modular systems stand out. Toolless assembly and cleaner cable routing reduce setup friction. They also reduce the chances of a rushed crew creating problems you inherit on opening morning.

Ask for content rules, not just content upload

A vendor who knows exhibits should have strong opinions about what belongs on screen. If they say, “Send anything you want,” that’s not service.

Ask what they recommend for:

  • message hierarchy
  • type size
  • motion use
  • dwell-time content versus walk-by content
  • how many claims should appear at once

A sharp provider should tell you to simplify. They should help you avoid overcrowding. They should know what a passerby can absorb in a few seconds.

If you want a benchmark for the level of detail your vendor should be able to discuss, compare them against a specialist in trade show display services.

Ask the one question most buyers skip

Ask: What usually goes wrong, and how do you prevent it?

Then stay quiet.

The best vendors answer with specifics. They mention setup access, cable routing, content mismatch, panel swaps, labor timing, and show forms. Weak vendors answer with “nothing usually goes wrong.”

That’s not confidence. That’s inexperience.

The Complete Checklist for Evaluating Your Trade Show Display Options

Most booth decisions go sideways because buyers compare concepts, not operating realities. They choose a pretty rendering, then get surprised by labor, freight, service gaps, or weak screen quality. Use a checklist that forces apples-to-apples comparison.

trade show display near me

Decide whether renting fits your schedule

For most exhibitors, renting is the smarter move. 70% of exhibitors choose rentals to reduce costs and improve flexibility, and 75% face pressure to reduce exhibit costs, while 48% say eye-catching displays are the most effective way to attract attendees, according to Exhibit Experience’s booth rental analysis.

That combination tells you a lot. Teams want impact, but they don’t want ownership headaches. Rental gives you flexibility on footprint, show schedule, and refresh cycles without locking money into a single structure.

A rental is especially attractive if you:

  • Attend different booth sizes from one show to the next
  • Need visual impact fast without a custom fabrication timeline
  • Don’t want storage and maintenance between events
  • Need to test messaging before committing to ownership

Evaluate the booth as a system

A booth isn’t one product. It’s a chain of dependencies. If one weak link breaks, the whole experience suffers.

Use this checklist when reviewing options:

  • Booth footprint fit
    Can the concept work cleanly in your exact space, not just in a generic rendering?

  • Viewing distance
    If attendees will stand close, screen resolution matters more. That’s why pitch should be part of your comparison, not an afterthought.

  • Brightness for the hall
    A booth has to compete with overhead lighting and neighboring exhibits.

  • Sightlines and traffic approach
    Can attendees understand your offer at a glance from the aisle?

  • Serviceability
    If a component fails, can it be swapped or fixed without tearing apart the booth?

Field note: The smartest buyers review the booth from the attendee’s path, not from the designer’s favorite angle.

Compare the hidden costs, not just the front-end quote

A cheap display can become an expensive show. Many teams often get burned as a result.

Look beyond the headline number and compare:

Cost area What to verify
Freight Is transport included or estimated separately?
Drayage Is the structure lightweight, or are you paying to move heavy gear?
Labor Does the setup method reduce crew time, or require more hands?
Support Is tech support onsite or remote?
Show services Which charges come from the venue, and which come from the vendor?

If you’re budgeting the full program, it helps to review a breakdown of trade show booth cost factors so you can separate vendor pricing from direct show charges.

Review the content plan before you approve the hardware

A high-resolution wall with weak content is still a weak booth. Before you commit, ask to see content guidance or templates. You don’t need a vendor that only plays files. You need one that helps shape what belongs on screen.

If your team is still building the pre-show asset package, this resource on how to prepare for trade shows with marketing is useful because it covers the support materials that should reinforce what your booth is saying.

Use this practical evaluation list

Print this and score each option.

  1. Can the display scale to our booth sizes?
    One footprint isn’t enough if your event calendar changes.

  2. Is the screen quality appropriate for close viewing?
    If your audience stands near the wall, finer pitch wins.

  3. Does the quote clearly separate included services from direct show bills?
    Confusion here always costs money later.

  4. Who handles install, dismantle, and onsite troubleshooting?
    Don’t assume. Ask for names and responsibilities.

  5. Is the booth visually simple enough to read fast?
    The aisle is not a conference room.

  6. Can the structure reduce shipping and handling burden?
    Lightweight modular systems have an advantage.

  7. Will the vendor help shape the content?
    Hardware without messaging support is incomplete.

  8. Do we trust them under pressure?
    This isn’t abstract. It’s the whole game.

The right display isn’t just attractive. It’s the one that gets installed cleanly, reads clearly, and doesn’t create a pile of small disasters during the event.

Our Turnkey Process for a Stress-Free Trade Show Display Experience

The smoothest trade show experiences all look the same from the exhibitor side. The booth is ready. The content works. The team shows up and starts talking to prospects instead of chasing cables, labor, or missing gear.

That’s what a real turnkey process should feel like.

A person holding a tablet displaying a diagram of a turnkey trade show display design process.

It starts before the freight leaves

A capable team doesn’t wait until move-in to solve booth problems. The work starts with pre-show analysis. Floor plan review. Traffic direction. Screen orientation. Message hierarchy. What should appear high, what should face the aisle, and what should stay off the wall entirely.

That planning matters because setup speed and labor efficiency don’t come from hustle. They come from system design. A documented process that includes pre-show analysis and toolless magnetic assembly can get a 10×10 booth set up in under 2 hours by a 2-person crew, while cutting labor costs 40-60% versus traditional setups, according to this expert booth methodology summary. The same source notes that reusing modular systems across five shows can improve ROI by 70%.

The booth should assemble cleanly

Modular LED offers significant advantages. Lightweight panels that lock together without a tool-heavy build reduce setup friction. Cleaner assembly usually means fewer mistakes, less crew time, and less drama during move-in.

Just as important, the vendor should manage the movement of the system itself. If you’re evaluating how the display will get to and from the venue, look at whether they have a clear process for shipping trade show exhibits, not just a vague promise that “logistics are covered.”

Good trade show support is quiet. You barely notice it because problems get handled before they reach your team.

The last mile is where vendors prove themselves

Setup isn’t the finish line. Open hours are.

A proper turnkey partner calibrates the wall, checks content playback, verifies brightness in hall lighting, and keeps support available while the event is live. That’s the part many exhibitors underestimate. A booth can look perfect at handoff and still fail when the show opens if no one owns playback, panel health, or live troubleshooting.

Here’s a quick look at the kind of process buyers should expect:

Stage What a strong partner handles
Pre-show planning Floor plan review, content guidance, traffic orientation
Logistics Scheduling, transport coordination, move-in timing
Install Assembly, calibration, testing
Live show support Monitoring, troubleshooting, rapid response
Breakdown Dismantle, pack-out, post-show handling

This short walkthrough shows the kind of execution standard exhibitors should expect from a true turnkey setup:

What matters most is simple. Your team should spend show hours meeting buyers, not babysitting technology.

Your Vendor Outreach Toolkit Contact Templates and Checklists

Most vendor outreach is too vague. Buyers ask for “pricing for a trade show booth,” and vendors respond with polished but incomplete answers. If you want useful proposals, your first message has to force clarity.

Use the checklist below to compare vendors side by side. Then use the email template to get direct answers on resolution, service, logistics, and pricing scope.

Sample Vendor Comparison Checklist

Feature/Service Vendor A Vendor B Our Standard (LED Exhibit Booths)
LED pixel pitch     P1.9 available
Booth sizes supported     Compact to larger modular formats
Quote clarity     Everything included except direct show charges like electricity and material handling
Design and renderings     Included in turnkey planning
Shipping coordination     Included
Install and dismantle support     Included
Assembly method     Toolless magnetic LED tile system
Content guidance     Included
Onsite AV technician during show hours     Included
Troubleshooting response path     Text or call for immediate booth-side support
White glove service     Standard
High-resolution screen focus     Yes

Email template to send vendors

Subject: Trade show display near me inquiry for upcoming event

Hi [Vendor Name],

We’re evaluating partners for an upcoming trade show and need a booth solution that goes beyond printed graphics. We’re specifically interested in an LED video wall exhibit or similar high-impact display.

Please reply with the following:

  • What LED pixel pitch do you offer for trade show booths?
  • What booth sizes and configurations can you support?
  • What is included in your quoted price?
  • What direct show charges are not included?
  • Do you provide shipping, install, dismantle, and content setup?
  • Is an AV technician onsite while the show is open?
  • How do you handle live troubleshooting during the event?
  • What is your assembly method, and how complex is setup?
  • Can you share examples of booths designed for close-range attendee viewing?
  • What do you recommend for content layout and message hierarchy?

Event details:

  • Show name:
  • Venue:
  • Booth size:
  • Show dates:
  • Primary goal:
  • Products or services featured:

We want a turnkey solution with clear pricing and reliable onsite support. Please send your recommended approach, lead time, and next steps.

Thanks,
[Your Name]
[Company]
[Phone]

A quick outreach checklist before you hit send

  • Include the venue name so the vendor can speak to logistics, not guess.
  • State your booth size because screen recommendations depend on footprint.
  • Ask for pixel pitch in writing so no one hides behind generic quality claims.
  • Demand pricing boundaries so you know what’s vendor-included and what’s billed by the show.
  • Require onsite support details because “support available” often means little.

The vendors worth talking to answer specific questions with specific answers. The rest save you time by being vague early.

If you’re narrowing your options and want a partner that handles the booth as a full operating system, not just a box of parts, LED Exhibit Booths is built for that job. We provide high-resolution LED video wall exhibits with P1.9 pitch, white glove turnkey service, and pricing that includes everything except the direct charges the show bills you for, such as electricity and material handling. We also keep an AV technician onsite while the show is open, so if something needs attention, help is minutes away and your team can stay focused on customers.

Large Touchscreen Display: A Trade Show Exhibitor’s Guide

Large touchscreen display choices can make or break your booth when the hall opens and every aisle is crowded with motion, noise, and brands fighting for the same few seconds of attention. We’ve seen the pattern over and over. A company invests in graphics, ships product, trains staff, and still ends up with a booth that looks static next to brighter, smarter, more interactive exhibits.

The problem usually isn’t effort. It’s the display decision.

A booth display isn’t just AV gear. It’s your storefront, your demo station, your brand signal, and in many cases your first salesperson. If it looks dated, has visible seams, washes out under show lighting, or fails when people start touching it, attendees move on fast. If it pulls them in, gives them something to do, and supports your team instead of distracting them, you win more conversations.

Why Your Booth Needs More Than Just a Sign

A printed backdrop still has a role. It gives your booth structure and branding. It does not stop traffic on its own.

At a busy show, attendees scan fast. They look for movement, clarity, and a reason to step in. A static message gets absorbed in a second. A large touchscreen display or dynamic visual surface gives people a reason to pause, explore, and interact.

large touchscreen display

What attendees actually respond to

Most exhibitors don’t lose attention because their product is weak. They lose it because their booth doesn’t communicate fast enough. A moving product loop, an interactive configurator, or a touch-driven demo tells your story without waiting for a rep to start the conversation.

That’s why interactive exhibit strategy matters. If you want ideas beyond hardware, PSW Events’ interactive solutions is a useful reference for how brands turn passive spaces into active experiences.

A display also changes how your team works. Instead of repeating the same top-level explanation all day, your booth can show it. Your staff then spends more time qualifying buyers and less time reciting an elevator pitch.

Practical rule: If your booth display can’t explain your value from the aisle, your staff is doing too much lifting.

Signage informs. Interactive displays engage. Large Touchscreen Displays Keep Them Involved

There’s a big difference between being visible and being memorable. A sign helps people identify you. A large-format digital surface helps them experience you.

That’s why many exhibitors move beyond traditional graphics and start comparing digital formats. If you’re evaluating display-driven booth design, digital signage for trade shows is the right starting point.

The exhibitors who stand out usually make one smart shift. They stop treating the booth wall as decoration and start treating it as media.

The Big Screen Showdown Large Touchscreen Display vs Seamless LED Wall

You are on day one of the show. Freight is late, install hours are tight, and the booth has to pull people in before your team says a word. That is why the critical decision is not screen size. It is choosing a display format that fits trade show logistics, booth design, and live audience behavior.

A traditional large touchscreen display and a continuous LED wall serve different jobs on the floor. A touchscreen gives you a defined interaction point. A unified LED wall turns more of the booth into active media and gives you far more flexibility during design, setup, and on-site changes.

large touchscreen display

Where traditional large touchscreen displays works well

Choose a standard large touchscreen display when you need close-range interaction and a clear user path.

It works well for product selectors, guided demos, lead forms, and one-on-one selling conversations. People understand it fast because the format is familiar. Your team can place it in a kiosk, a meeting area, or a demo counter without redesigning the whole booth around it.

It also keeps execution simple. If your plan calls for one screen, one message path, and one staff-led interaction zone, a touchscreen is often the right tool.

Where it starts to fall short

Trade shows expose the limits of fixed hardware quickly. A large touchscreen has a set size, a visible frame, and a physical footprint that can be hard to hide in a tighter booth.

The problem gets bigger when exhibitors try to create a large visual statement by grouping multiple flat panels. Bezels break up the image. Content loses impact. The booth starts to feel pieced together, which is the opposite of what you want at a premium event.

Setup is another difference buyers miss. Standard touchscreens are easy to understand, but they do not give you much design freedom once the booth layout changes. If aisle traffic favors one side, if a product pedestal moves, or if the structure needs to do more visual work from a distance, the screen stays exactly what it is.

If people notice the hardware before the message, the display choice is costing you attention.

Why continuous LED walls win in exhibit environments

A continuous LED wall gives you more control where trade shows are least forgiving. You can build it into back walls, curves, towers, counters, and custom structures without forcing the booth to conform to a single framed screen.

That matters during planning, install, and show hours. We can design the display into the exhibit from the start, reduce the visual clutter of separate devices, and create a cleaner result from every aisle angle. If your team needs booth-scale media that feels integrated instead of added on later, review our video display wall solutions.

It also solves a practical booth problem. One larger visual surface carries branding, motion, and product storytelling across the structure, so the booth works harder even when staff are tied up with other visitors. That is a better fit for busy show floors where you have only a few seconds to get noticed.

Large Touchscreen Displays vs. Continuous LED Video Wall for Trade Shows

Feature Traditional Large Touchscreen Continuous LED Video Wall (Our Solution)
Interaction style Direct touch on a single panel Can support booth-scale interactive experiences
Visual continuity Framed screen with edges Unified visual canvas
Booth fit Fixed rectangular format Custom shapes and integrated structures
Viewing strength Best for close-up engagement Strong for both close and farther viewing
Expansion Limited by panel size Modular and scalable
Overall impression Functional demo station Immersive branded environment

My recommendation

Use a traditional large touchscreen when you need a focused demo station and direct user input at arm’s length.

Choose a continuous LED wall when the booth itself needs to attract, explain, and sell. For most exhibitors, that is the stronger move. You get more design freedom, stronger aisle presence, and a display system that fits the realities of trade shows instead of fighting them.

Decoding the Tech Specs for Your Large Touchscreen Display

You are on day one of the show. The booth is built, the lights are brutal, and your display has two jobs. It needs to pull people in from the aisle, then hold up when they step in close. That is why spec sheets matter. The wrong specs create expensive disappointment on a trade show floor.

For a large touchscreen display, we tell clients to judge four things first. Resolution, brightness, touch performance, and viewing distance. If you are also comparing that screen to an LED wall, pixel pitch belongs on the list too, because it changes how polished the image looks at booth range.

Resolution, brightness, and pitch

A standard large touchscreen usually gets sold on 4K, and that is a sensible starting point. ViewSonic’s commercial display guide explains why brightness and environment matter just as much as panel resolution in public-facing spaces. On a trade show floor, overhead hall lighting can wash out weak screens fast.

For LED systems, pitch deserves equal attention. Pixel pitch is the distance between LEDs. Smaller pitch produces a tighter image at close range, which matters in booths where visitors often stand only a few feet away. That is one reason our walls use finer pitch options than the larger formats many exhibitors get quoted first. If your booth depends on product detail, text, or premium brand visuals, that difference shows up immediately.

If you are comparing modular systems, review the build quality and image options in these LED wall panels for trade show exhibits. It is the fastest way to compare what looks good on paper versus what will hold up under real booth conditions.

What matters on the show floor

Specs only matter if they improve the attendee experience.

Here is what we push clients to verify before they commit:

  • Close-view sharpness: Booth visitors do not watch from the back of a conference room. They walk up close. Fine detail needs to stay clean at short distance.
  • Brightness under venue lighting: Convention centers are full of spill light, truss lighting, and glare. A display that looked acceptable in an office can look flat at the event.
  • Touch response with real traffic: A laggy interactive screen kills demos. Fast response keeps the experience feeling deliberate and professional.
  • Playback quality: Motion graphics and product loops should run smoothly, especially if your booth relies on animation to stop traffic.
  • Physical format: A large touchscreen gives you a fixed rectangle. An LED wall can match the booth footprint far more closely, which often solves layout problems before they become setup problems.

The spec sheet does not tell you how the display will behave after shipping, install, and eight hours of constant attendee use. We do.

Why IR touch works well in exhibits

For trade shows, we prefer infrared touch because it is practical in public-use environments. It does not depend on the same kind of direct surface contact some other touch systems require, and that makes it a strong fit for repeated demos, shared interaction, and fast booth turnover. Elo’s explanation of infrared touch technology gives a useful overview of how the sensor grid detects input across the display surface.

That matters on a busy floor. People tap quickly, they come in at odd angles, and they do not treat your screen gently. You need touch hardware that responds cleanly and keeps working through the show.

If you need to build motion content for that interactive experience without dragging your internal team into a long production cycle, the Direct AI platform for AI video can speed up screen content creation.

Questions to ask before you sign

Do not stop at size and price. Ask the vendor these questions and push for clear answers:

  1. How will this look from the aisle and from two to three feet away?
  2. What brightness level is recommended for a convention hall, not an office lobby?
  3. What is the actual pixel pitch on the LED option being quoted?
  4. What touch technology is included, and how does it perform during repeated public use?
  5. How long does setup take on site, and who handles problems if something fails during the show?

That last question gets ignored too often. It should not. A standard touchscreen can be simpler to deploy, but it also limits your booth design and audience reach. An integrated LED wall takes more planning, yet it gives you stronger visual coverage and a better fit for custom exhibits. We help clients choose based on the full trade show reality, not just the monitor spec sheet.

Creating Content That Engages and Converts

A great screen with weak content is just expensive wallpaper.

Most exhibit content fails because it’s designed like a website or a sales deck. Trade show content has a different job. It has to stop people, orient them fast, and move them toward a next step without requiring patience.

Build for two modes of attention

Your booth content should work in passive mode and active mode.

Passive mode is what people see from the aisle. This includes motion graphics, product hero visuals, short value statements, and ambient loops that make the booth feel alive. It should be readable quickly and from a distance.

Active mode begins once someone steps in. That’s where touch demos, product selectors, interactive explainers, and lead capture tools take over. The screen stops broadcasting and starts guiding.

Design for use, not for approval meetings

A lot of internal teams overpack booth content because every stakeholder wants something included. That creates clutter. Attendees won’t stand there and decode six product categories, a feature grid, and a corporate timeline.

Use a simple structure instead:

  • Top-level attraction: one clear visual idea
  • Immediate choice: a small set of touch targets
  • Focused path: one task per screen
  • Clear handoff: talk to staff, scan a badge, request follow-up

If you’re producing motion content quickly, Direct AI platform for AI video can help teams explore faster video workflows before final polishing.

Treat the large touchscreen display like a staff member

The most effective booth screens do one of three jobs well. They qualify visitors, explain complex products, or create a reason to start a conversation.

A booth display shouldn’t try to replace your team. It should free your team to have better conversations.

That means the interface has to be obvious. Buttons should look touchable. Menus should be limited. Text should be short. If several people may gather around the screen, the layout needs to stay understandable without one person “driving” the experience for everyone else.

For brands building custom media for booth-scale displays, video wall video production is a useful benchmark because it forces content decisions around scale, distance, and motion.

The content mistakes I’d cut immediately

  • Long paragraphs: nobody reads them on a show floor.
  • Tiny product labels: they disappear at distance.
  • Overcomplicated navigation: people leave before they learn anything.
  • Generic stock footage: it fills space but doesn’t sell your offer.

Good booth content isn’t about showing everything. It’s about making the right next interaction easy.

Turnkey Installation for a Flawless Show

You arrive at the hall for move-in and the booth footprint is taped out, crates are still in transit, labor has a tight window, and your screen vendor is nowhere to be found. That is how expensive display choices fail. On a trade show floor, the key test is not how the screen looked in a product photo. It is how fast it gets installed, how cleanly it fits the booth, and who fixes it when something breaks at 9:12 a.m. on show day.

Shipping, drayage, labor scheduling, cable routing, content checks, and day-of support decide whether your booth feels polished or patched together. Standard large touchscreen displays can work well, but they often bring more pieces, more visible framing, and more setup constraints. An integrated LED wall usually gives us more control over footprint, sightlines, and install speed, which matters when union labor is billing by the hour.

large touchscreen display

Setup speed affects labor cost

Every extra install step adds labor time and creates another chance for alignment problems, missing hardware, or last-minute changes. That is why we prefer display systems built for events, not repurposed office or retail hardware.

Toolless LED cabinet systems and pre-engineered booth integrations cut down on small failures that waste hours. Fewer brackets. Fewer loose parts. Less time spent shimming mounts or hiding support structures. If your priority is a large interactive surface, a standard touchscreen may still be the right call. If your priority is high visual impact across a wider wall with cleaner integration into the booth build, LED usually wins on event practicality.

What turnkey should actually include

A real turnkey partner handles the work exhibitors should never be stuck managing from the aisle.

  • Pre-show coordination: booth layout, power planning, content specs, freight timing, and labor scheduling
  • Install and dismantle: handled by crews who know the exact system going in
  • On-site supervision: one accountable team owns performance during show hours
  • Immediate support: fast troubleshooting for playback, processor, signal, or panel issues

This is also where renting often beats ownership for exhibitors who want fewer operational headaches. Our guide to owning versus renting an LED video wall for trade shows breaks down the support and logistics differences clearly.

We take this further than basic delivery. We handle the install, stay accountable during the event, and keep an audiovisual technician on site while the trade show is open. If something goes wrong, you text or call. An AV technician comes to the booth and fixes it.

Avoid the multi-vendor trap

A surprising number of exhibitors still piece together a booth from separate monitor vendors, mount providers, content teams, and show labor. That approach looks cheaper on a spreadsheet. On the floor, it creates confusion about who owns the problem.

If a touchscreen mount arrives late, the screen vendor blames freight. If content scales wrong, the content team blames the hardware. If an LED processor loses signal, nobody wants the call. We do. One team, one plan, one point of accountability.

Here’s a closer look at how a professional build comes together in the field.

White-glove support for large touchscreen displays protects show performance

White-glove service is not a fancy add-on. It is risk control.

Your staff should spend show hours meeting buyers, running demos, and booking follow-ups. They should not be under a counter tracing a bad cable, rebooting a media player, or searching the hall for emergency AV help. For trade shows, the best display partner is the one that stays responsible after the screen turns on.

Calculating the Value Renting Versus Buying

Most exhibitors don’t need to buy first. They need the right decision for how often they exhibit, how much flexibility they need, and how much operational burden they want to carry.

A large touchscreen display or LED system can make sense as either a rental or a purchase. The smart choice depends on use frequency and internal capacity, not pride of ownership.

A split path illustration in an empty room, choosing between renting and buying a property.

When renting is the better move

Renting is usually the right call when you exhibit occasionally, want to test a format before committing, or need different booth footprints across shows. It keeps you flexible. It also removes the long list of ownership issues that buyers underestimate, including storage, maintenance, transport, refurbishment, and tech updates.

Renting makes even more sense if your internal team isn’t built to manage AV logistics. In that case, ownership can create work instead of value.

When buying starts to make sense

Buying works better for frequent exhibitors, brands that want a consistent system across multiple events, or organizations that also plan to use the display outside trade shows. If the system will live in a showroom, briefing center, or headquarters between events, the investment may be easier to justify.

But even then, don’t buy just because the hardware can be owned. Buy if your team can support the lifecycle.

Price transparency matters more than the base number

Exhibitors often find themselves in a bind. A low initial quote often excludes the work that makes the exhibit function.

Our pricing approach is simple. We include everything in our price except the bills the show sends you directly. For example, the show will bill you for electricity and material handling. Everything else is included in our price. That means you’re not piecing together separate charges for core execution after the fact.

If you’re comparing models in detail, owning vs renting an LED video wall is a practical resource because it forces the conversation past sticker price.

How I’d think about return on value

I wouldn’t reduce the decision to a spreadsheet alone. Booth displays influence more than direct lead count.

Look at the value across several categories:

Consideration Renting Buying
Flexibility High Lower
Upfront commitment Lower Higher
Operational burden Lighter Heavier
Format experimentation Easier Harder
Long-term asset use Limited Stronger if used often

Then ask the harder questions. Did the display make the booth easier to find? Did it improve first impressions? Did it help your team start better conversations? Did it make your launch or demo feel more established?

Buy when repetition justifies ownership. Rent when agility matters more than possession.

That’s the cleaner way to make the call.

Your Next Steps to a Standout Booth Experience

If you’re deciding on a large touchscreen display for an upcoming show, don’t start with the biggest screen size or the flashiest render. Start with how your booth needs to perform.

A good decision comes down to a few practical filters.

Use this short decision checklist

Ask these questions before you approve anything:

  1. Do we need one-to-one interaction or booth-wide visual impact?
    If the answer is both, you may need a broader display strategy than a single panel.

  2. Will attendees view the content from a few feet away, across the aisle, or both?
    That determines how much image precision and scale matter.

  3. Is our content built for trade shows or recycled from other channels?
    Most repurposed content looks busy and weak on the floor.

  4. Who is responsible if something fails during show hours?
    If the answer is “our team,” rethink the plan.

Pick the large touchscreen display solution that matches the environment

Trade shows are temporary, crowded, bright, and unforgiving. That’s why a display that works in a lobby or conference room may disappoint in an exhibit hall.

If your goal is a contained demo station, a traditional touchscreen can work. If your goal is to create presence, continuity, and a booth that reads as modern from every angle, a unified integrated display format is usually the better move.

Don’t separate the hardware from the experience

The strongest booths connect three things well:

  • Display format
  • Content strategy
  • Execution support

Miss one of those, and the whole experience softens. Nail all three, and your booth stops looking like rented equipment and starts feeling like a branded environment.

If you’re planning now, the next step is simple. Build your shortlist around vendors who can answer technical questions clearly, support content decisions, and stay accountable when the hall opens. That’s the standard worth holding.

Frequently Asked Questions About Large Display Technology

The final questions are usually the ones that matter most on a trade show floor. Exhibitors stop asking what looks impressive in a showroom and start asking what will hold up during install, perform under hall lighting, and stay reliable once the doors open.

FAQ

Question Answer
Will a large touchscreen display work under bright expo lighting? Yes, if you choose the right panel. Bright halls expose weak screens fast. Glare, poor off-angle visibility, and washed-out color make touch content harder to use, which is why viewing performance and surface treatment matter as much as resolution. This viewing-angle display analysis explains why wide-view technology helps maintain image consistency across the booth.
Is an integrated LED wall too much for a smaller booth? No. In a small footprint, a single integrated display surface often looks cleaner than stacking separate screens, mounts, and cables into a tight space. It also simplifies the visual story. One strong canvas usually beats several disconnected screens.
Should we choose touch for every booth display? No. Use touch where people need to explore products, compare options, or trigger a guided demo. Use non-touch screens where the job is visibility, motion, and brand impact from a distance.
What matters more, brightness or resolution? Brightness wins first. If attendees cannot see the screen clearly from the aisle, resolution does not save it. Once visibility is handled, image detail matters most for close-up interaction and product content.
How many people should be able to use an interactive display at once? Match the display to the booth workflow. A one-on-one sales demo needs speed and simplicity. A busy booth with shared exploration needs a layout, software, and screen size that prevent people from crowding each other out.
What gets overlooked when comparing a touchscreen to an LED wall? Setup time, cable management, transport risk, and who fixes problems on site. General tech guides skip that part. At trade shows, those details shape the outcome as much as the hardware does.

A few blunt answers exhibitors need for large touchscreen displays

A screen that looks strong in a conference room can fail fast in an exhibit hall.

We tell clients to judge display options by three things. How hard they are to ship. How clean they look once installed. How much support they need during show hours. That is where the key trade-off sits between a standard large touchscreen display and an integrated LED wall.

Touchscreens are a smart fit for focused demos. Integrated LED walls are the stronger choice when the booth needs scale, cleaner sightlines, and fewer visible hardware distractions.

The right display choice reduces booth friction for your team and makes the brand easier for attendees to notice, understand, and remember.

If you want help choosing the right format for your next exhibit, talk with LED Exhibit Booths. We’ll compare a large touchscreen display against an integrated LED booth solution, explain the trade-offs clearly, and build a turnkey plan that fits your space, content, and budget.

Light Box Displays: A Complete Exhibitor’s Guide

Light box displays are usually on your shortlist when you’re planning a booth and realize your space has to do three jobs at once. It has to stop traffic, explain your offer fast, and make your brand look established. That’s when the options start piling up. Backlit fabric walls. SEG frames. Monitor stacks. Rental counters. Video walls. Every vendor says theirs is the smart choice.

We see the same decision point again and again. A team wants something brighter than a printed pop-up, cleaner than a banner stand, and more polished than a patchwork of screens. That makes light box displays a logical place to start. They look sharp, they’re proven, and they solve a real visibility problem on crowded show floors.

But stopping at “lighted graphic = good” is where many exhibitors make an expensive mistake. The right question isn’t whether light box displays work. They do. The real question is whether a static illuminated display is enough for your message, your booth size, and your event strategy.

Choosing Your Booth’s Visual Centerpiece with Light Box Displays

Most exhibitors don’t struggle with whether they need a focal point. They struggle with picking the right one.

A marketing manager might start with a clean idea: one illuminated back wall, one counter, one product demo station. Then reality kicks in. The booth sits between bigger brands. The aisle is noisy. Competitors are running motion content. Suddenly a static display feels safe, but maybe too safe.

That tension is why light box displays remain popular. They have history on their side. Light box displays originated in the mid-20th century, and Testrite began producing them for the photographic industry in 1952, a manufacturing milestone that helped define the format. Those early units used heavy metal frames and fluorescent bulbs, and shipping and installation costs could exceed 30% of total exhibit budgets, according to Testrite’s history of light box manufacturing.

That background matters because it explains both the appeal and the limitation. Light box displays became a staple because they grabbed attention with simple, bold illumination. They also carried baggage. Weight, logistics, and static messaging were always part of the trade-off.

What most exhibitors are really deciding regarding light box displays

You’re usually choosing between three paths:

  • A static illuminated message: Best when your brand story is simple and your offer is easy to understand at a glance.
  • A modular backlit booth system: Better when you want flexibility and cleaner presentation across multiple events.
  • A dynamic digital surface: Best when your content needs motion, sequencing, demos, or frequent updates.

If you’re still evaluating classic backlit options, it helps to review examples of backlit trade show displays and compare them against what your booth needs to do.

Practical rule: If your main message fits in one hero image and one headline, a light box can work well. If your booth needs to tell a story, motion usually wins.

The centerpiece of your booth shouldn’t just look premium. It should match how people buy from you.

Understanding Light Box Displays

A light box display is basically a high-end illuminated frame built for branded graphics. In trade shows, the modern version usually combines an aluminum frame, a printed fabric graphic, and an internal LED lighting system. When it’s done right, the result looks clean, bright, and far more polished than a standard printed wall.

The easiest way to think about it is this: a light box is a static message with internal illumination. It isn’t a digital screen. It doesn’t play video. It makes one printed visual look better.

light box displays

The three parts that matter

The frame is the structure. Most modern systems use modular aluminum extrusions because they’re lighter and easier to handle than older welded sign bodies. The graphic is usually a fabric print, often finished with a silicone edge bead so it tucks into the frame tightly. The lighting sits behind or along the edge of the graphic.

That fabric system matters more than many exhibitors realize. The silicone edge approach creates a taut, edge-to-edge look without the wrinkles and visible hardware that make cheaper displays look temporary. If you’re comparing products, that’s one of the first details to inspect.

Edge-lit vs backlit

This is the decision that affects visual quality the most.

Backlit systems place LEDs behind the graphic. According to LED lightbox technical specifications, backlit configurations use 30-60 LEDs per square meter with optic lenses and can achieve brightness up to 1360 cd/m². That layout is designed for more even illumination across the graphic surface.

Edge-lit systems place LEDs along the perimeter and push light inward through diffusion material. They give you a slimmer profile, but they can struggle with consistency in larger formats. That’s why some displays look great in a showroom sample and less convincing on a full event wall.

Backlit is the safer choice when visual consistency matters more than the thinnest possible frame.

Here’s the practical breakdown:

Display type Best use Main advantage Main drawback
Edge-lit Smaller formats, tighter footprints Slimmer profile Can lose brightness toward the center
Backlit Larger branded walls, premium booth visuals More uniform illumination Slightly deeper construction

If you’re reviewing illuminated formats that add more visual interest than a basic static wall, animation light boxes are worth looking at because they sit between traditional static displays and fully dynamic digital surfaces.

Why exhibitors like SEG systems for light box displays

Modern light box displays are built for repeat use. A new campaign doesn’t require a new frame. You swap the fabric. That’s one of the strongest reasons these systems remain viable for trade shows.

Use them when you need:

  • Fast graphic changes: Seasonal promotion, new product image, updated messaging.
  • A polished finish: No obvious clamps, exposed hardware, or cheap-looking seams.
  • Reasonable portability: Easier handling than legacy illuminated sign structures.

Use caution when you need motion, layered storytelling, live demos, or multiple messages in the same visual footprint. That’s where the category starts to run out of room.

Comparing Light Box Displays and LED Video Walls

Here, exhibitors need to stop thinking in product categories and start thinking in outcomes.

A light box display gives you one illuminated printed message. An LED video wall gives you a digital canvas. Those are not small differences. They’re different communication tools.

light box displays

Static impact vs dynamic impact

A strong light box can absolutely anchor a booth. For logo visibility, brand color, and a clean hero image, it does the job. If your company sells one product with one clear promise, a static illuminated wall can be enough.

But “enough” isn’t the same as “best.”

Video walls let you rotate messages, run product footage, show animations, sequence benefits, display testimonials, and adapt content throughout the day. That matters when attendees don’t all care about the same thing. One prospect wants a technical view. Another wants proof of use. Another only notices movement and walks over because the booth feels active.

Resolution matters more than most vendors admit

Not all video walls look the same up close. That’s one of the biggest traps in the category.

Many providers use a 2.5mm pitch. Our view is simple: that’s not where you want to stop if attendees will stand close to the wall. A 1.9mm pitch gives a sharper, higher-resolution image. If your booth relies on detailed visuals, premium branding, product renders, or text that people may read from short distance, finer pitch matters.

This is the same basic logic buyers use when they compare large-format viewing technologies at home. If someone is weighing screen sharpness, immersion, and room conditions, resources on best home cinema display options help illustrate why image quality specs shouldn’t be treated as afterthoughts.

Scalability changes the decision

A lot of exhibitors assume they can just scale a light box up. That’s not always true.

According to DSA Signage’s discussion of edge-lit versus backlit light boxes, edge-lit displays can grow dimmer in the center on displays over 10 feet wide. That’s a real issue on trade show floors because the larger the wall, the more obvious uneven illumination becomes.

If you’re trying to create an immersive branded environment, that limitation matters. Large trade show visuals don’t just need to be big. They need to stay visually consistent.

When a booth wall gets large enough to become architecture instead of signage, uneven illumination stops being a minor flaw and starts hurting the whole presentation.

Side-by-side decision criteria

Here’s the blunt comparison most exhibitors need:

  • Choose light box displays if your message is stable, your content is primarily graphic, and you want a premium static look.
  • Choose a video wall if your message changes, your booth needs motion, or you want the structure itself to become the attraction.
  • Avoid cheap digital alternatives if they rely on stacked monitors, visible bezels, cable clutter, or awkward support structures.

The seamless factor with light box displays

This part gets overlooked until show day.

A lot of “digital booth” solutions are really screens bolted into a booth design. You end up with gaps, framing lines, extra hardware, and content chopped across panels. That undercuts the experience.

An integrated LED wall behaves differently. It turns walls, towers, arches, and counters into one connected visual surface. That changes how a booth feels. It looks intentional, not assembled from separate pieces.

If you want to see how that format works in exhibit design, a trade show display wall built as a continuous digital surface is the right reference point.

Our recommendation

If your brand only needs a polished backdrop, use light box displays and keep the design disciplined.

If your booth has to educate, persuade, demo, and hold attention, skip the static compromise. Go digital, and go with the finest pitch you can justify. A video wall isn’t just a prettier screen. It’s a better storytelling tool.

Trade Show Setup and Logistics

Most booth decisions look smart in a rendering and painful in a convention hall.

Shipping cases arrive late. Labor windows shrink. Material handling fees pile up. Someone realizes the booth needs tools nobody brought. Then the team that wanted to spend setup day rehearsing demos is stuck managing parts and paperwork.

That is why logistics should drive your display decision almost as much as visual impact.

light box displays

Why modular systems changed the game

Older illuminated structures were heavy, awkward, and expensive to move. Modern systems improved the situation by using aluminum extrusion frames and SEG graphics. According to this overview of display light box selection factors, modular aluminum frames and tool-free SEG assembly are designed to reduce shipping weight and cut installation time from hours to minutes.

That matters because show-floor costs punish complexity. The longer a setup takes and the more physical bulk it involves, the more likely you are to feel it in drayage and labor.

The real cost centers exhibitors forget with light box displays

Booth budgets usually focus on the display itself. The smarter approach is to break the event into operational categories:

  • Material handling: The show moves freight from the dock to your booth and back. Heavy systems can make this line item painful.
  • Install and dismantle labor: If the build requires tools, extra hands, or longer labor windows, the cost goes up fast.
  • Shipping and packing: Bulky hardware creates recurring friction, especially across multiple events.
  • Failure risk: More parts and more complexity mean more chances something goes wrong on setup day.

If you want a simpler mindset for small-format event planning, even non-trade-show resources like 10 craft fair booth setup ideas are useful because they reinforce the same practical truth: the easier your booth is to transport, assemble, and present clearly, the better your event experience tends to be.

What fast setup actually looks like

The best systems remove avoidable decisions from the floor. Frames align predictably. Graphics install cleanly. Panels lock in without specialized tools. Power and connections are integrated instead of improvised.

That approach doesn’t just save labor. It reduces mistakes.

Field advice: If a display requires a long setup explanation, it will eventually fail under show pressure.

A modern setup partner should be able to tell you exactly who handles freight coordination, who supervises install, who manages dismantle, and what support exists if something misfires during live hours. If those answers are vague, the proposal is incomplete.

For exhibitors evaluating service-heavy options, it helps to compare what a true trade show set up partner handles versus what still lands on your team.

Why lightweight digital systems deserve a hard look

There’s still a misconception that digital booths automatically mean difficult setup. That used to be true when screens were treated like equipment racks and truss projects. It doesn’t have to be true now.

Lightweight LED tiles with magnetic and tool less locking systems change the equation. They can reduce physical burden, simplify assembly, and make large digital surfaces more practical than many exhibitors expect. That becomes especially important when your booth design includes walls, columns, or counters that need to look integrated rather than pieced together.

This walkthrough gives a useful visual sense of how modern modular displays come together in real life:

Our blunt recommendation on logistics

If your team is small, your event calendar is busy, or your tolerance for show-floor chaos is low, don’t choose a display system based only on the purchase or rental number. Choose the system that lowers handling, setup friction, and failure points.

A booth that looks dramatic but creates operational headaches is not a premium solution. It’s a stress generator.

Evaluating Cost ROI and Service Models

The cheapest booth proposal is often the most expensive booth decision.

Exhibitors get trapped when they compare line-item prices without comparing what the price covers. One vendor quotes the structure. Another quotes the graphics. Another adds install later. Then support becomes a separate conversation. By the time the event happens, the “lower price” wasn’t lower at all.

This is why we push people to evaluate total cost of ownership, not just purchase price.

A modern illuminated light box display showcasing a business ROI calculation presentation in a professional office boardroom.

What to include in a real ROI review

According to Displays2go’s discussion of LED light box considerations, a 3-5 year review should include purchase price, energy consumption, replacement parts, and maintenance labor. That’s the right framework because booth decisions rarely live for one event.

If you exhibit repeatedly, ask these questions:

  • How often will we refresh content? Static graphics may be easy to replace, but frequent campaign changes still add cost and coordination.
  • What maintenance does the system require? Older technologies create more upkeep. LED-based systems make a stronger case because of longevity and low maintenance.
  • What labor does this format create every show cycle? A complicated install creates recurring cost, not a one-time inconvenience.
  • What happens when something fails during show hours? When faced with this question, many proposals go silent.

Upfront price vs complete price with light box displays and LED video wall booths

Our advice is simple. Treat incomplete pricing as a warning sign.

A serious event display quote should make clear what the show bills directly and what your display partner includes. In our model, the show bills direct venue items such as electricity and material handling. Everything else is included in our price. That means the planning, the display, shipping, setup, dismantle, and support aren’t left dangling as surprise add-ons.

That pricing structure is worth more than it first appears. It lets your team budget accurately, and it removes the awkward handoff where everyone assumes someone else is handling a critical piece.

Renting vs owning

There isn’t one right answer. There is a right answer for your event cadence.

Scenario Better fit
You attend occasional shows and want flexibility Renting
You exhibit frequently with a repeatable footprint Owning
Your content changes often and booth sizes vary Renting
You need consistency across many events Owning

If you’re weighing those paths, compare your use pattern before you compare monthly or event-specific pricing. A useful starting point is this guide on owning vs renting an LED video wall.

Service model matters more than most buyers think

Premium providers separate themselves from box shippers.

White-glove, turnkey service means your team isn’t coordinating freight, chasing labor, troubleshooting screens, or patching together missing responsibilities on show day. It means one group owns execution. That’s the only model we trust for high-stakes events.

The strongest version of that model includes on-site technical support throughout open show hours. We leave an audiovisual technician onsite the entire time the trade show is open. If anything goes wrong, your team texts or calls, and an AV technician is at the booth within minutes to resolve the problem.

A display isn’t fully supported because it arrived assembled. It’s fully supported when someone owns performance after the doors open.

Our recommendation on value

If you’re comparing a bargain display against a fully managed one, don’t ask which is cheaper. Ask which one leaves your staff free to greet customers, run demos, and close meetings.

That’s the true return. Peace of mind isn’t fluff at a trade show. It’s an operational advantage.

Tips for High-Impact Display Content

A great display with weak content is just expensive furniture.

We’ve seen booths with premium hardware fail because the message was cluttered, the imagery was generic, or the video tried to do too much. We’ve also seen simple displays perform well because the content was disciplined and built for the environment.

What works on light box displays

A static illuminated surface has one job. Deliver one message quickly.

Use a short headline, a single visual focal point, and typography people can read while walking. Don’t cram a brochure onto the wall. Light helps, but it doesn’t rescue crowded design.

A strong light box graphic usually includes:

  • One hero image: Product, outcome, or brand scene. Not a collage.
  • One headline: Short enough to understand in seconds.
  • Minimal supporting text: A subhead if needed, but no dense copy blocks.
  • High contrast: The illumination should support readability, not wash it out.

What works on video walls

Video walls give you more freedom, but they also punish bad editing.

The best content loops are built for trade show behavior. People join mid-sequence. They glance first, then stop if something is relevant. Your content has to communicate even if nobody watches from the beginning.

Use motion with purpose:

  1. Start with a visual hook. Product motion, transformation, or a bold opening frame.
  2. Follow with one idea at a time. Don’t stack every benefit at once.
  3. Build silent-first content. Assume many viewers won’t hear audio.
  4. End in a way that loops cleanly, without awkward resets.

Creative note: If a passerby only gives you five seconds, your content still has to make sense.

Match content to booth goals

Different goals need different formats.

If you’re launching a product, run short product animations and close-up detail shots. If you’re selling a complex service, use sequenced messaging that simplifies the process. If credibility is the challenge, show short testimonial clips, client logos, or proof-driven visuals.

A useful planning exercise is to assign each part of the wall a role:

  • Top of wall: Brand recognition and distance visibility
  • Center zone: Product or service explanation
  • Near eye level: CTA, demo cue, or meeting prompt

Common mistakes we tell clients to avoid

Some problems repeat across almost every event season.

  • Overloading a static wall: Too many logos, too much copy, no focal point.
  • Using video that depends on sound: Trade shows are noisy and inconsistent for audio.
  • Creating long-form content for short attention spans: Keep loops tight and scannable.
  • Forgetting brand consistency: Booth content should match your sales deck, landing pages, and follow-up emails.

The strongest booth content doesn’t try to say everything. It starts the conversation your team can finish in person.

Your Exhibitor’s Decision Checklist

By this point, the decision usually gets clearer. You’re not choosing between “good” and “bad.” You’re choosing between a static illuminated graphic and a dynamic visual system, then deciding how much service and support you need wrapped around it.

Use this checklist the same way we do when advising exhibitors.

Ask what your message needs

If your core message can live in one image and one headline, light box displays may be enough. If your offer needs demonstration, sequencing, or multiple audience-specific messages, a video wall is the stronger fit.

Write your booth message in one sentence. Then ask whether a static visual can carry it without explanation.

Check booth scale and viewing distance

Large walls magnify weaknesses. If you’re designing a broad visual surface, pay attention to how the display technology scales and how it looks from both aisle distance and close range.

For digital, resolution matters. That is where finer pitch earns its keep. For static illuminated systems, uniformity matters just as much.

Audit the hidden cost questions

Before signing anything, ask for a plain-English list of what’s included and what isn’t.

Use this shortlist:

  • Direct venue charges: What will the show bill you for directly?
  • Freight and handling: Who manages it?
  • Install and dismantle: Included or extra?
  • On-site support: Available during live show hours or not?
  • Content help: Included guidance or DIY only?

Stress-test your content plan

Your booth hardware can’t save weak content. Make sure your visuals are built for how attendees behave.

If you need stronger product imagery before committing to final graphics or motion assets, resources on how to boost conversions with AI photos can help your team think through faster creative production and cleaner visual presentation.

Decide how much operational burden you want

This is the question buyers often avoid because it sounds subjective. It isn’t.

If you want your internal team managing setup details, support calls, and technical issues, choose accordingly. If you want your staff focused on meetings and customer conversations, pay for the service model that protects that outcome.

The best booth decision is the one that still feels smart at 7 a.m. during install, not just the one that looked good in the mockup.

Our final checklist

Before you choose, make sure you can answer yes to these:

  • Do we know whether our message is static or dynamic
  • What do we know how close attendees will stand to the display
  • Are we sure we understand the actual setup and handling burden
  • Do we know what support exists during show hours
  • Have we decided whether renting or owning fits our event schedule
  • We have content designed for the actual medium

If you can’t answer those confidently, don’t buy yet. Get clearer first. The wrong display doesn’t just waste money. It weakens your booth performance and creates avoidable stress for your team.


If you want a booth partner that handles the details and leaves your team free to greet customers, talk with LED Exhibit Booths. We provide turnkey LED video wall trade show displays with higher-resolution 1.9 pitch tiles, while many competitors use 2.5 pitch. Our pricing includes everything except what the show bills you directly, such as electricity and material handling. We also provide white-glove service and keep an AV technician onsite for the full time the show is open, so if something needs attention, help is only a text or call away.

LED Wall Panels: The Exhibitor’s Complete 2026 Guide

led wall panels solve a problem most exhibitors know too well. You pay for the space, ship the booth, brief the team, and still end up looking flat next to brands that move, glow, and pull people in from the aisle.

Marketing managers don’t need another gadget. You need a booth that gets noticed, supports your story, and doesn’t create technical chaos during show hours. That’s why we recommend led wall panels when the goal is stronger presence and less stress. Done right, they turn your structure itself into the message instead of treating the screen like an accessory.

Why Your Booth Needs More Than a Banner to Stand Out

Most booths fail before anyone reads the headline. Attendees scan fast. If your space looks static, they keep walking. A printed backdrop can still support a booth, but it won’t compete with motion, scale, and light on a crowded floor.

Modern led wall panels changed that. The key turning point came in 1992, when the invention of true blue LEDs enabled full-color RGB displays, a breakthrough later tied to the 2014 Nobel Prize in Physics. That innovation is what transformed LED displays from single-color indicators into the large visual canvases now used across trade shows and events, as noted in this history of direct-view LED video walls.

led wall panels

Static graphics don’t stop traffic like LED wall panels

A banner tells. A video wall demonstrates. That difference matters when you’re launching a product, showing software, running a brand film, or trying to make a small footprint feel bigger.

We see the same pattern at shows. Brands that rely only on print often struggle to create depth. Brands that use motion graphics, product visuals, and timed messaging across led wall panels create a booth people notice before the sales team says a word.

If you’re still weighing whether the upgrade is worth it, look at the difference between a standard backdrop and a pop-up wall display approach that creates a focal point.

A trade show booth has one job first. Earn the next three seconds of attention.

Attention is only half the value

The primary benefit isn’t just visual impact. It’s control. You can change messaging by daypart, audience, or meeting schedule. You can run a teaser before a demo, product visuals during traffic peaks, and cleaner brand content during networking hours.

That’s why we push clients to think beyond “screen size.” The right led wall panels give you a live communication surface that works as hard as your team does.

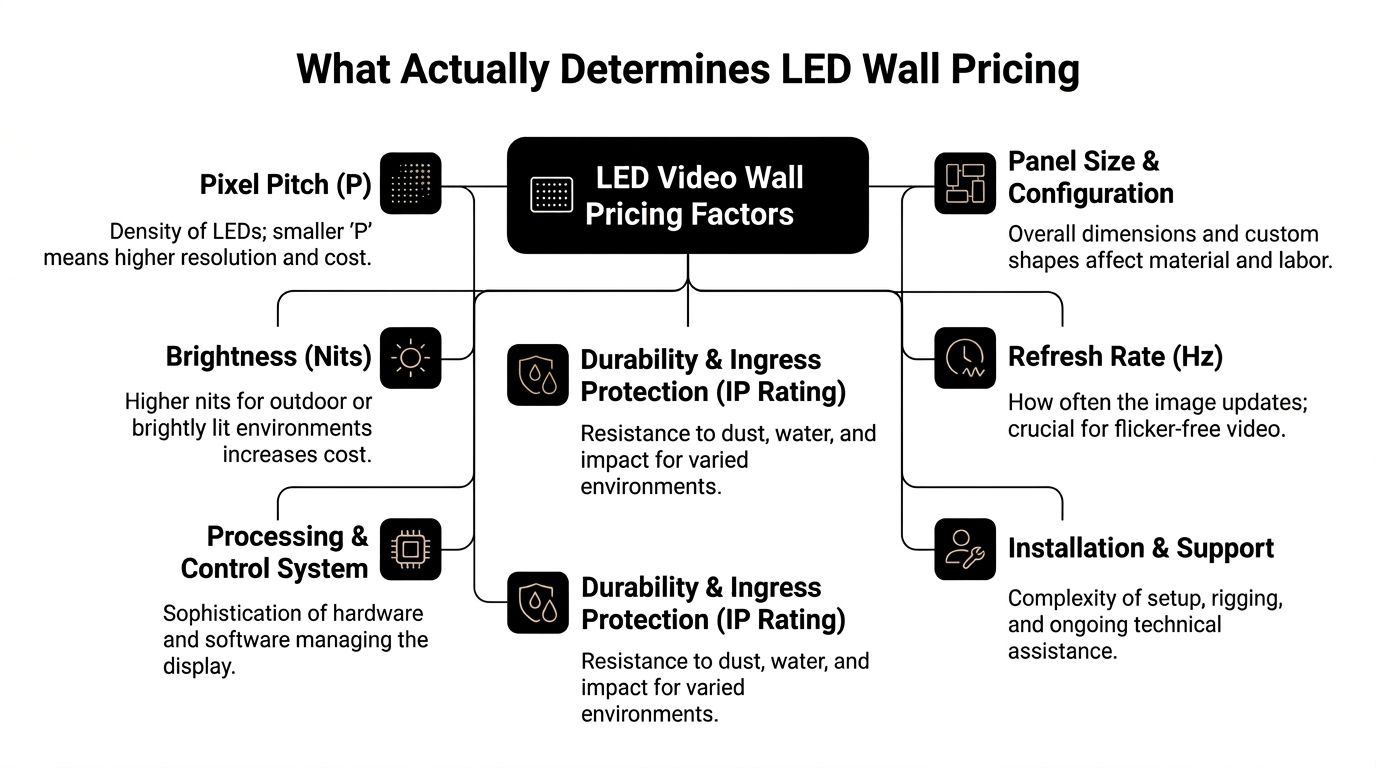
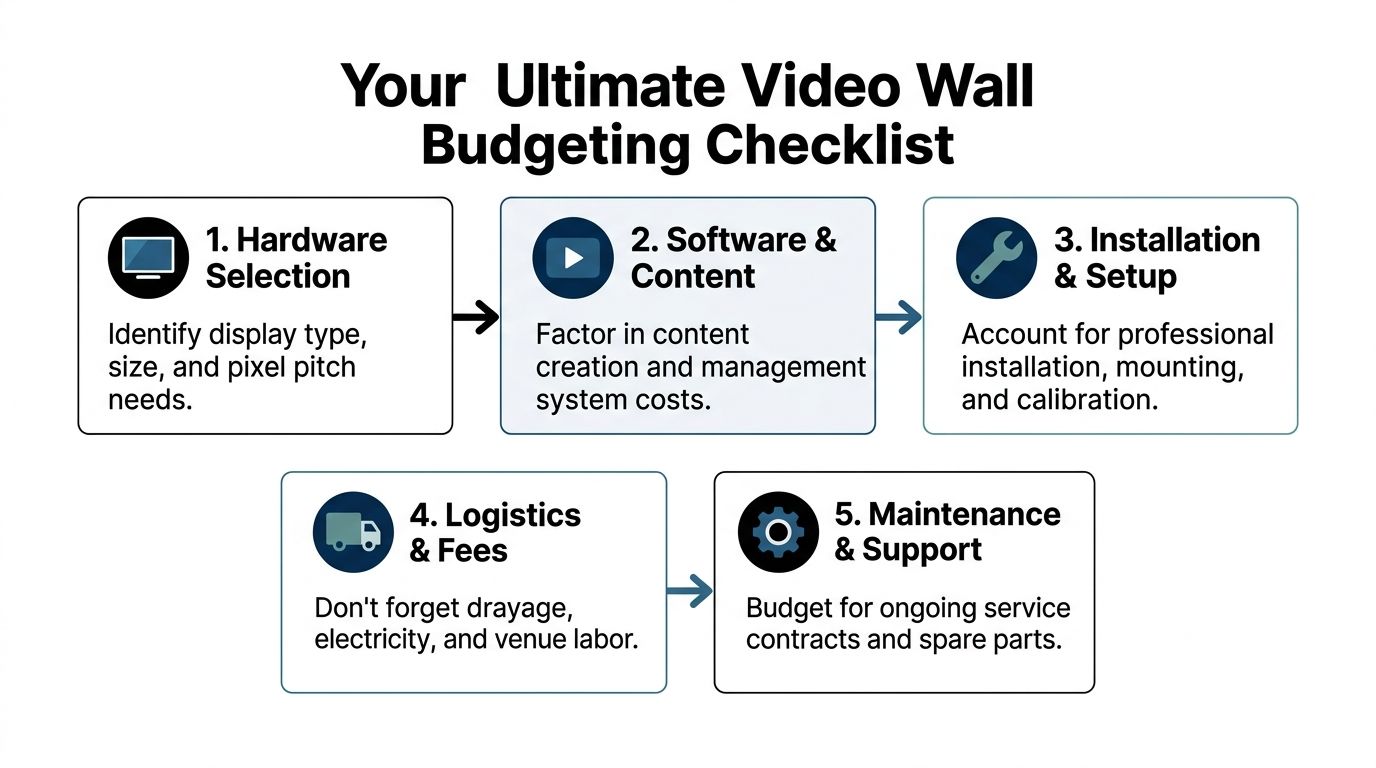
Decoding the Specs of High-Impact LED Wall Panels

Most spec sheets are written for engineers. Marketing managers need a simpler filter. When we evaluate led wall panels for a trade show booth, we care about one question first. Will this look sharp from the actual distance your audience sees it?

That’s where pixel pitch matters most. Pixel pitch is the distance between LED pixel centers. For trade shows, it’s the main driver of both cost and visual quality, and a finer pitch like P1.9 gives higher pixel density for close-up viewing than the coarser P2.5 or P3.0 options commonly offered elsewhere, as discussed in Samsung’s overview of digital signage and video wall innovations.

led wall panels

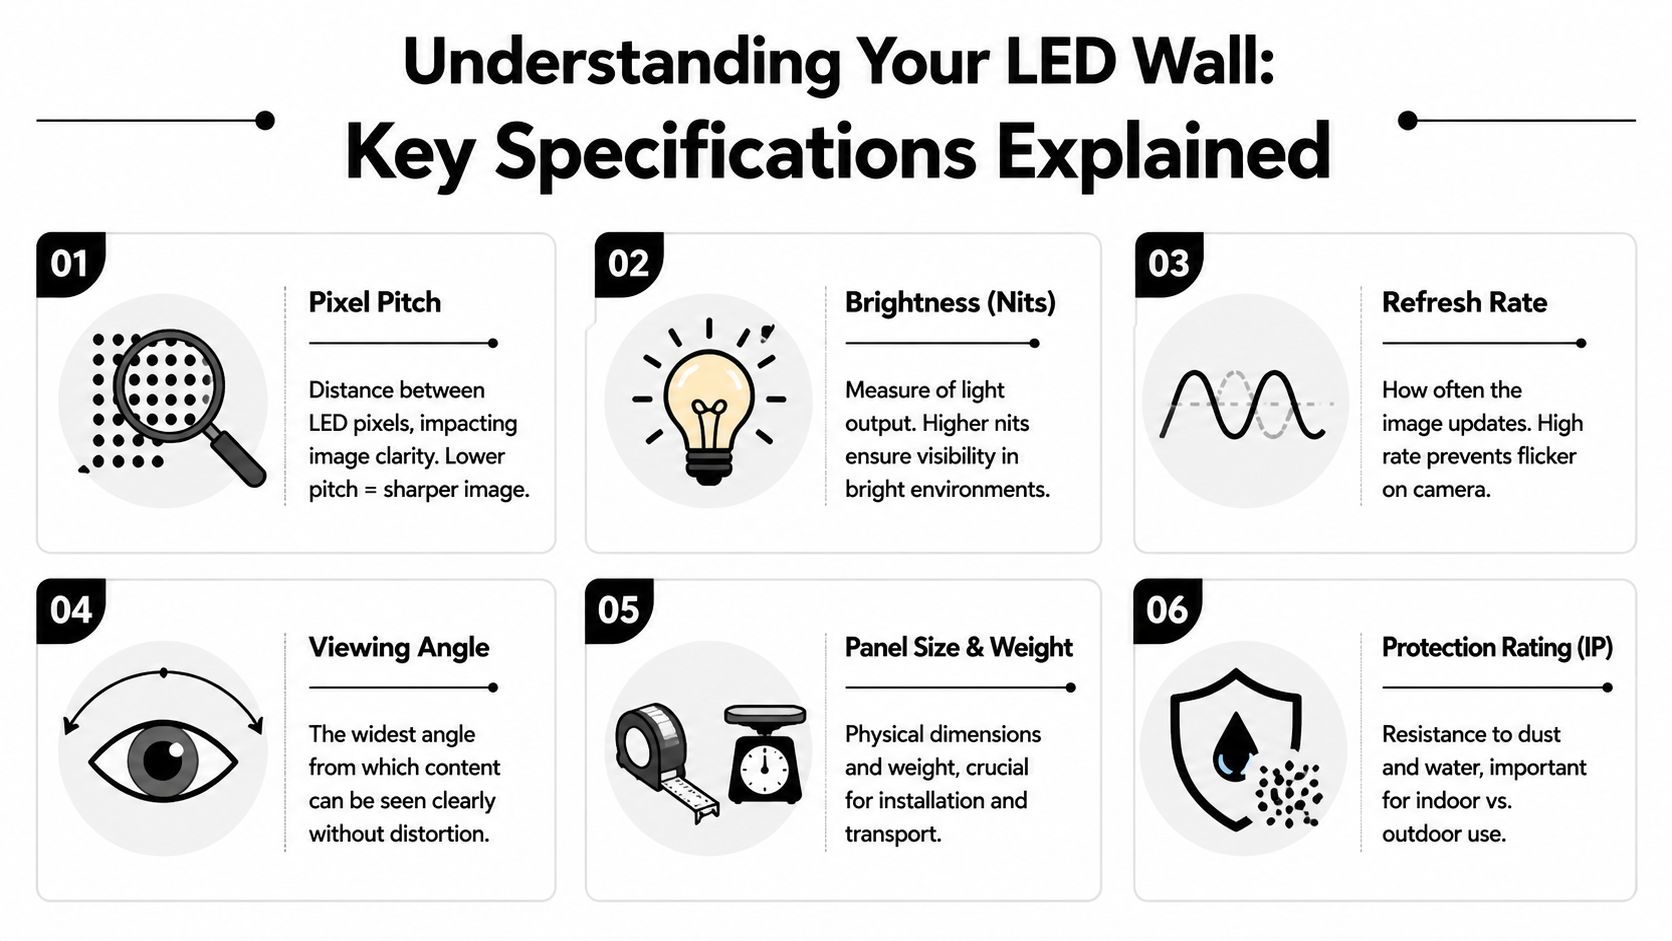
Pixel pitch decides whether your booth looks premium

Think of pixel pitch like the difference between a crisp laptop display and an old scoreboard. The smaller the spacing, the smoother the image looks up close. That matters in trade shows because people don’t always stand far away. They stop at the aisle, step into the booth, and often view the wall from only a short distance.

Our standard recommendation is P1.9 for brands that care about a polished presentation. Many competitors lean on P2.5 because it’s cheaper. That’s the tradeoff. Lower upfront equipment cost, lower resolution. If you’re showing product detail, software interfaces, lifestyle footage, or brand video with text overlays, P1.9 is the better call.

The core specs that actually matter with LED wall panels

Below is the practical version of the spec sheet.

Specification What It Means Our Advantage (LED Exhibit Booths) Competitor Standard
Pixel Pitch Distance between LED pixels and the main factor behind clarity P1.9 for sharper close-up viewing Often P2.5
Brightness Light output needed for venue conditions Spec matched to booth environment One-size-fits-all recommendations
Refresh Rate How smoothly video displays, especially on camera Chosen for live event content and filming needs Often treated as an afterthought
Viewing Angle How well content holds up from the side Better planning around aisle traffic and booth geometry Flat-wall assumptions
Panel Construction How panels connect and assemble Built for fast exhibit deployment More cumbersome setups
Service Model What happens if something fails during show hours On-site support model Remote help or limited floor support

If you’re comparing products, don’t get distracted by a long list of secondary features before you confirm the pitch and viewing distance match.

For a closer look at display options built for exhibit environments, review this page on LED panels for video walls.

Brightness has to fit the hall

Brightness is not a vanity metric. It’s about whether your content stays visible in the actual booth location. A dim panel can look fine in a dark showroom and washed out on a bright convention floor.

We also care about how the wall performs when the content is filmed. Brands doing interviews, demos, or social capture at the booth need panels configured to avoid visual issues on camera. That doesn’t mean chasing specs for the sake of it. It means choosing the right system for the content plan.

Practical rule: Start with viewing distance, then pick pixel pitch. Start with venue lighting, then pick brightness. Don’t do it in reverse.

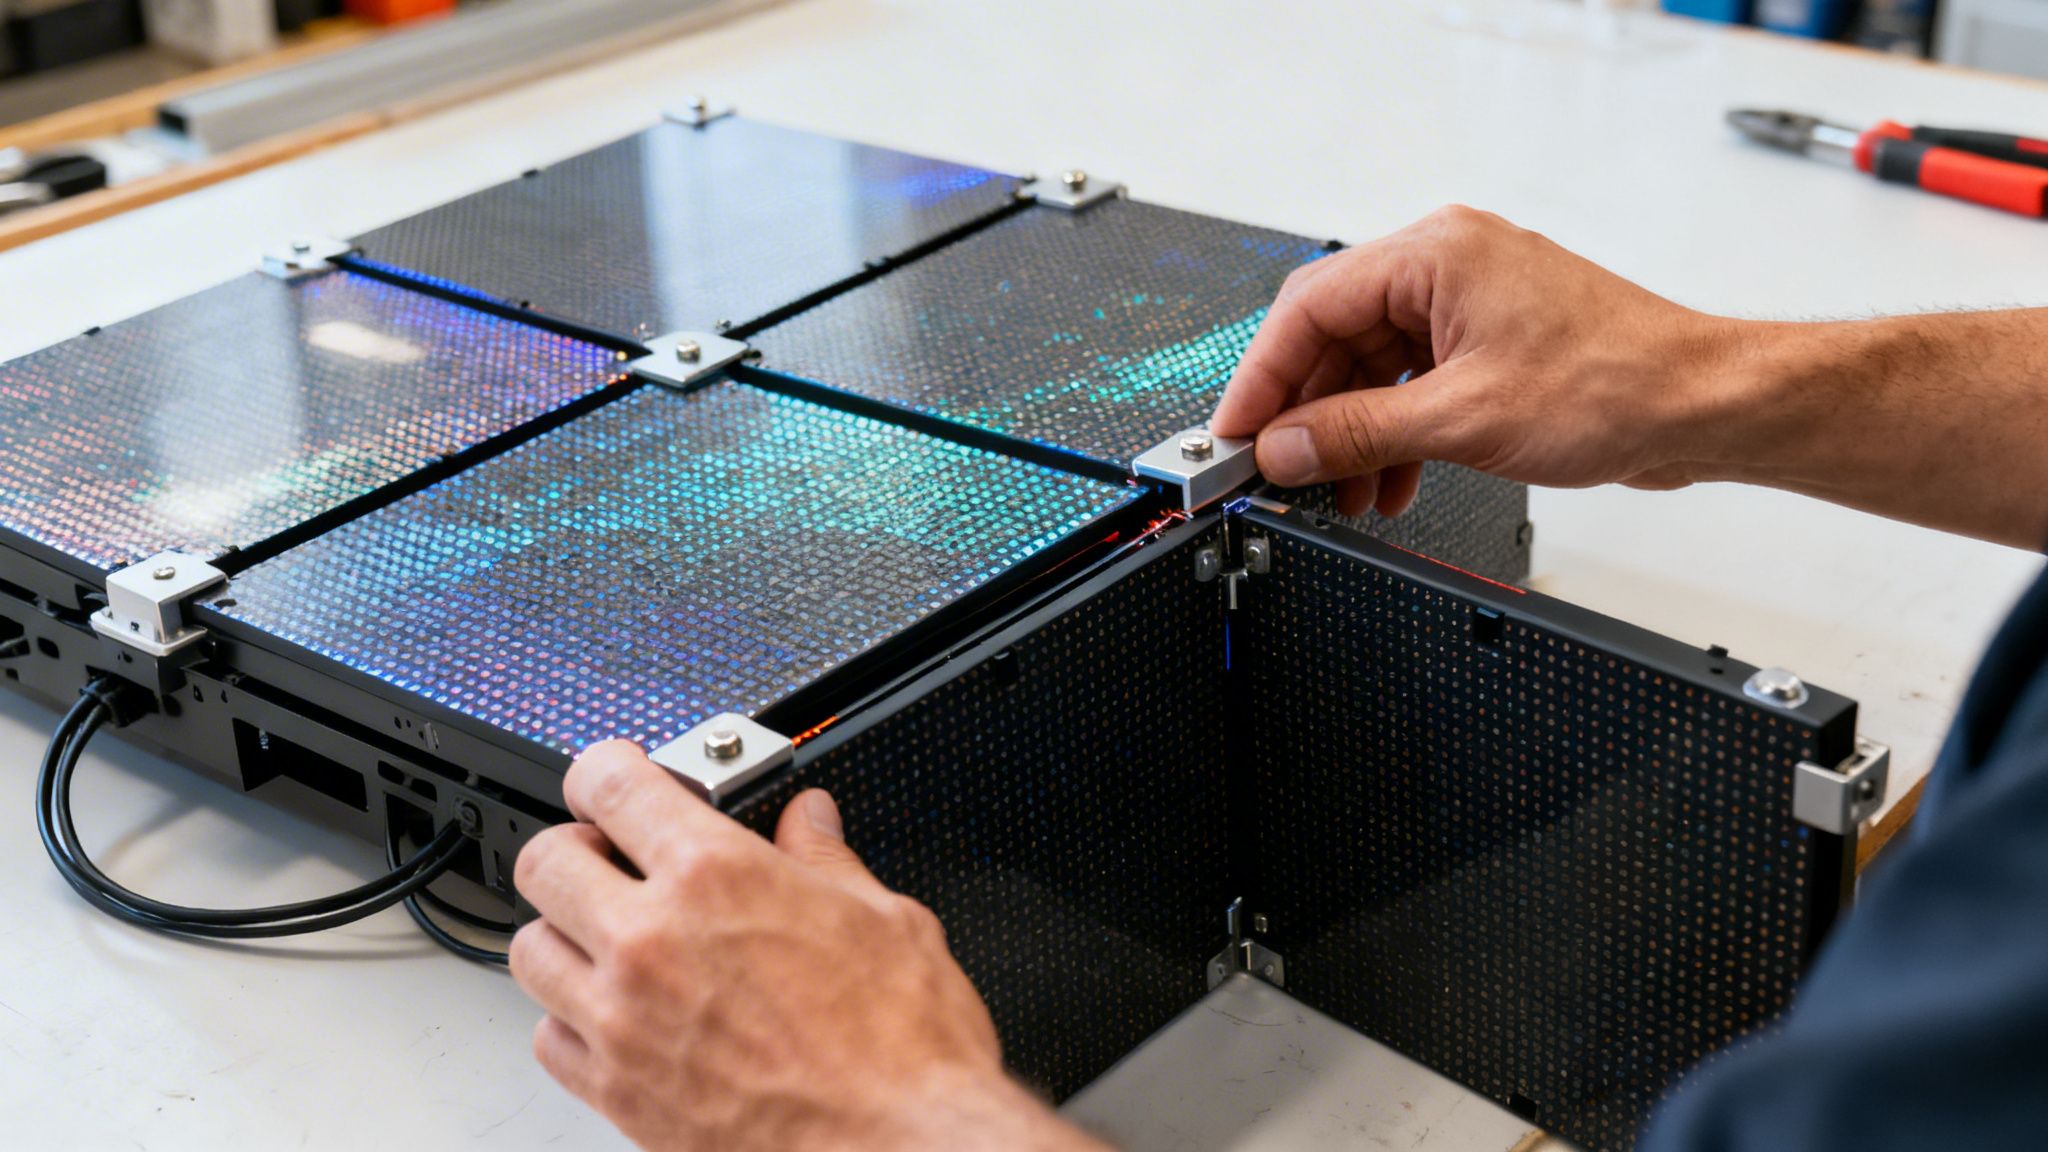
Lightweight modular design affects real cost

Marketing teams often focus on the display and forget the labor. That’s a mistake. Panel construction changes setup time, install complexity, and the chances of something going wrong under deadline.

We prefer modular systems that go up cleanly and predictably. Better panel design means fewer install headaches, cleaner seams, and less booth-side improvisation. That has direct ROI because your team spends less time troubleshooting and more time meeting prospects.

Cheaper options usually hide the pain in deployment. The wall may technically work, but the finish looks rough, the process drags, and every adjustment becomes a production.

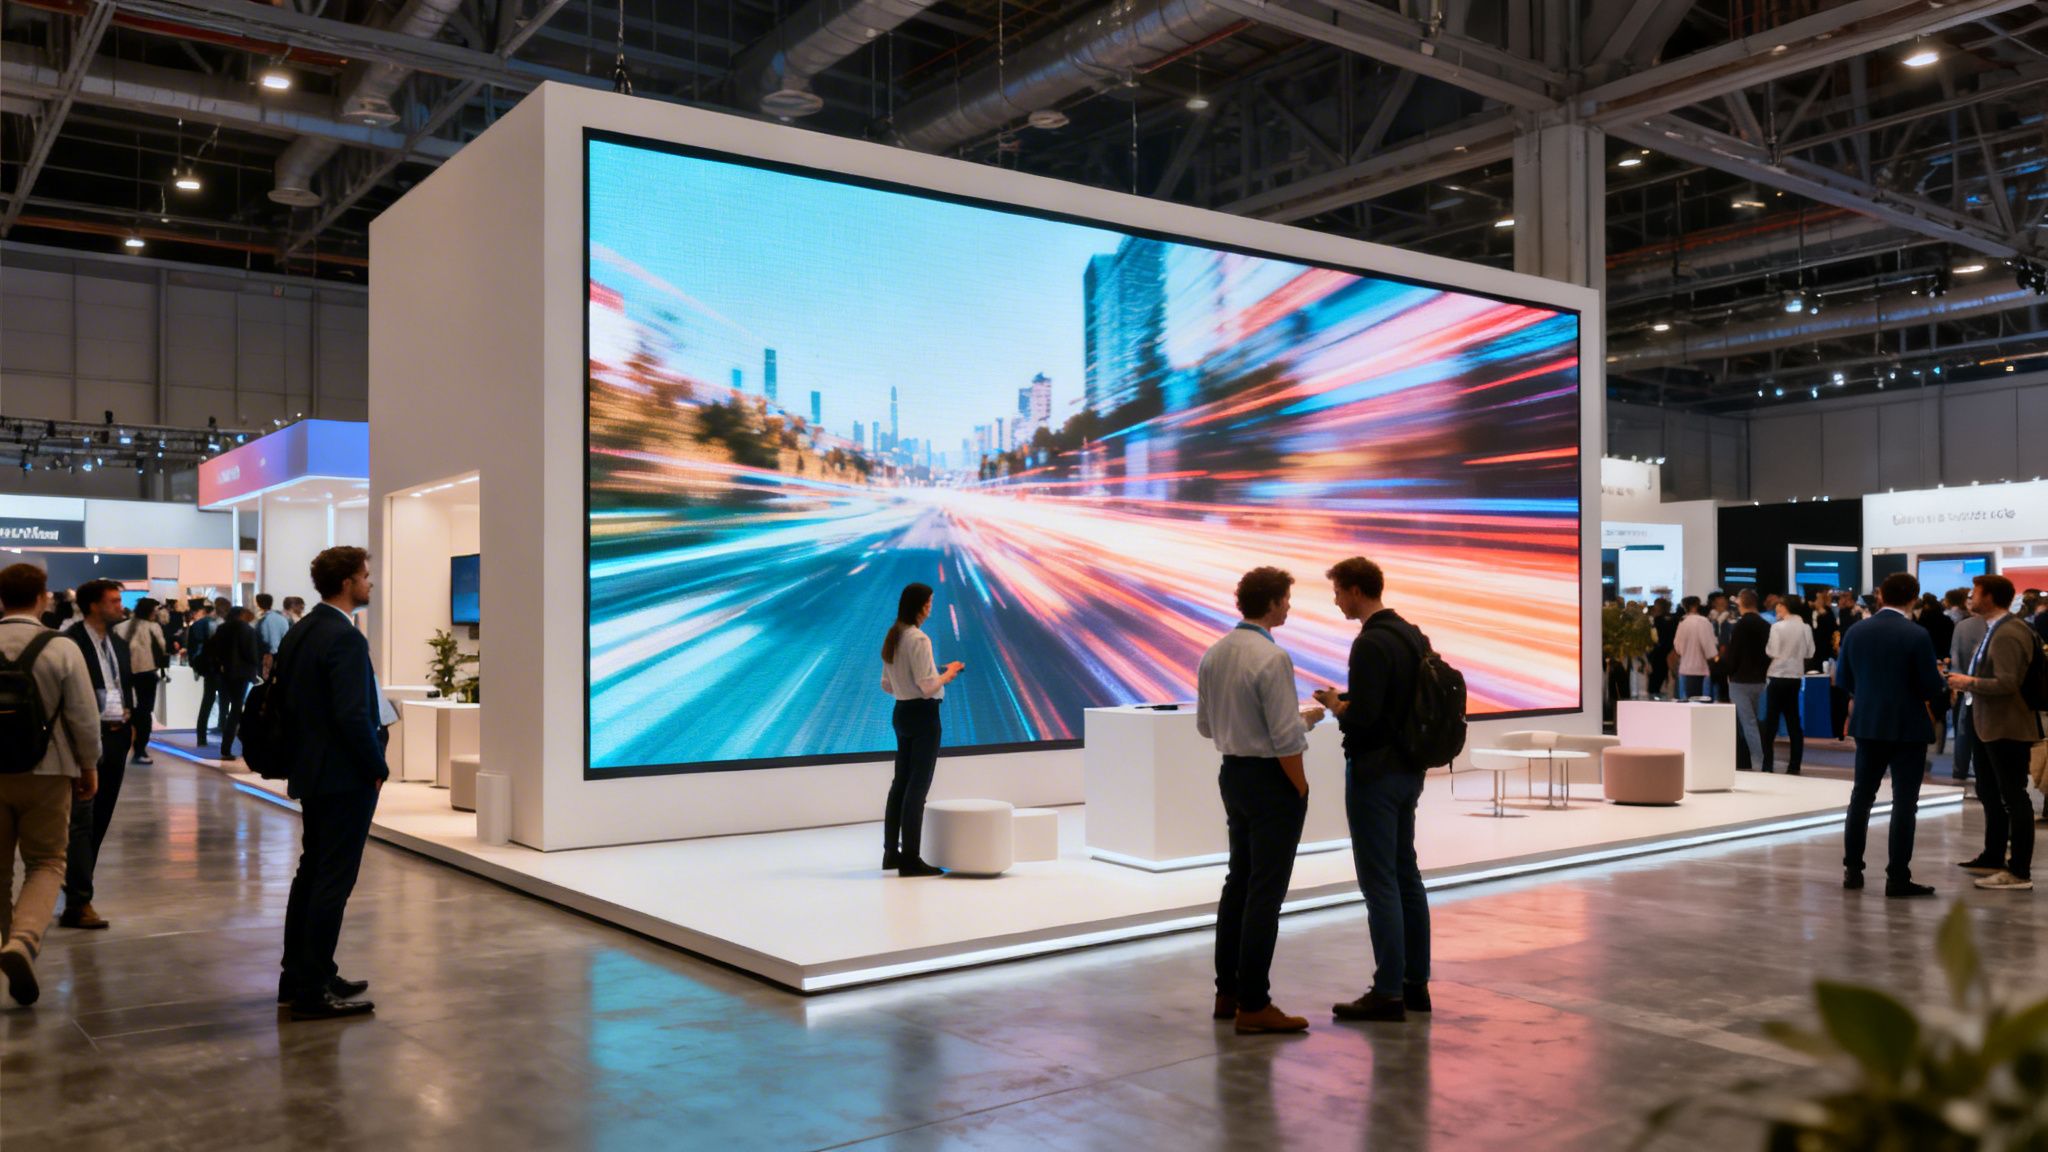
Creative Designs Using Modular LED Wall Panels

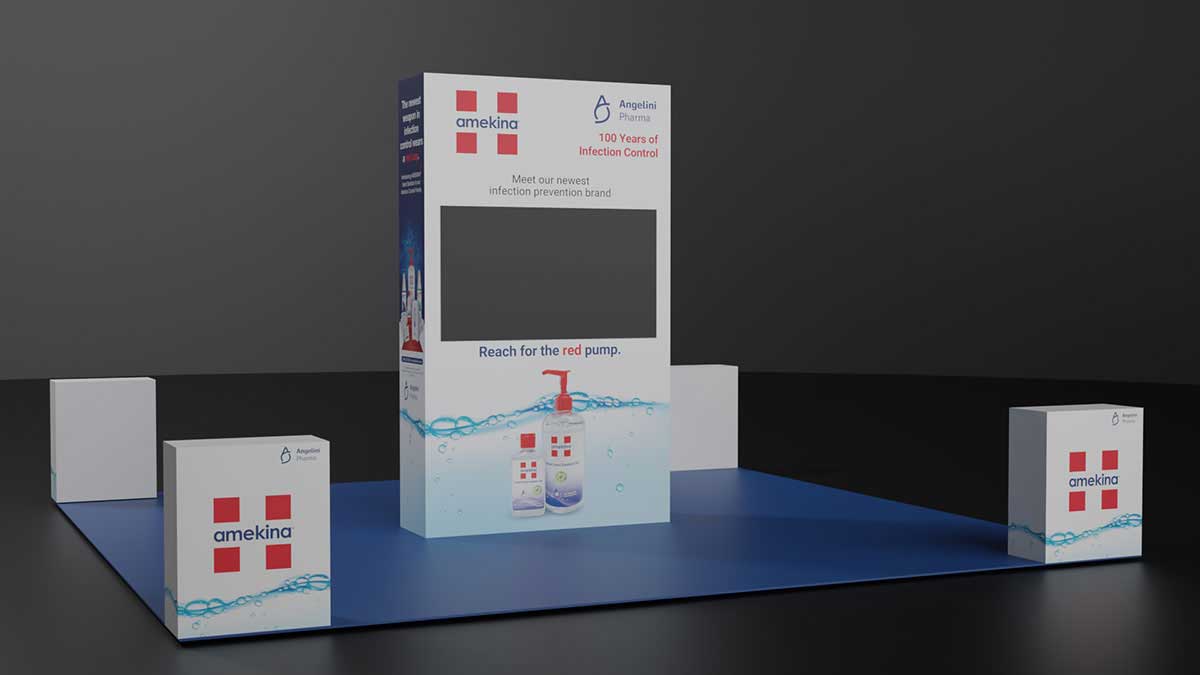
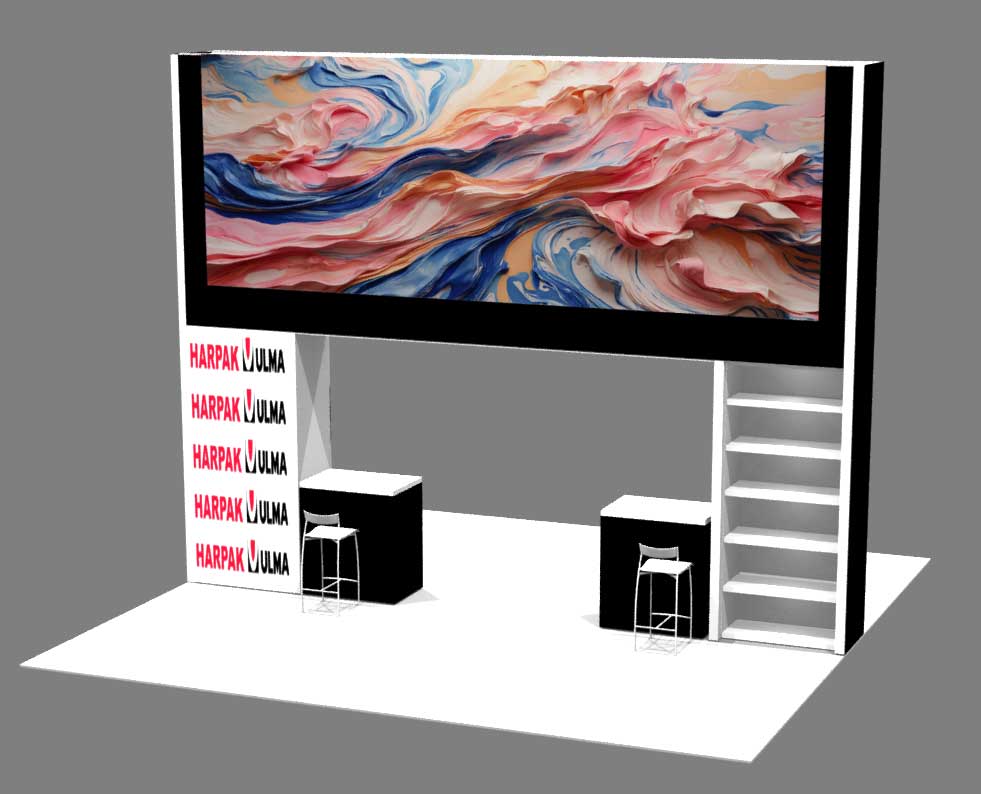
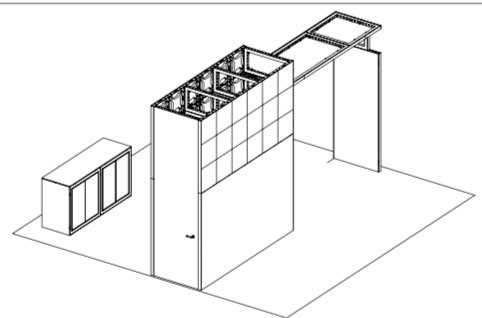
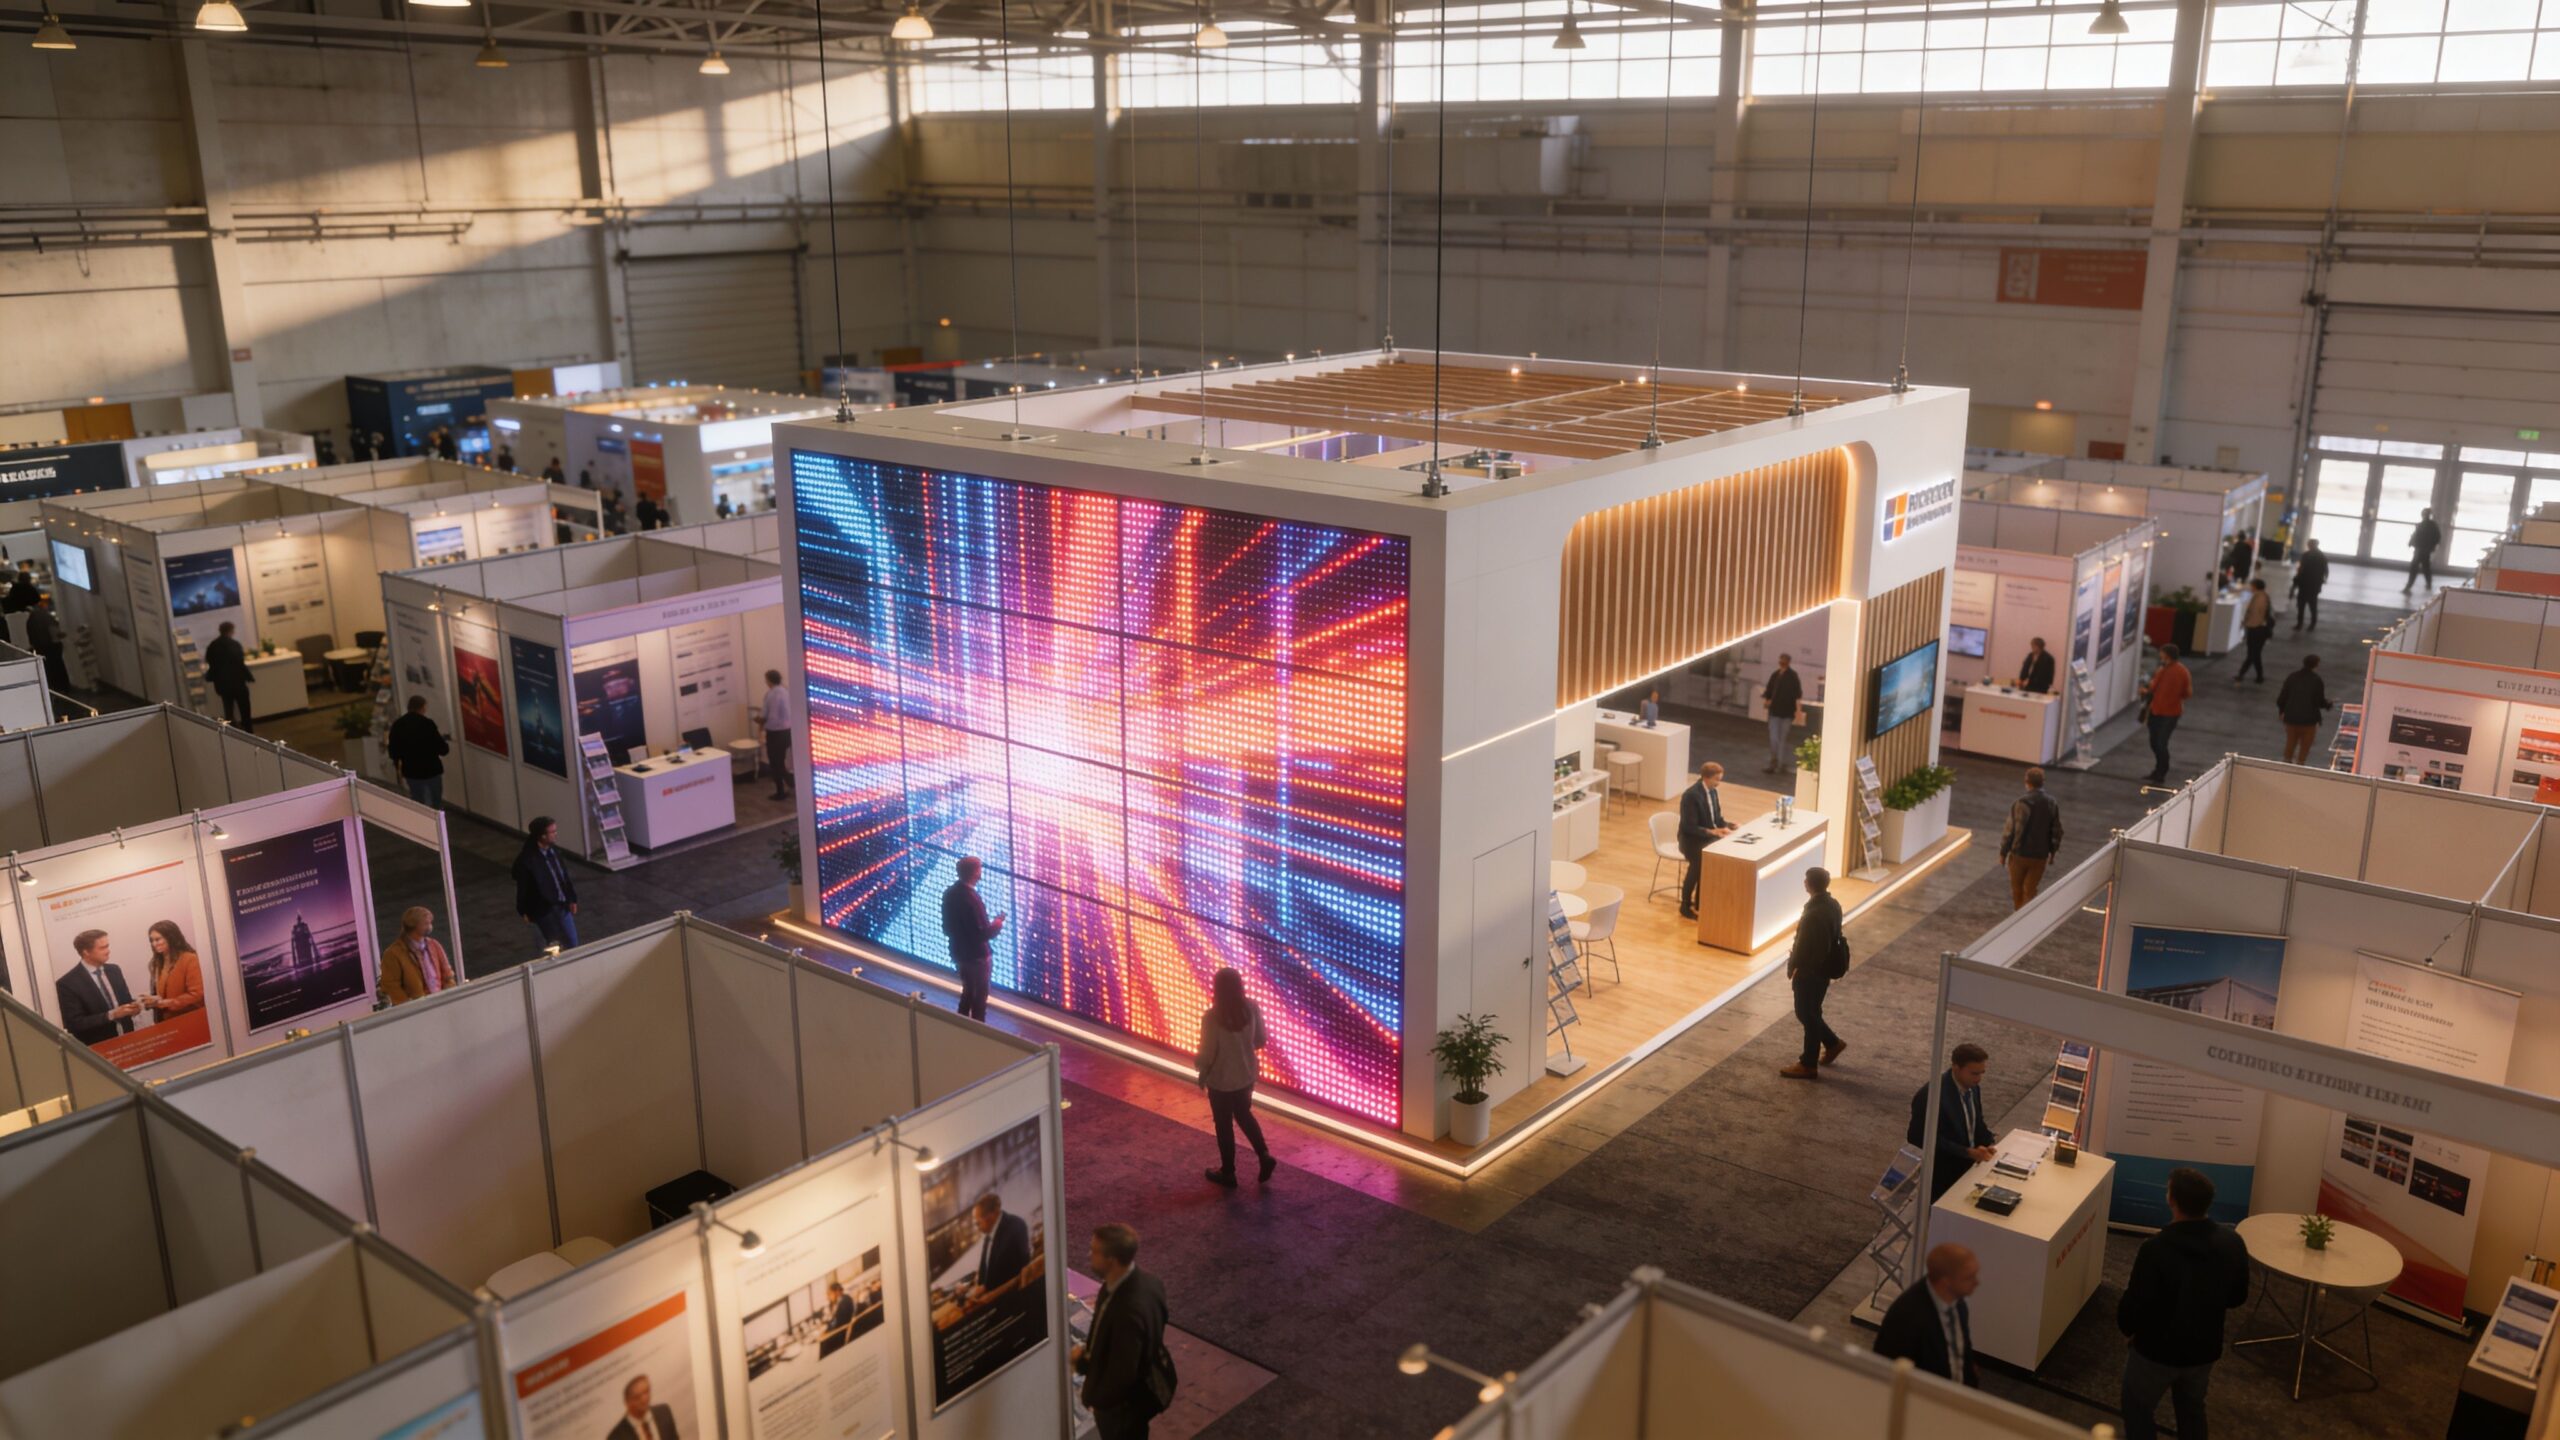
A flat rectangle is the most conservative use of led wall panels. It works, but it leaves a lot on the table. The modular format is what makes LED interesting for trade shows. You’re not limited to a screen on a stand. You can build the booth itself around the display surface.

led wall panels

We’ve used modular walls to create branded backdrops that wrap into side returns, reception counters that animate with product visuals, and booth entrances that feel more like stage sets than standard exhibits. That matters because the physical form and the content work together. If the wall shape guides traffic, the message lands before the rep starts the conversation.

Shapes change how people experience the booth

Curved layouts deserve more attention than they get. In real trade show traffic, people rarely face the booth straight on. Many approach from the side, glance while walking, or stand at odd angles in crowded aisles. Standard viewing angle claims don’t tell the whole story.

A useful reference on placement notes that curved led wall panels can boost effective viewing by 25% in trade show layouts where people see content from sharp angles, according to this guide on LED video wall viewing angles. We agree with the practical takeaway. Curves are not decorative fluff. They help more people see the content as intended.

If you’re planning a custom environment rather than a basic inline booth, modular structures like those used in a modular trade show booth give you more design freedom.

Three configurations we recommend often with LED wall panels

  • Immersive back wall: Best for product launches, software demos, and brand storytelling. Keep the main narrative on the center field and use side zones for motion texture or supporting visuals.
  • LED columns and portals: Strong for island spaces where attendees approach from multiple directions. These forms create visibility from farther down the aisle.
  • Reception counters with integrated motion: Useful when you want the first touchpoint to feel active instead of static. It can carry logo animation, product loops, or directional messaging.

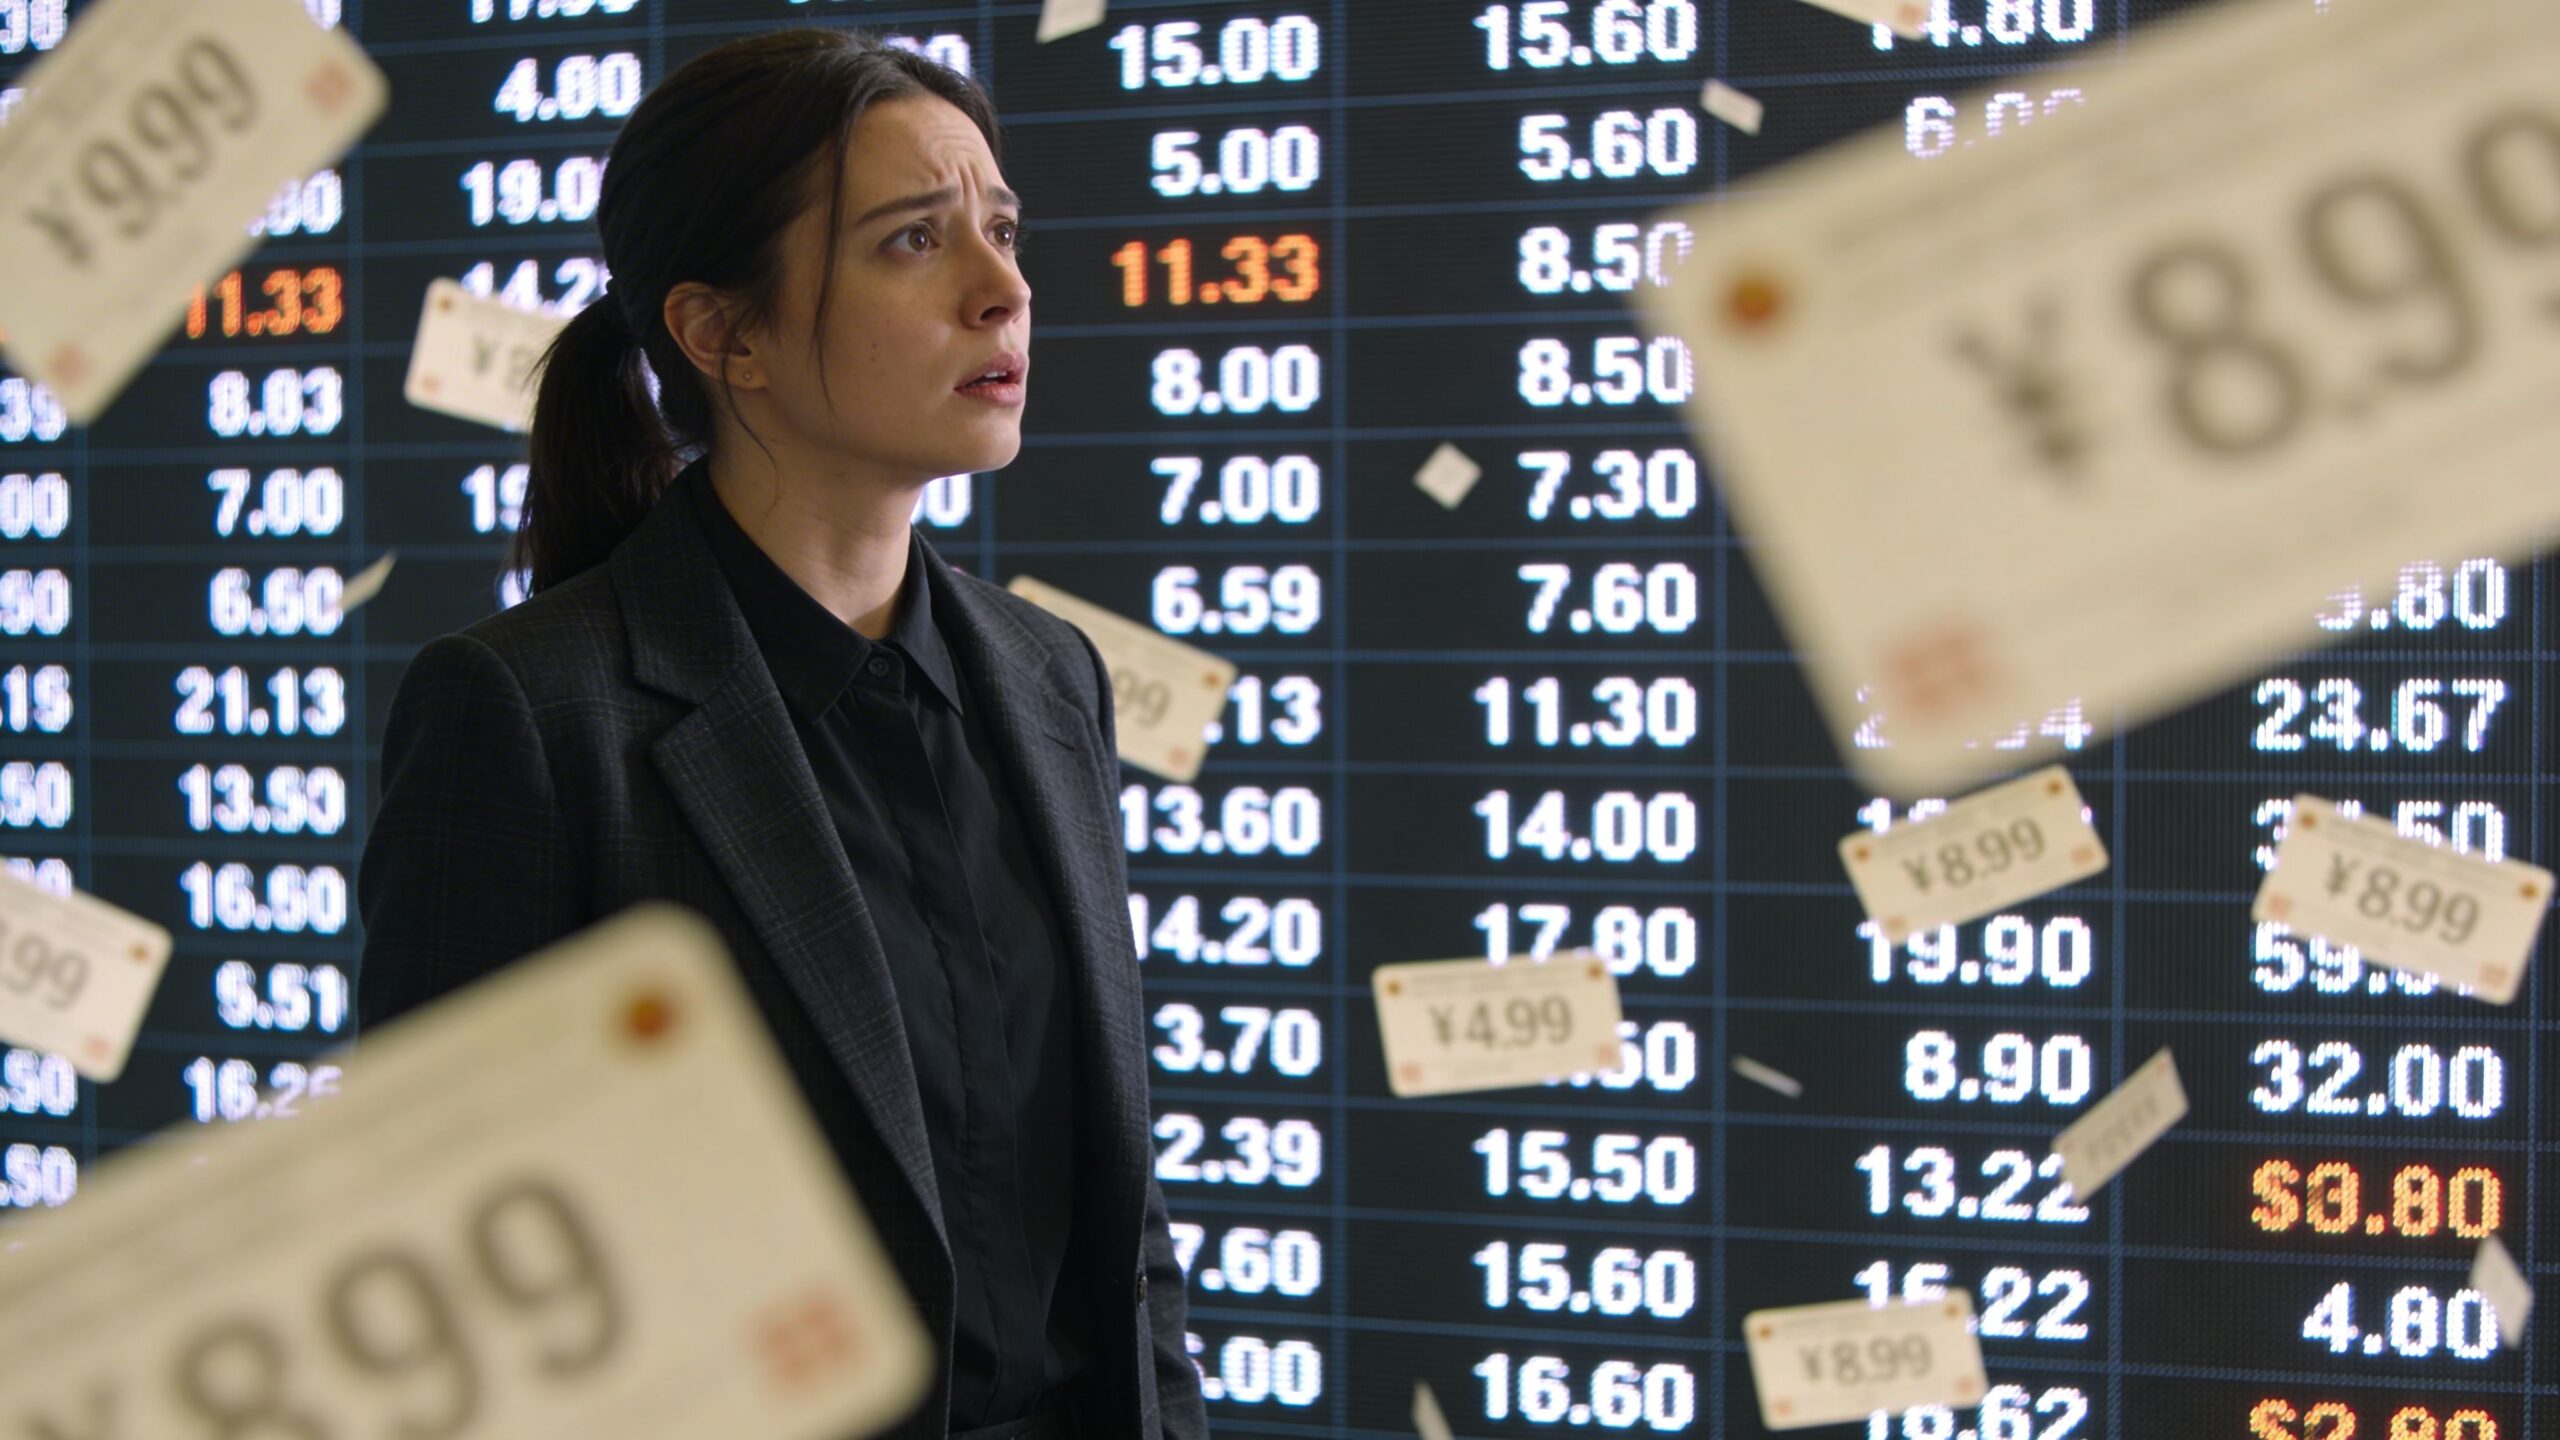
Here is a visual example of how dynamic booth video can shape the whole environment:

Curved and sculptural LED works best when the content is designed for the form, not stretched from a flat template.

The common pitfall is buying the hardware idea before solving the storytelling problem. A dramatic structure with lazy content still underperforms. We push clients to match the shape to the audience flow and the content rhythm, not just the booth rendering.

Our White-Glove Turnkey Service for LED Wall Panels

Most LED projects go wrong. Not on the screen itself. In the handoffs.

One vendor handles the booth. Another handles the video wall. Someone else ships the pieces. A freelancer exports the content. Then show day arrives and your marketing team becomes the project manager for a technical installation they didn’t sign up to run.

We don’t think that’s acceptable. If you hire led wall panels for a trade show, you should not spend the event chasing cables, installer updates, or software issues.

What turnkey should actually include

A real white-glove process means one coordinated path from concept to teardown. We handle planning, booth integration, logistics, install, operation, and dismantle so your team can stay focused on customers.

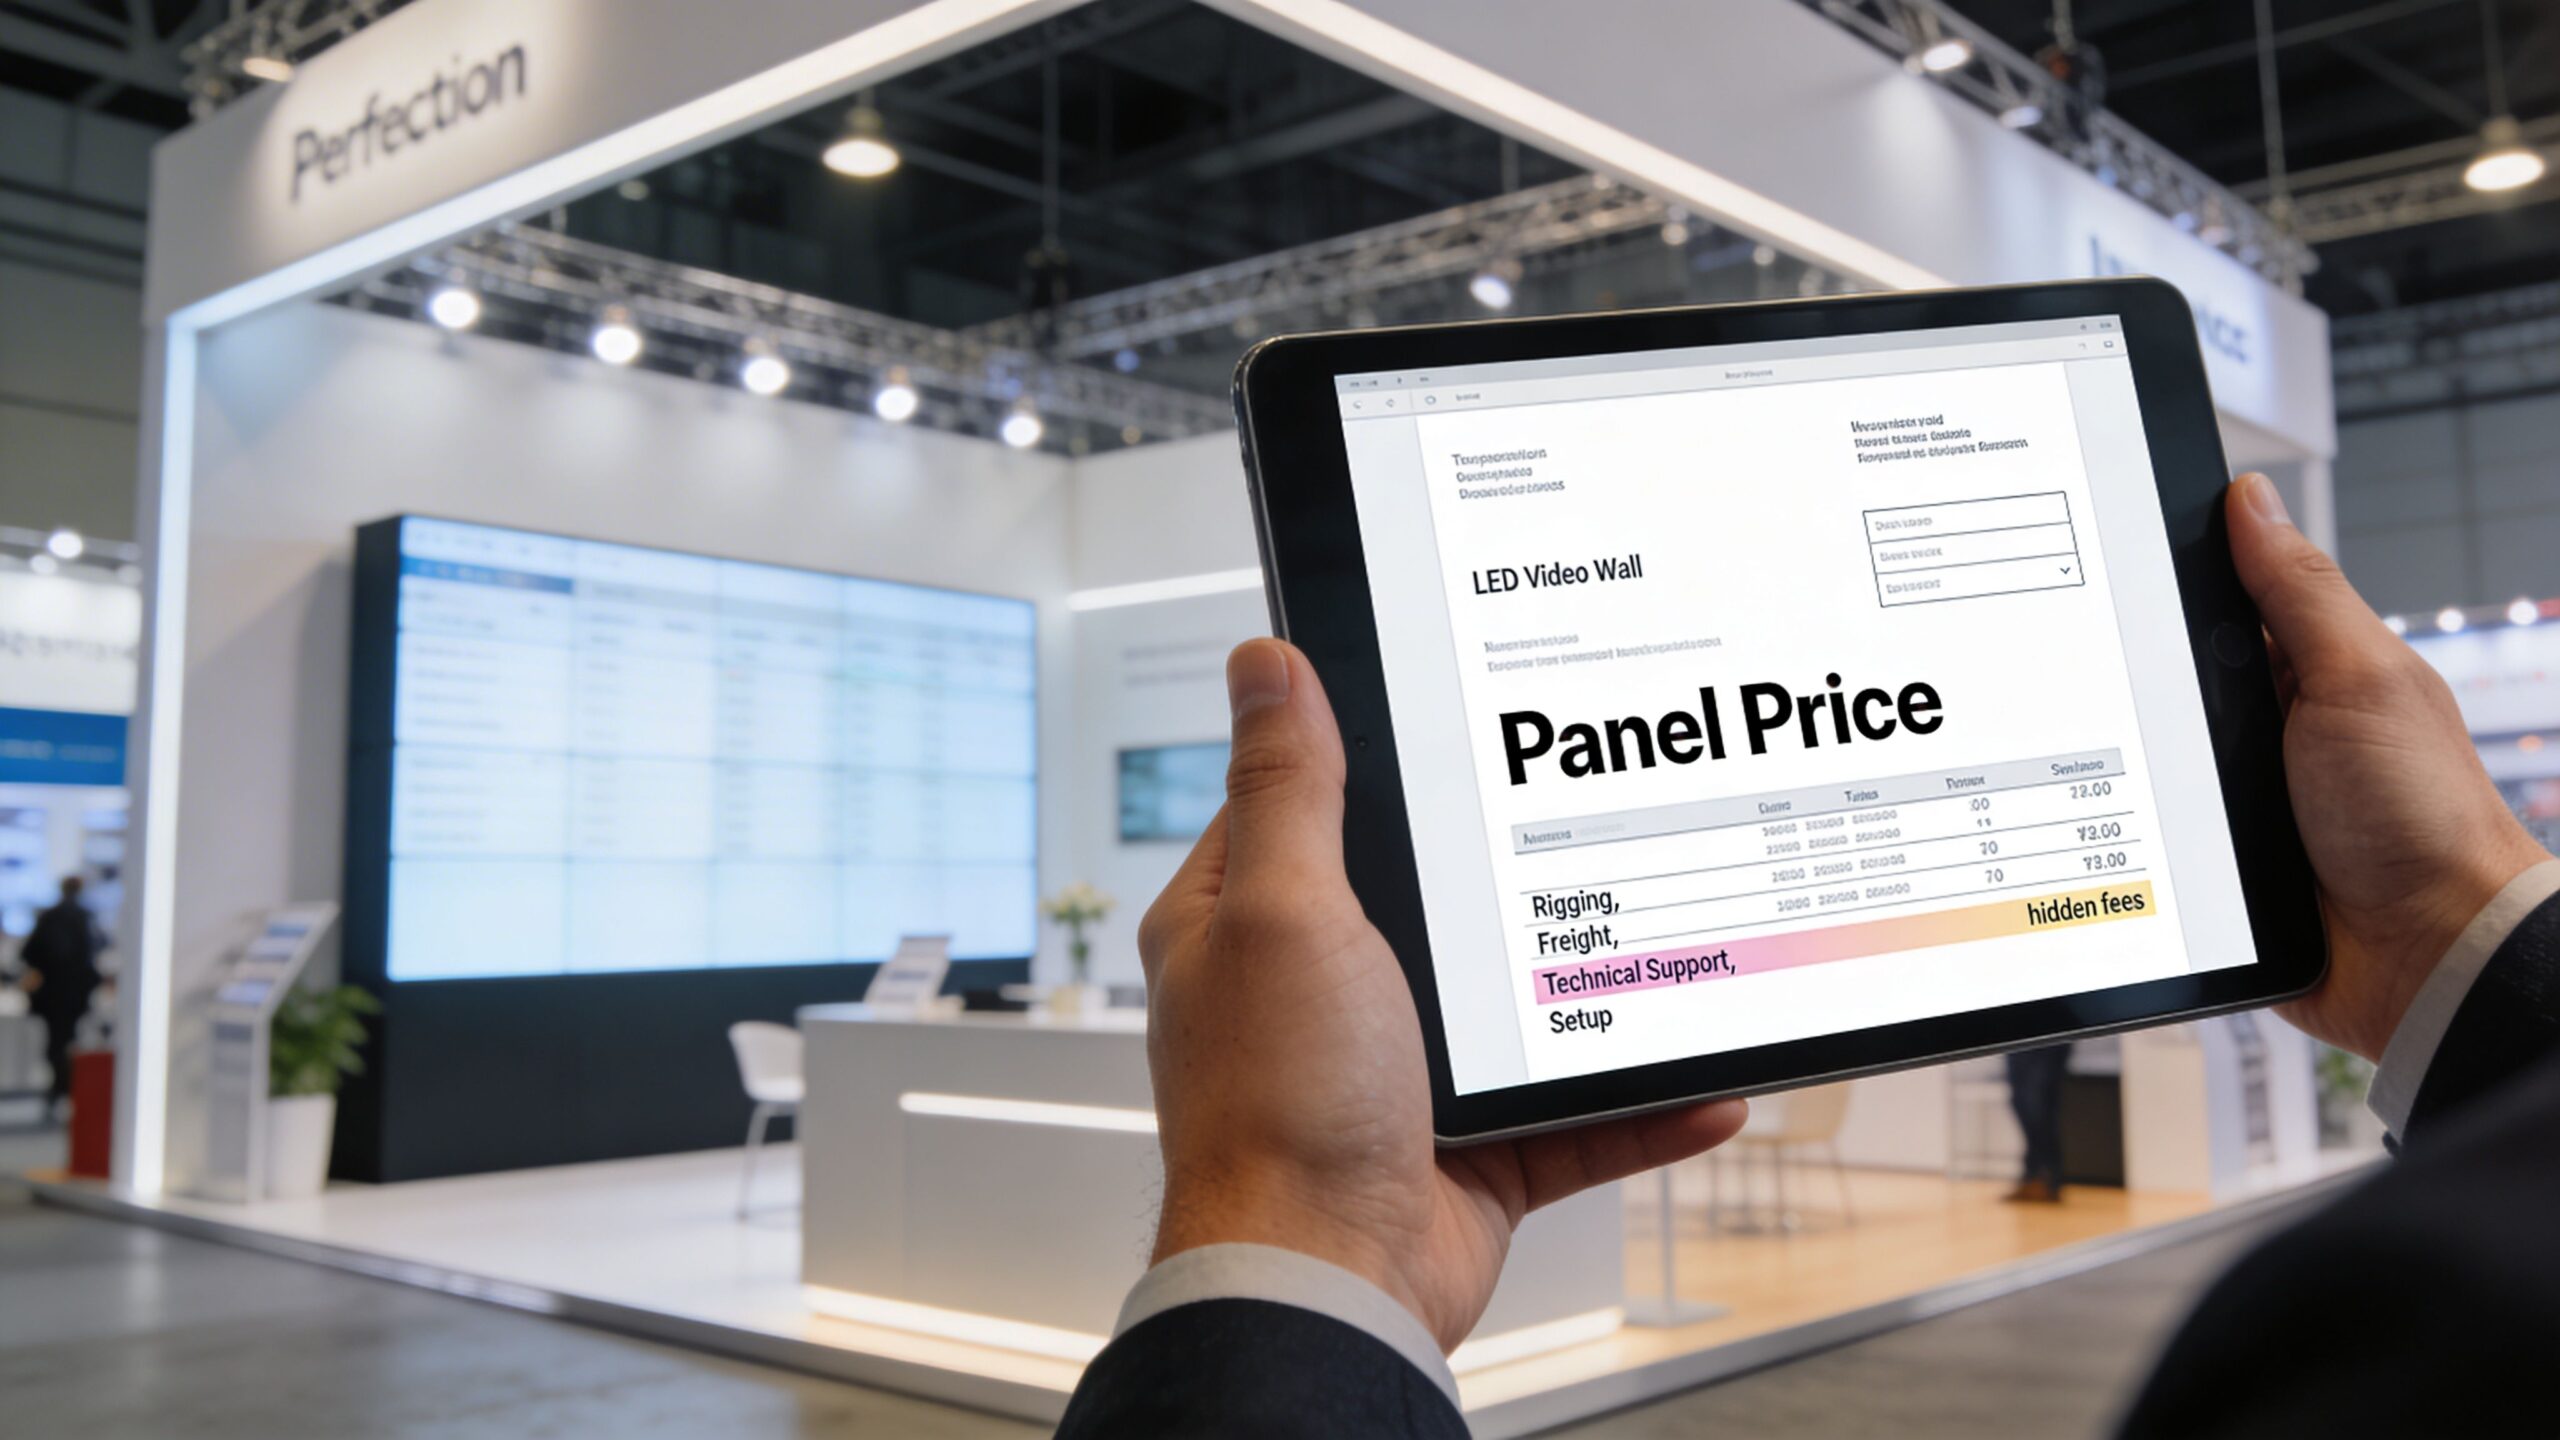
Our pricing is also simple. We include everything except the charges the show bills you directly, such as electricity and material handling. Those venue bills come from the show. The rest is covered in our price.

That matters because a lot of cheaper proposals look fine until the add-ons start stacking up. Labor. Setup support. show-site fixes. content handling. On-site oversight. The invoice grows, and your team still carries the risk.

The on-site support difference

We leave an audiovisual technician onsite the entire time the trade show is open. If anything goes wrong, you text or call and within minutes an AV Technician is at your booth to resolve the problem.

That changes the experience completely. Your staff doesn’t need to troubleshoot playback. They don’t need to explain a signal issue to venue labor. They don’t need to stand in the aisle wondering whether the wall will come back online before the next demo.

Most exhibit problems are manageable. The real damage happens when no one owns the fix in the moment.

Why cheaper options often cost more

The low-price version of an LED wall usually cuts support first. You may get the hardware, basic setup, and a phone number. What you don’t get is accountability at the booth during live show hours.

That’s a bad trade. A trade show isn’t a warehouse install. It is a live sales environment with fixed deadlines and no tolerance for downtime during traffic peaks.

White-glove service protects you from:

  • Last-minute install surprises: Booth plans and display plans need to align before freight arrives.
  • Content mismatches: Screen dimensions, resolution mapping, and playback formatting have to be checked early.
  • Live-show failures: If an issue appears during booth traffic, somebody needs to own the repair immediately.
  • Team distraction: Your marketers should greet buyers, not coordinate technicians.

We’d rather be judged on a complete operating model than a bare hardware quote. That’s the right way to buy LED for events.

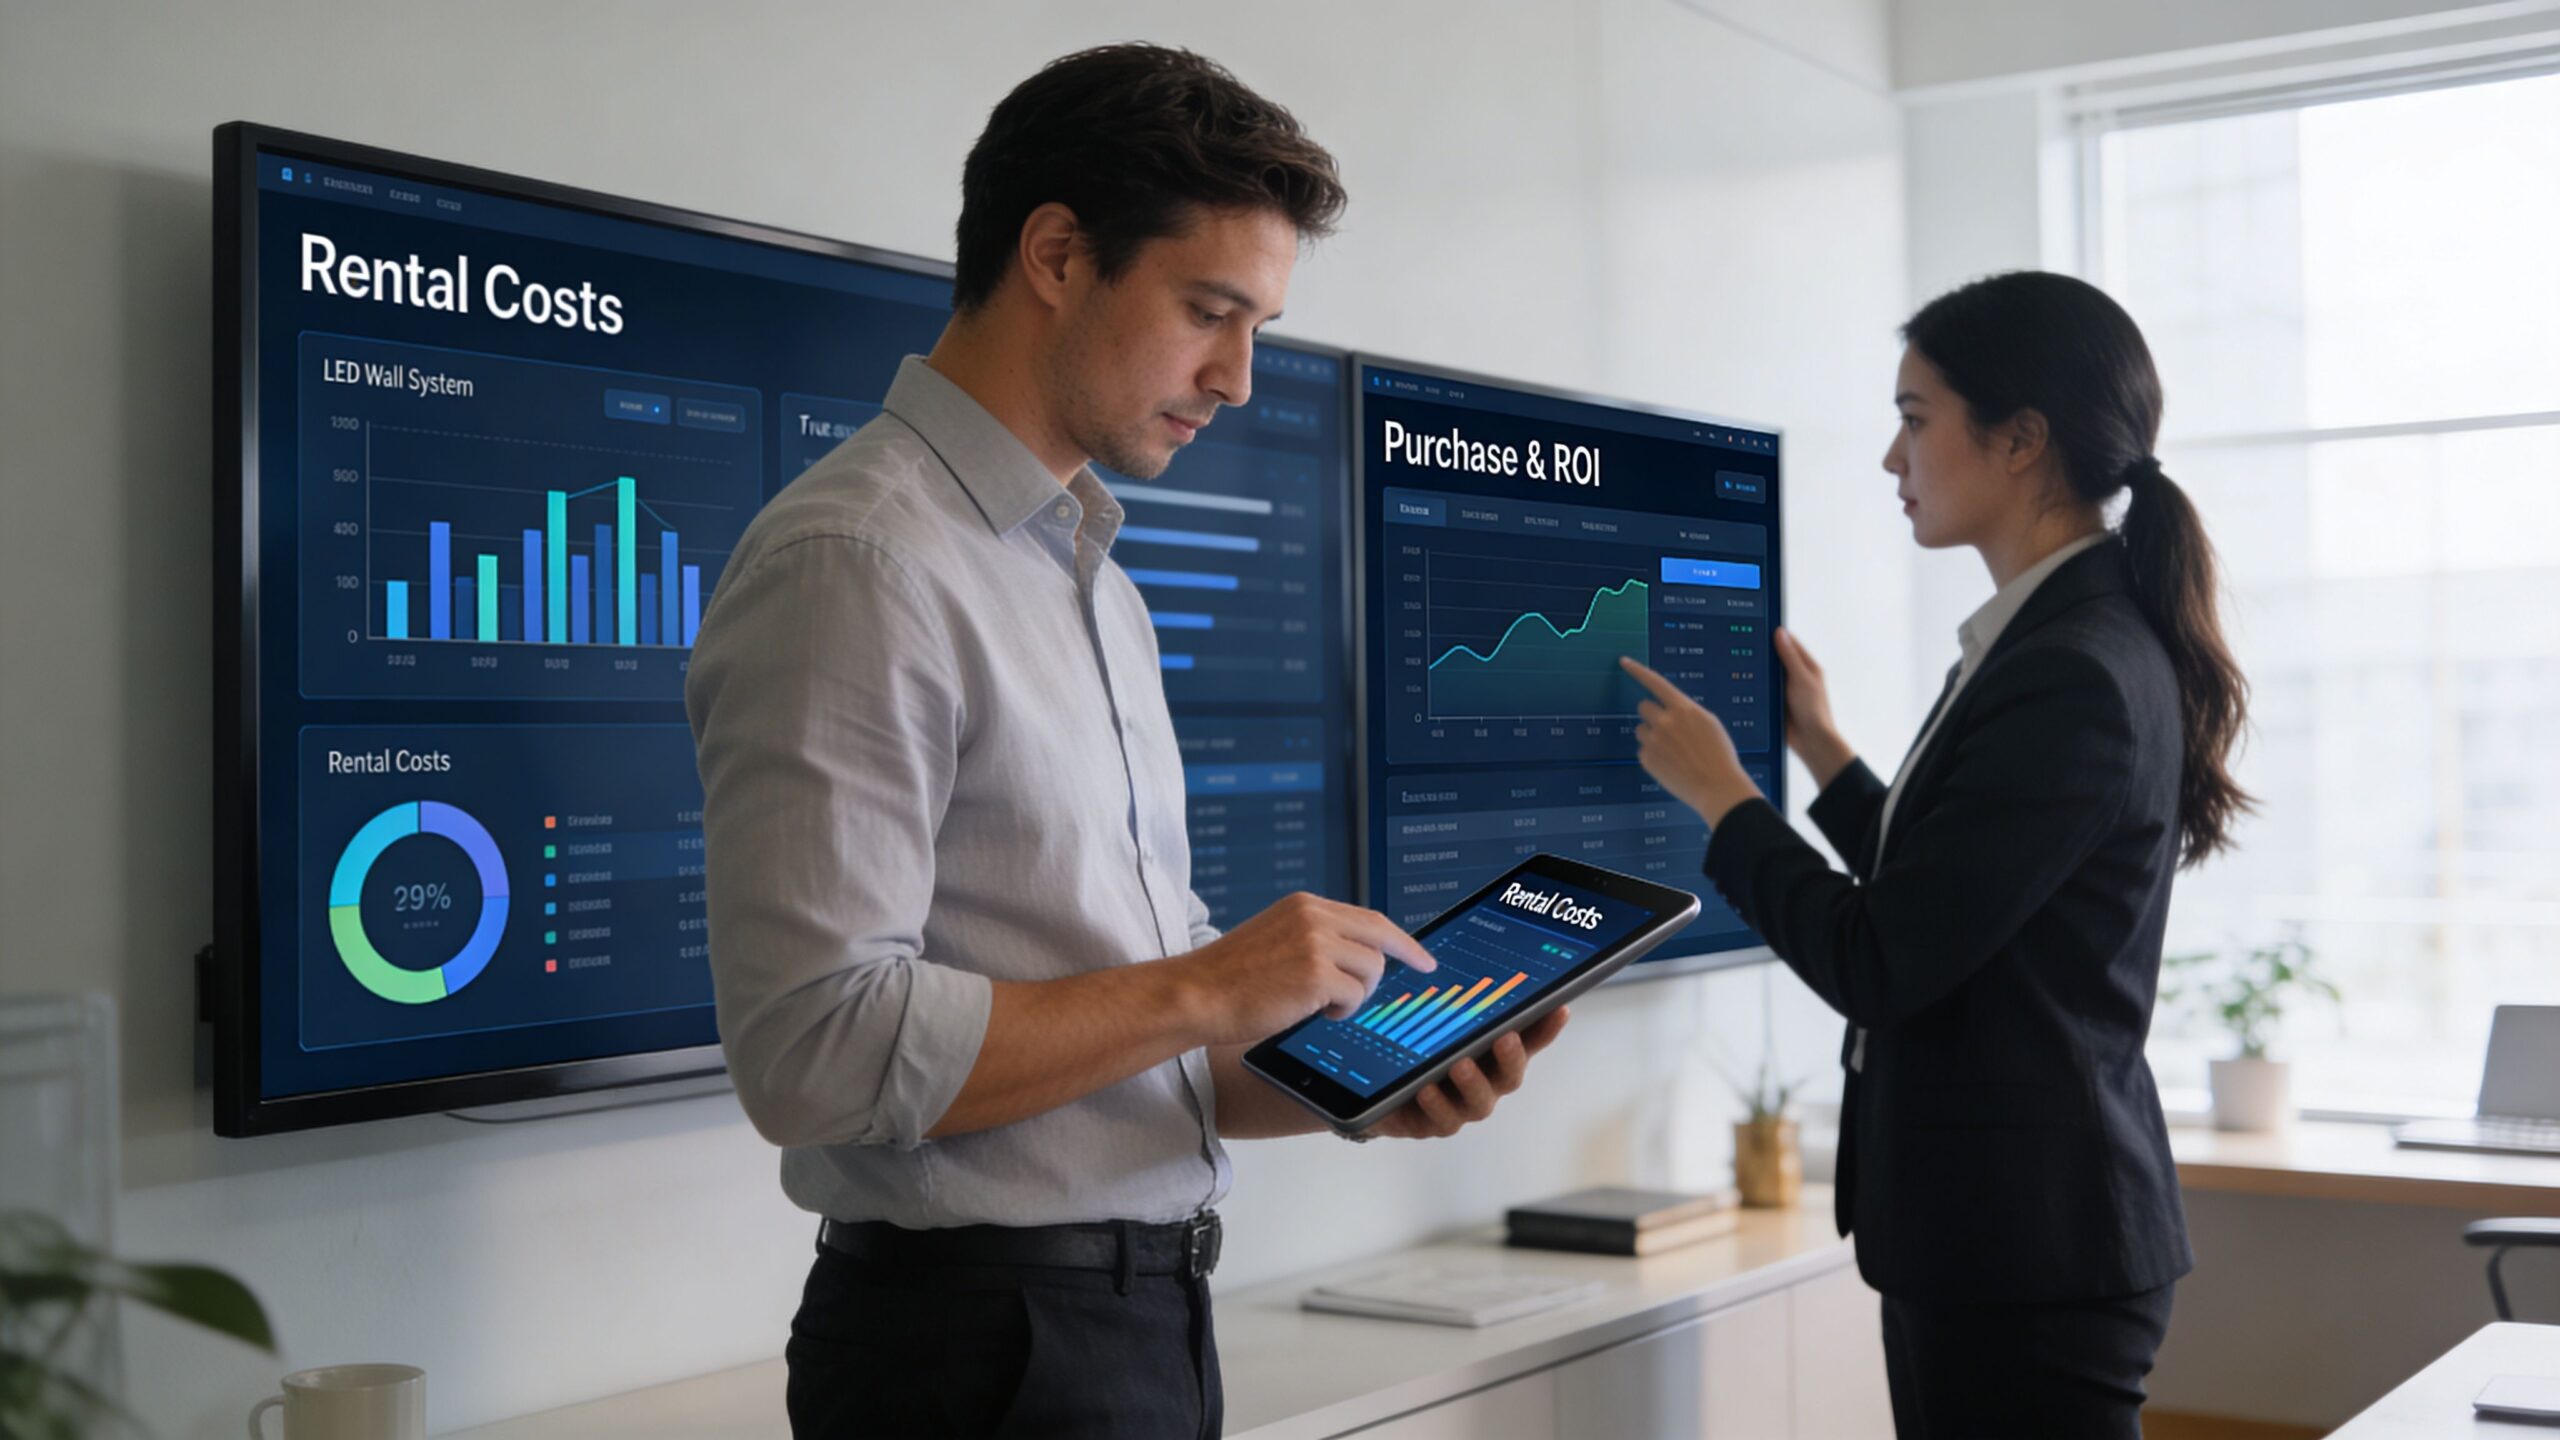
Rental vs Purchase Calculating the True Cost and ROI with LED Wall Panels

Most exhibitors should rent first. That’s our blunt advice.

If you exhibit occasionally, change booth sizes, or want flexibility across different shows, renting led wall panels is usually the smarter decision. You avoid storage, maintenance, refresh-cycle headaches, and internal technical ownership. You also keep the option to change configuration based on each event.

Buying makes sense when you exhibit frequently, use similar booth formats repeatedly, and have a clear plan for storage, transport, content management, and support. If you don’t have those pieces locked down, ownership can become a burden instead of an asset.

Two professionals analyze data on LED wall panels and a tablet in a modern office environment.

Rent when flexibility matters

Rental works well for launch campaigns, annual conferences, regional test programs, and brands that need different booth footprints over the year. It also fits teams that want a managed solution rather than becoming display operators.

The big advantage is operational simplicity. You get the visual impact without taking on long-term technical responsibility.

If you’re comparing options, use a transparent quote format and check what’s included. A useful starting point is to review video wall pricing for trade shows and compare that structure against competing proposals line by line.

Buy when repetition is predictable

Purchase is more defensible if your event calendar is stable and your booth architecture stays close to the same from show to show. In that case, the system can become part of your standard exhibit toolkit.

But don’t evaluate purchase on hardware alone. Include internal labor, logistics oversight, replacement planning, storage, and who supports the wall when something goes wrong at the venue. Many teams underestimate the management load.

ROI comes from outcomes, not just equipment cost

We look at ROI in three buckets.

First, brand perception. A sharper wall with P1.9 pitch presents content more cleanly than the common P2.5 competitor option mentioned earlier. That improves how polished your booth feels in close-range interactions.

Second, team productivity. If the booth runs smoothly and support is handled, your staff can focus on meetings, demos, and lead conversations.

Third, content visibility. Brightness has to match the hall. Indoor booths typically need 800 to 1,500 nits, while booths near windows or in brightly lit halls need 5,000+ nits to remain visible, and panels with adaptive brightness help maintain impact while avoiding sustained full-load operation, according to this overview of LED wall panel brightness and environmental use.

Don’t compare a managed rental to a bare panel quote. Compare complete outcomes against complete outcomes.

What to ask before approving either option

Use these questions in procurement conversations:

  • What’s included in the quoted price? If labor, integration, on-site support, or content handling sit outside the quote, your actual cost is higher than it appears.
  • Who owns show-site problem resolution? If that answer is vague, the risk falls on your team.
  • Is the pitch right for our audience distance? Cheap resolution compromises are easy to miss until the wall is already on the floor.
  • Does the system fit our booth environments? A panel that struggles in bright conditions undermines the whole investment.

The wrong LED wall isn’t just a visual downgrade. It’s a management problem waiting to happen.

Logistics and Content Tips for a Flawless Show

A strong LED booth is built long before install day. Most problems come from missed details in logistics or lazy content preparation, not from the display itself.

We handle the coordination work because it’s the part most exhibitors underestimate. Power requirements, load-in windows, rigging limitations, venue rules, freight timing, and floor conditions all affect how led wall panels get deployed. If nobody owns those details early, the booth becomes expensive improvisation.

Logistics details that matter

Before the show, we lock down the practical issues that can derail setup:

  • Power planning: The venue has to know what the system needs, and your order has to match the actual booth design.
  • Material handling expectations: Show-site handling affects timing and budget, so it needs to be accounted for early.
  • Install sequencing: The LED structure, graphics, lighting, and any product demo stations have to be installed in the right order.
  • Freight protection: Proper packing matters. If your team wants a useful outside perspective on transport protection, this guide to crating for shipping is worth reviewing.

Content that works on LED Wall Panels

Too many brands take desktop presentation content and push it onto a massive wall. That usually looks weak. LED content should be built for motion, distance, and fast comprehension.

Use these rules:

  1. Lead with motion, not paragraphs. Attendees should understand the category or message at a glance.
  2. Keep text minimal. Sales reps can explain. The wall should attract and reinforce.
  3. Use high-contrast visuals. Booth environments are busy, and subtle design often disappears.
  4. Build short loops. Repetition is fine if the sequence is clean and easy to enter at any point.
  5. Design for the structure. A curved wall, counter, or column needs custom framing and motion logic.

Good booth content doesn’t try to say everything. It gives your reps a stronger opening.

We also push teams to review content in the actual mapped canvas size before the event. A file that looks balanced on a laptop can feel cramped or empty on a large-format LED surface. That final pre-show review saves a lot of regret.

Exhibitor Questions About LED Wall Panels Answered

What if the wall fails during show hours

That depends on the service model you bought. This is exactly why we insist on on-site technical coverage for live events. If support lives somewhere off-site, your staff becomes the middle layer between the booth and the fix. That’s slow and avoidable.

Do we need special content for led wall panels

Usually, yes. You can repurpose existing assets, but they often need to be reformatted for the wall shape, viewing distance, and motion pacing. A good starting resource if you’re comparing approaches in a major event market is this Trade Show Booth LED Technology Las Vegas Guide, which helps frame the practical differences between booth LED applications.

Are LED wall panels only for large island booths

No. They work in smaller spaces too. The mistake is assuming LED only makes sense at massive scale. A compact booth can benefit a lot from one sharp visual surface if the content and structure are designed with discipline.

How much control do we have over messaging

A lot. That’s one of the biggest advantages. You can rotate loops, update product visuals, change messaging by audience, and tailor the content to the event goal. If you want a deeper look at common setup and planning concerns, review these LED video wall FAQs.

What’s the biggest buying mistake exhibitors make

They buy on panel price instead of show performance. The cheaper quote often excludes support, compromises resolution, or ignores the booth’s real lighting and traffic conditions. That’s how a “deal” turns into a distraction for your team.


If you’re planning a booth and want led wall panels that are handled end to end, talk with LED Exhibit Booths. We can help you evaluate the right pitch, configuration, service model, and show strategy so your booth works on the floor, not just in the rendering.

High-Impact Ideas for Booths That Stop Traffic

Ideas for booths usually start the same way. You book the space, look at the floor plan, and realize your brand is about to sit in a row of booths that all blend together. The result isn’t just disappointing. It costs conversations you should have had. Naturally, we have plenty of trade show booth examples.

The strongest ideas for booths don’t start with a table, a backdrop, and a logo placement exercise. They start with a question: what should someone feel, understand, and do in the first few seconds they see your space? Once you think that way, the booth stops being a container and becomes a working brand experience.

Your Guide to Unforgettable Trade Show Booth Ideas

Most exhibitors know the pain point. You spend on the show, ship materials, brief staff, and show up to a hall full of visual noise. Then attendees walk past because your booth looks like a dozen others nearby.

That reaction is predictable. 76% of trade show attendees say booth design influences their decision to visit a booth. Design isn’t decoration. It’s the first filter attendees use to decide where their time goes.

The practical implication is simple. If your concept can only live on printed panels, you’re limiting what the booth can do before the show even opens. The better approach is to treat the structure itself as media. A continuous LED wall can become the background, the product stage, the brand signal, and the directional system all at once.

What ideas for booths actually makes an exhibit memorable

A memorable booth does three jobs at the same time:

  • Stops traffic: It creates enough visual contrast to break the attendee’s autopilot.
  • Explains quickly: It communicates what you do without forcing people to read a wall of copy.
  • Supports sales conversations: It gives your team a setting that helps demos, qualification, and follow-up.

That matters even more when you’re planning a larger footprint. Booths sized 20×20 and above attract 2x more visitors than smaller ones in the same source above, which makes the quality of the experience inside that space even more important.

Practical rule: If a booth idea only looks good in a render and doesn’t help a real visitor understand your offer faster, it isn’t a strong idea.

The exhibitors who get the best results usually make one shift early. They don’t ask, “What graphics should go on the wall?” They ask, “What should the wall do?” That change leads to better concepts, clearer layouts, and stronger content.

The best LED-driven ideas for booths are built from the start around motion, scale, and flexibility. Curves, corners, counters, columns, and full-height surfaces can all become part of one visual system. That opens the door to booth ideas that static builds can’t execute cleanly.

Fresh Ideas for Booths Begin with the Right Canvas

A good booth concept doesn’t come from collecting random features. It comes from choosing the right canvas first. If the structure can only support flat printed graphics, your thinking gets boxed in. If the structure itself can display motion, depth, texture, and responsive content, your concept options expand immediately.

ideas for booths

The most useful way to generate ideas for booths is to work from concept models, not decorations. That keeps the idea tied to visitor behavior instead of surface-level styling.

The immersive environment

This model turns the booth into a place, not just a display. A cybersecurity company can surround visitors with animated threat maps and system visuals. A manufacturing brand can simulate a factory line or place attendees inside the product workflow. A wellness company can create a calm, low-noise atmosphere that feels different from the aisle outside.

This works because the LED wall isn’t acting like a television bolted onto a booth. It becomes architecture. Curved walls, entry portals, and digital backdrops all support the same story.

For teams refining the look and feel, it helps to review core visual branding principles before content production begins. Strong visual systems matter more on a large LED surface because inconsistency becomes obvious fast.

The interactive digital playground

Some brands need attendees to do something, not just watch. That’s where an interactive concept works well. Visitors can trigger product reveals, explore use cases, scan QR codes tied to zones, or activate on-screen comparisons through touchpoints or guided demos.

The mistake here is making interactivity feel like a gimmick. If the interaction doesn’t reinforce the product story, it creates crowd noise without sales value. The best version is simple. One action, one payoff, one clear reason to engage.

A lightweight modular wall helps because you can build the interaction into the shape of the space. A counter can become a demo station. A column can become a product selector. A side wall can become a live comparison surface.

The dynamic storytelling stage

Some products need a narrative arc. A startup launching a new platform may need to explain the problem, show the workflow, then prove the result. That sequence is hard to communicate with static signage alone.

A storytelling stage lets the booth run in chapters:

  1. Problem frame: show the friction your buyer already recognizes.
  2. Product in action: move into feature demonstration and use-case visuals.
  3. Proof and next step: give staff a natural point to start the conversation.

This concept works especially well when the booth has one dominant visual anchor and a clean entry path. Teams that want a compact option can look at modular pop up walls for trade shows as a starting point for scaling this idea into smaller footprints.

A booth concept gets stronger when the structure, content, and staffing plan all support the same behavior.

Design a Visitor Journey Not Just Random Ideas for Booths

Many booth ideas fail for a simple reason. They look exciting in elevation, but they don’t work at floor level. Attendees don’t experience your booth as a rendering. They experience it while walking fast, scanning side to side, and deciding in seconds whether to step in or keep moving.

The fix is to design a journey, not just a footprint.

ideas for booths

Research on trade show ROI points to a recurring gap: exhibitors often struggle to connect booth aesthetics to measurable outcomes. At the same time, friction-free layouts can boost qualified interactions by up to 40% when the space guides visitors through a planned journey instead of leaving them to wander.

Attraction zone

The outer edge of the booth has one job. It has to signal relevance from the aisle. LED surfaces are invaluable for this purpose. Motion, contrast, and scale help people understand what your company is about before they commit to entering.

Keep this zone open. Don’t choke the front line with furniture, storage, or staff huddles. The perimeter should invite movement inward.

A useful planning discipline comes from retail and interior design thinking. If you want a strong framework for circulation and functional zoning, mastering interior space planning with AI offers a helpful way to think about movement through a space.

Engagement zone

Once someone stops, the booth has to reward that pause. This is the area for product demos, touchpoints, featured content loops, and short interactions. It should feel obvious where to stand and what to look at.

The common mistake is overcrowding this area with too many messages. A tighter plan works better:

  • One focal demo: Give visitors a clear center of gravity.
  • One secondary support element: Add detail without stealing attention.
  • One easy next step: Scan, watch, touch, or talk.

If you’re mapping options for different footprints, these trade show booth layout examples are useful for thinking through inline spaces, corners, and larger islands.

Conversation zone

Not every prospect should be handled in the aisle. Once interest is established, people need a place where the conversation can deepen without blocking traffic. This can be a side counter, a partially enclosed nook, or a quieter edge of the booth.

Keep your highest-value conversations one step away from the aisle, not buried at the back.

That placement matters. Too exposed, and serious prospects won’t linger. Too hidden, and staff won’t transition people there naturally. The best conversation zones feel like a continuation of the experience, not an afterthought added with a café table.

Create Unforgettable Content for Seamless LED Walls

A premium LED booth can still underperform if the content is weak. Hardware gets attention. Content earns the conversation. If the wall shows generic stock video, overloaded slides, or low-resolution graphics, the booth loses credibility fast.

Resolution matters here. Our pitch is 1.9, while many competitors sit at 2.5, which means the wall presents a sharper image at closer viewing distances. In practice, that means clearer text, cleaner product renders, and a more polished look for motion graphics on the show floor.

ideas for booths

Use three content layers

The strongest ideas for booths separate content by job, not by department. That prevents the wall from turning into a dumping ground for every brand asset.

Here are the three layers that work best:

  • Ambient content: This sets the visual mood. It can be subtle motion, environmental visuals, branded textures, or slow product atmosphere.
  • Attraction loops: These are short sequences designed to catch the eye and explain the offer quickly.
  • Interactive or staff-led content: This supports real conversations, demos, and specific walkthroughs.

The attraction loop is where many brands either win or lose. It needs to communicate one message fast. If someone has to watch too long to understand what’s happening, the content is too slow or too abstract.

Design for the distance people actually stand

Trade show content has to work at multiple distances. Someone across the aisle sees shape, color, and motion first. Someone near the wall sees typography, detail, and product proof. Your creative has to hold up at both ranges.

That is one reason digital execution keeps replacing static materials. 36% of exhibitors are ditching printed materials for digital, and the same source notes that consistent branding boosts recall by 80%. Uniform surfaces support that consistency far better than a patchwork of standees, monitors, and printed panels.

If your team needs a basic refresher on display quality, this guide on how to optimize your video resolution is worth reviewing before final export decisions.

What works and what doesn’t in ideas for booths

Take a look at what works:

  • Bold hierarchy: One main message visible from a distance.
  • Motion with restraint: Enough movement to attract attention, not so much that the booth feels chaotic.
  • Readable typography: Short lines, strong contrast, generous sizing.
  • Content built for the structure: Curved walls, counters, and tall surfaces each need different creative treatment.

Now let’s see what doesn’t work:

  • Presentation decks on loop: Slides made for conference rooms rarely work on an expo floor.
  • Tiny product labels: If people need to stand still and squint, the design failed.
  • Unrelated videos: Visual noise may attract a glance, but it won’t support the sales team.
  • Last-minute exports: LED content needs testing, scaling, and calibration.

A large-format video display wall for trade shows works best when the creative team designs with the physical structure in mind from day one.

Good booth content doesn’t just look impressive. It tells your staff exactly where to start the conversation.

Understand the True Cost and ROI of Ideas for Booths

A lot of exhibitors compare booth options the wrong way. They line up rental prices, circle the lowest number, and assume they’re making a disciplined decision. Then the hidden costs show up. Labor changes. Drayage grows. Setup gets more complicated. Vendors start pointing at one another when something breaks.

That’s why a booth should be evaluated as an operating system, not a line item.

A conceptual trade show booth display featuring charts and graphs detailing cost and ROI projections.

There is a real gap in the market here. Budget-to-impact ratios are rarely explained clearly, and exhibitors often don’t get a full picture of trade-offs before they commit. One useful framing is this: a well-integrated LED system with magnetic assembly can reduce hidden costs like drayage and labor hours, which is why a transparent cost-benefit view matters when comparing it with traditional modular systems, as discussed in this analysis of trade show booth cost trade-offs.

Compare total burden, not quoted price

When evaluating booth ideas, ask better questions:

  • What is included: Shipping, install, dismantle, content support, show services coordination, and on-site help all matter.
  • What is billed separately by the show: Electricity and material handling are common direct show charges.
  • What risk sits on your team: If something goes wrong during show hours, who fixes it and how fast?

Here, white-glove service changes the math. A turnkey model removes operational drag from your marketing team. Instead of coordinating fabricators, labor, AV, and last-minute troubleshooting across multiple vendors, one team handles the build, logistics, setup, and support.

The hidden cost of stress

Exhibitors often underestimate the cost of uncertainty. If your screen glitches, a connector fails, or content doesn’t display correctly, your team shouldn’t be hunting down a technician while qualified prospects are standing in front of the booth.

A better setup leaves an audiovisual technician onsite for the full time the show is open. If anything needs attention, your team texts or calls and an AV technician is at the booth quickly to resolve it. That isn’t a luxury feature. It’s operational insurance.

The cheapest quote can become the most expensive booth once labor, delays, and downtime enter the picture.

The other practical advantage is pricing clarity. A strong turnkey quote includes everything except the bills the show charges directly, such as electricity and material handling. That makes budgeting more honest because your team isn’t trying to decode a low initial price wrapped around a pile of later add-ons.

For a more realistic planning view, these trade show booth cost considerations are a good reference when you’re comparing concepts, footprints, and service models.

Proven Ideas Booth Ideas for Every Space from 10×10 to Islands

The best booth concepts scale. A startup in a small inline space still needs presence. A mid-size exhibitor needs a stronger story. An enterprise island needs multiple engagement modes without turning into chaos.

Below is a practical set of starting templates that show how ideas for booths can work across common footprints.

Three examples that translate to real shows

A startup in a 10×10 usually needs focus more than variety. One clean LED backdrop, one key message, one short demo loop, and one staff-led interaction can outperform a cluttered setup. In a small space, discipline is the differentiator.

A mid-size brand in a 10×20 has room to sequence the experience. One side can handle attention-grabbing motion content while the other supports guided demos or scans. That extra depth gives the team a chance to qualify visitors without stalling the front aisle.

An enterprise exhibitor in a 20×20 island can treat the booth like a full environment. That’s where curved counters, multiple sightlines, and zoned storytelling become powerful. In one example, a client’s interactive LED wall in a 20×20 island booth achieved 50% higher visitor engagement than its previous static display, and heatmaps showed that a central curved video counter increased product demo requests by 35%, as shared in this review of trade show booth engagement design.

LED Video Wall Booth Idea Templates

Booth Size Concept Idea Primary Goal Sample Layout & Content
10×10 The Product Portal Lead capture with fast qualification Full back wall LED canvas, short attraction loop, narrow front counter, one staff demo point, QR follow-up
10×20 The Brand Journey Balanced awareness and conversations LED hero wall at rear, side engagement station, open center path, rotating chapter-based content, semi-private discussion edge
20×20 island The Interactive Stage Deep demos and multi-person engagement Central curved video counter, perimeter attraction content, multiple entry points, zoned staff positions, story-driven content by side

For smaller exhibitors exploring compact concepts, these 10 x 10 booth layout ideas are a useful benchmark for building presence without overcrowding the space.

The point isn’t to copy a template exactly. It’s to start with a concept that fits your footprint, your sales motion, and the way attendees move through the hall.


If you want booth ideas that are built around continuous LED walls from the start, LED Exhibit Booths can help you move from concept to execution without the usual trade show chaos. We handle the booth as a true turnkey system, including design guidance, logistics, setup, dismantle, and white-glove support, with only direct show bills like electricity and material handling left outside the price. We also keep an AV technician onsite while the show is open, so your team can focus on customers instead of troubleshooting.

Furniture for Trade Shows: Expert Booth Design

Furniture for trade shows usually become urgent the week before a show, when someone realizes the rental stools don’t match the brand, the reception counter has nowhere to hide chargers, and the product pedestal blocks the screen everyone paid to showcase. That’s when furniture stops being a line item and starts affecting traffic, conversations, and credibility.

We see the same pattern across exhibit programs. Teams spend months on graphics, demos, and sales prep, then treat the booth’s physical environment like a checklist. The result is a booth that functions against them. Visitors hesitate at the edge, staff have no clean place to meet, and cables, bags, and literature end up visible from the aisle.

Good furniture for trade shows fixes that. It gives visitors a reason to step in, supports the kind of conversation you want to have, and makes your space feel intentional instead of improvised. That matters in a category where visual sameness is common and buyers move fast.

Beyond Chairs and Tables Why Your Furniture for Trade Shows Strategy Matters

A familiar scene plays out on setup day. The booth looks strong on the rendering, but the actual furniture arrives as a pile of compromises. A heavy laminate counter eats up the front corner. Two lounge chairs sit too deep in the footprint and create a dead zone. The storage cabinet lands where a product demo should happen. By opening morning, the team has a booth, but not a working environment.

That’s the mistake. Furniture for trade shows isn’t only about giving people a place to sit. It shapes movement, frames conversations, holds product, hides clutter, and signals what kind of company you are before anyone says a word.

The broader market tells the same story. The global furniture market reached USD 786.13 billion in 2025 and is expected to grow to USD 1,334.08 billion by 2033, according to VIFA ASEAN’s overview of major furniture fairs. At the event level, that pressure to stand out gets even sharper. The same source notes that High Point Market draws over 75,000 visitors, which means exhibitors compete in an environment where small design decisions have outsized consequences.

What furniture actually does on the show floor

The right furniture changes booth behavior in practical ways:

  • Guides entry: Low-profile front pieces invite people in. Bulky front pieces stop them at the aisle.
  • Supports selling: A standing-height counter works for quick qualification. Lounge seating supports longer discussions.
  • Improves product focus: Pedestals, shelves, and demo surfaces tell attendees where to look first.
  • Protects brand perception: Worn rentals, mismatched finishes, and exposed clutter make a premium brand look unprepared.

Furniture should solve a booth problem. If a piece doesn’t improve flow, comfort, storage, or storytelling, it’s decoration.

That’s why we recommend planning furniture at the same time as graphics, demos, and staffing. If you’re already reviewing general trade show trends for 2026, add furniture strategy to that same planning conversation rather than leaving it to an event decorator at the end.

Why furniture and displays have to work together

One of the fastest ways to weaken a booth is to separate furniture planning from product presentation. Teams choose a beautiful table set, then realize it blocks the hero message or competes with the main display. That’s especially common when the booth includes product showcases or freestanding display elements.

If your booth needs to merchandise physical samples, prototypes, or packaged goods, the furniture should support that objective, not compete with it. A smart starting point is to map furniture around the display system itself, especially if you’re using display stands for products as a core part of the visitor journey.

Choosing the Right Types of Furniture for Trade Shows

Not all furniture for trade shows plays the same role. The mistake isn’t choosing the wrong style first. It’s choosing pieces before deciding how the booth needs to function. Start with the job each area must do, then select the furniture category that supports it.

Seating that sets the tone

Seating changes the pace of interaction more than most exhibitors expect.

Lounge chairs tell visitors it’s acceptable to stay. They work well for consultative selling, partnership conversations, and booths where the goal is depth over volume. The downside is footprint. Oversized lounge seating can consume valuable square footage and make a compact booth feel full before anyone walks in.

Bar stools create a more active posture. They’re useful when you want short, efficient conversations and a clean visual line across the booth. They also pair well with charging counters or standing demo stations.

Task seating belongs behind workstations, kiosks, and consult desks. It’s practical, but it rarely adds much to the brand unless the workstation itself is central to the experience.

A simple rule helps here:

  • Use lounge seating when privacy and longer dwell matter
  • Use stools when throughput matters
  • Use task chairs only where a specific function requires them

Counters and reception points

The reception counter is often the most overloaded furniture choice in the booth. Teams expect it to greet visitors, hide personal items, hold giveaways, support lead capture, and sometimes serve as a demo point too. That can work, but only if it’s sized and positioned correctly.

A strong counter should do three things well:

  1. Face the aisle clearly
  2. Provide concealed storage
  3. Leave room for staff to engage without creating a wall

Counters fail when they become barriers. If visitors have to lean over a large block to talk to your team, the booth starts to feel transactional. If your team needs tablets or interactive content at the front of the booth, integrated surfaces like touch screen tables can handle that role more effectively than a standard podium.

Demo stations and product surfaces

Demo surfaces need stability, visibility, and wiring logic. That sounds basic, but it’s where many booths break down. A beautiful table without cable planning becomes a visible tangle. A small pedestal may look elegant, but it can fail if staff need room for samples, literature, or a monitor.

Use different surface types based on the interaction:

Booth need Best furniture type Common mistake
Quick product handling Standing demo counter Making it too deep
Detailed consultation Seated meeting table Using a low coffee table for paperwork
Premium sample display Clean pedestal or shelf Mixing too many heights
Self-guided exploration Interactive station No nearby storage for resets

Storage that protects the front-of-house experience

Storage is usually the least glamorous decision and one of the most important. If there’s no lockable place for bags, literature overstock, chargers, cleaning kits, and staff water bottles, those items drift into sight by mid-morning.

Practical rule: If you can see staff supplies from the aisle, you don’t have enough storage.

For small footprints, hidden storage inside counters often works best. Larger spaces can justify a back-wall closet or enclosed cabinet zone. What matters is keeping operational materials out of the selling area.

Materials and finishes

Material choice communicates more than exhibitors think. Matte laminates tend to feel cleaner than shiny budget finishes under show lighting. Upholstery can soften a tech-heavy booth, but only if the color palette is disciplined. Wood looks warm, but lower-grade woodgrain prints can make the booth feel temporary.

Use finishes to support your brand, not to chase trends. If your message is precision, choose sharp lines and restrained palettes. If your category is hospitality or residential design, softer textures may make sense. Either way, consistency matters more than novelty.

How to Integrate Furniture for Trade Shows with High-Impact LED Booths

Most furniture for trade shows is still planned as if the booth graphics and the booth structure are separate things. That old model creates friction. The screen becomes one element, the counter becomes another, and the visitor experiences them as disconnected parts. The booth may contain technology, but it doesn’t feel integrated.

That gap shows up in practical ways. Furniture interrupts sightlines. Counters block content. Cables distract from the visual story. The result is a booth that asks visitors to process too many unrelated signals at once.

furniture for trade shows

Why static furniture often weakens a digital booth

According to Novo Studio Events’ discussion of trade show furniture trends, most guidance around furniture for trade shows overlooks integration with immersive LED video walls. That same source notes a major gap in how furniture should be positioned to enhance video flow, and it reports that dynamic furniture-embedded LED counters boosted visitor dwell time by 35% based on client analytics from Q1 through Q4 of 2025.

That finding aligns with what we see in real booth planning. A booth performs better when the furniture is part of the visual system rather than sitting in front of it as an obstacle.

What integrated furniture looks like in practice

Integrated design usually works best in a few common forms:

  • Reception counters beneath active LED surfaces: The counter handles check-in or lead capture while the wall above carries motion content, messaging, or product visuals.
  • Low-profile demo counters under LED arches: This keeps the visual field open and lets the digital content frame the conversation.
  • Embedded charging or interaction points: Visitors engage with the furniture while the surrounding content reinforces the message.

A strong example is using a video display wall as the architectural backdrop, then selecting furniture heights and placements that preserve continuous visual flow instead of slicing it into disconnected layers.

Resolution matters when the booth itself becomes the screen

If your booth uses LED as structure, pixel pitch matters because visitors stand close. Our standard pitch is 1.9, while many competitors offer 2.5. That means our video walls deliver higher resolution and a cleaner image at close viewing distances, which matters for product visuals, typography, motion graphics, and branded environments where people are only a few steps away.

That isn’t just a spec-sheet point. It affects whether text looks crisp, whether gradients look smooth, and whether your booth reads as premium or improvised.

The closer attendees get to your booth, the less forgiving low-resolution LED becomes.

Integration also changes the operational side

This approach isn’t only about aesthetics. It solves practical booth problems. When furniture and LED are planned together, cable pathways are cleaner, the layout is easier to stage, and setup tends to be more controlled because each piece has a defined role inside the system.

We also build around a white-glove, turnkey model. Our pricing includes everything except the charges the show bills exhibitors directly, such as electricity and material handling. That clarity matters because exhibitors often compare booth quotes without realizing how many services are excluded elsewhere. We also keep an audiovisual technician onsite the entire time the show is open, so if a content or hardware issue appears, help is immediately available.

Strategic Layouts in Furniture for Trade Shows and Compliance Rules

The layout usually breaks before the furniture does. A booth can be furnished well and still underperform if people hesitate at the edge, staff block the entry, or a tall piece violates show rules and has to be moved on site.

furniture for trade shows

In LED booths, layout discipline matters even more. The screen draws attention fast, but furniture determines whether that attention turns into a conversation, a demo, or a bottleneck. I recommend planning the path first, then assigning furniture to support that path. Lounge seating, counters, charging tables, and storage should reinforce the visitor journey, not compete with the video wall for space or sightlines.

Start with traffic flow, then place furniture

Visitors should understand the booth in seconds. Where do they step in? Where do they pause? Where does a short conversation happen without blocking the aisle?

Those answers shape the furniture plan.

A practical layout usually follows a few rules:

  • Keep the front edge open: Low-profile pieces at the aisle invite entry and let staff greet visitors without talking over furniture.
  • Establish one main interaction zone: Put the primary demo, reception point, or product conversation area where attendees can see it immediately.
  • Push support functions out of the way: Storage, literature backups, charging accessories, and staff bags belong behind the active zone, not beside the entry.
  • Protect LED sightlines: Don’t place tall stools, shelving, or high-back seating where they cut into the screen’s visibility from the aisle.

That last point gets missed in traditional furniture guides. In a modern booth, the LED wall often carries your motion graphics, product visuals, and brand message. Furniture has to frame that content, not interrupt it.

Show rules shape furniture for trade shows layout more than exhibitors expect

Every venue and organizer publishes an exhibitor manual, and the details matter. Linear booths often have strict height limits and line-of-sight restrictions so neighboring exhibitors keep visibility into the aisle. Instructables’ guide to booth furniture compliance summarizes a common standard: rear height in a linear booth is typically limited to 8 feet, with lower height restrictions closer to the aisle.

That affects more than walls and signs. Tall shelving, decorative towers, oversized reception counters, and stacked product displays can all create compliance problems if they sit in the wrong zone. I have also seen exhibitors create a furniture issue accidentally by adding a branded backdrop behind a counter without checking how that element fits the footprint rules.

Review the official show manual before approving any piece that adds height, depth, or concealed storage. It is also smart to confirm freight timing and floor handling early, especially for heavier lounge pieces or integrated counters. This guide to trade show shipping and material handling planning helps teams avoid layout decisions that look fine in a render but create problems at move-in.

Accessibility has to survive the real booth, not just the rendering

Accessibility issues often show up after the final styling pass. A layout can appear open in a design file, then tighten up once sample cases, literature holders, bar stools, and attendee traffic enter the picture.

The ADA Standards for Accessible Design from the U.S. Department of Justice are the right reference point for clearance and accessible route requirements. For trade show furniture planning, the practical takeaway is straightforward. Maintain a clear route through the booth, leave enough turning and passing space near seating and counters, and avoid creating narrow pinch points at corners or entry points.

Use this check before signoff:

Layout question What to confirm
Seating area Guests can enter, sit, and exit without moving chairs into the main path
Demo zone Viewers can gather without blocking the accessible route
Counter placement Staff interaction stays inside the booth footprint
Product displays Corners and side walls do not create tight turns or dead ends

Common mistakes that hurt performance

The mistakes are rarely dramatic. They are small planning decisions that add friction all day.

  1. Furniture loads the front of the booth: Attendees read the space as occupied before they enter.
  2. Meeting seating sits too far back: Staff miss early engagement opportunities and qualified visitors drift away.
  3. The booth has no working space: Samples, personal items, and literature end up visible because there is nowhere to reset.
  4. Furniture ignores the LED program: A chair cluster or counter blocks the screen, weakens content visibility, and shrinks the visual impact you paid for.

Good layout work is operational as much as visual. It improves traffic flow, keeps the booth compliant, and protects the investment in both furniture and LED structure. That is also part of the total cost of ownership. A cheaper furniture plan that causes rework, on-site changes, or poor traffic conversion usually costs more by the end of the show.

Renting vs Purchasing A Financial and Logistical Breakdown

The rent-versus-buy decision usually gets framed as budget only. That’s too narrow. The better question is how often you exhibit, how consistent your booth program is, and how much control you need over the final environment.

furniture for trade shows

According to Interactive Party’s summary of ExhibitorLIVE trade show trends, 10’x10’ and 10’x20’ booths each account for 28.3% of setups, which is one reason many exhibitors choose rental flexibility. That same source notes that 46% of companies manage 21 or more shows yearly, and for those exhibitors, purchasing can make more long-term financial sense.

When renting furniture for trade shows makes more sense

Renting is usually the better fit when your program changes often. That includes companies testing new markets, rotating booth sizes, or attending a small number of shows where storage and maintenance would add unnecessary complexity.

Renting also works when:

  • You need flexibility: Different venues require different footprints.
  • Your brand is evolving: You don’t want hard assets locking you into last year’s look.
  • Your team is lean: You’d rather outsource warehousing, refurbishment, and replacement.

The tradeoff is limited control. Rental catalogs can solve a need, but they don’t always create a distinctive environment. Availability can also become an issue close to major shows.

When purchasing earns its place

Purchasing becomes more attractive when the same core footprint appears across many events and the brand benefits from repeatable execution. You control the finishes, the fit, and how the furniture works with the rest of the exhibit system.

This matters even more for integrated environments. If your booth relies on repeated demo choreography, branded interaction points, or a consistent LED-driven presentation, ownership can make operations smoother from show to show. A useful comparison point is this guide on owning vs renting an LED video wall, which mirrors the same logic exhibitors should apply to furniture and structural components.

Side-by-side decision criteria

Factor Renting Purchasing
Upfront cost Lower Higher
Flexibility Strong Moderate
Brand consistency Variable Strong
Storage needs Minimal Ongoing
Long-term control Limited High
Best fit Occasional or changing programs Frequent, repeatable programs

A short visual can help teams align on that decision before they commit to a program-wide model.

The practical middle ground

Many exhibitors do best with a hybrid approach. They purchase the pieces that define the brand and rent the items that depend on venue size, campaign changes, or local show requirements. That’s often the smartest path for firms that want consistency without carrying unnecessary assets.

Buy what repeats. Rent what changes.

That approach keeps the booth disciplined while preserving room to adapt.

Budgeting for the Hidden Costs of Trade Show Furniture

At budget review, the furniture line often looks straightforward. Then the actual numbers surface. Freight is higher than expected, union labor takes longer than planned, the lounge chairs block a cable path to the LED wall, and a last-minute floor adjustment turns a low-cost order into an expensive one.

That gap between quote and actual spend is why experienced exhibitors budget furniture by total cost of ownership, not purchase price alone. A lower-priced piece can cost more over the life of the program if it ships poorly, needs extra setup time, creates access problems, or does not integrate cleanly with the booth structure and media system.

The hidden costs usually show up in four places.

Material handling increases with weight, bulk, and inefficient packing. Furniture that looks compact in a catalog can still take up expensive floor-to-freight volume once it is padded, crated, and routed through the venue.

Installation and dismantle labor rises when pieces need tools, field assembly, alignment with counters or shelving, or careful placement around LED walls and powered demo stations. In a modern booth, furniture is rarely standalone. It has to work around screens, sightlines, power drops, and presenter movement.

Onsite corrections are expensive because they happen under time pressure. If a bench blocks a storage door, a table sits too close to an LED corner, or seating interrupts a traffic lane, the fix happens on show-floor labor rates.

Downtime risk is easy to miss on a spreadsheet. In LED-driven exhibits, the furniture plan can either support the content experience or interfere with it. A badly placed seating group can weaken viewing angles. The wrong table height can expose cables, force awkward demo posture, or create glare and reflections that make the media wall work harder than it should.

What an honest budget should include

A realistic furniture budget covers more than the order itself. It should answer questions like these:

  • How many labor hours will setup and teardown take
  • How the furniture packs, ships, and protects finished surfaces
  • Whether power access, cable routing, or AV integration affects placement
  • What storage, drape, or back-of-house functions the furniture replaces or creates
  • What contingency cost applies if a piece arrives damaged or does not fit the final floor plan

Shipping decisions belong in that conversation early. Teams that want a clearer picture of freight, timing, and show-site handling should review this guide on shipping trade show materials before approving final furniture counts.

Where turnkey service changes the math

Proposals often look comparable until the show invoice arrives. One vendor includes delivery but not setup. Another includes furniture but not the labor to integrate it with the exhibit. A third quotes the booth without accounting for the AV support needed when furniture and LED presentation zones share the same footprint.

We price projects differently. We include everything in our quote except venue-billed items such as electricity and material handling. That gives clients a cleaner budget and fewer late additions.

It also matters during the show. Our team handles the booth as one system, not as separate furniture, structure, and screen packages managed by different parties. That reduces coordination errors and protects the exhibit experience your visitors see.

We also provide white-glove, turnkey service. Your team can stay focused on meetings, demos, and lead capture while we handle setup issues. During show hours, an audiovisual technician remains onsite the entire time. If something goes wrong, you call or text, and an AV technician is at the booth within minutes to fix it.

A Procurement Checklist for Flawless Execution

Furniture for trade shows goes wrong when decisions are made in isolation. Marketing chooses the look. Operations worries about shipping later. Sales asks for more meeting space after the layout is approved. The cleanest exhibits come from a procurement process that forces those decisions into one shared plan.

A tablet displaying a trade show furniture procurement checklist next to fabric samples, a pen, and furniture miniatures.

Pre-approval checks

Before ordering anything, confirm the following:

  • Booth objective: Decide whether the priority is lead capture, demos, meetings, product display, or a mix.
  • Interaction style: Match furniture to the type of conversation you want staff to have.
  • Brand fit: Review finish samples under show-style lighting, not just office lighting.
  • Layout fit: Confirm every piece on the scaled floor plan, not a mood board.

Compliance and logistics checks

These checks save the most pain later:

  1. Confirm ADA clearance on the final layout
  2. Review height restrictions for the exact booth type
  3. Get material handling implications before signoff
  4. Verify concealed storage for staff and operational items
  5. Map power and cable paths before selecting demo furniture

If your team is evaluating assembly complexity, it can help to understand the role of movers in disassembling and reassembling furniture. The same operational logic applies on the trade show floor. Every extra assembly step introduces time, cost, and failure points.

Final show-readiness checklist

Use this as the last review before freight leaves:

  • Sales-team test: Have staff walk the layout and simulate greeting, demoing, sitting, and resetting.
  • Storage test: Place actual giveaway volume, chargers, literature, and cleaning supplies into the storage plan.
  • Content sync: If furniture integrates with digital surfaces, schedule final content review before move-in.
  • Damage plan: Identify who handles repair, replacement, or technical support during show hours.
  • Post-show decision: Decide in advance what gets stored, refurbished, rented again, or replaced.

A booth feels effortless to visitors only when the planning was disciplined behind the scenes.

The strongest furniture choices don’t call attention to themselves. They make the booth work better, the staff more effective, and the brand easier to trust.


If you want a booth where furniture, structure, and content work as one system, LED Exhibit Booths can help. We build turnkey LED trade show environments with higher-resolution 1.9 pitch video walls, integrated counters and display elements, white-glove support, transparent pricing that includes everything except show-billed services like electricity and material handling, and an onsite AV technician available throughout show hours so your team can stay focused on customers.

Vertical Banner Stand: A Guide to Upgrading Your Booth

Vertical banner stand decisions usually start the same way. You’re booking booth space, the deadline is close, and someone says, “Let’s just get a couple of banners and keep it simple.” That instinct makes sense. A vertical banner stand is familiar, portable, and easy to fit into almost any exhibit plan.

The problem is that “good enough” doesn’t perform the way it used to. Trade show floors are louder, brighter, and more crowded than they were even a few years ago. If your display looks like everyone else’s, attendees treat it like background.

Most exhibitors don’t need a lecture on what a banner stand is. They need honest advice on whether it’s still the right tool. Sometimes it is. Often, it’s just the baseline. If you’re still weighing lightweight printed graphics against more immersive options like a pop up display for trade show booths, the essential question isn’t convenience. It’s impact.

Introduction The Familiar Choice in a Changing World

You’ve seen this play out before. A team spends weeks refining messaging, books a decent booth location, then fills the space with one table, one branded backdrop, and a vertical banner stand by the aisle. The setup looks professional enough during install. Once the hall opens, that same booth disappears into a sea of similar hardware. However, there are many different types of retractable banners.

That’s why the vertical banner stand deserves a more serious look. It’s not a bad tool. It’s a legacy tool. It solved a specific problem for years: fast setup, small footprint, portable branding. But exhibitors in 2026 aren’t competing against blank booths. They’re competing against motion, brightness, product demos, and environments designed to stop traffic.

vertical banner stand

Why exhibitors still default to it

A banner stand feels safe because it removes friction. You can order it fast, carry it easily, and reuse it across events. For small booths, that convenience matters.

But convenience isn’t the same as performance. If your event matters, your display has to do more than mark your territory.

A vertical banner stand is often the first purchase exhibitors make. It shouldn’t be the last display strategy they consider.

The real decision in front of you

A modern vertical banner stand is usually a printed graphic on a retractable or tension-based frame. It gives you a tall, narrow branding surface that works in tight spaces and near booth edges. That’s useful.

What’s changed is the cost of being ignored. If you’re exhibiting to launch a product, book meetings, or reset market perception, the old “set up a banner and hope” approach won’t carry the load.

The Role of a Vertical Banner Stand at Trade Shows

The vertical banner stand has been around because it does a few jobs well. Historically, it has deep roots. It has been a cornerstone of trade show marketing since the Middle Ages, when similar vertical displays appeared as heraldic markers at trade fairs. By the 20th century, custom vinyl banners and popup retractable models had become standard, and retractable versions are favored for toolless setup in 80% of temporary promotions according to Banner N Print’s historical overview.

That long history matters because it explains why exhibitors still trust the format. It’s simple, direct, and easy to deploy.

What a banner stand is supposed to do

At a trade show, a vertical banner stand usually handles one or more of these tasks:

  • Aisle visibility: It gives attendees something tall enough to notice from outside your booth line.
  • Message compression: It forces you to narrow your pitch to a headline, a few bullets, and one visual.
  • Brand continuity: It helps a small booth look intentional instead of improvised.
  • Product support: It can reinforce a demo table, shelving unit, or literature station.

If you’re building a booth on a budget, that’s why banner stands remain common. They’re practical tools, not magic tools.

Why it became the default

The format earned its place because it solved event logistics better than many bulkier display systems. A retractable stand packs down quickly, ships without much drama, and doesn’t usually require a specialist to assemble it.

That’s also why banner stands still pair well with other printed assets. If you’re reviewing broader booth collateral, this guide to high-impact trade show materials is useful because it looks at how different printed pieces work together instead of treating the banner as a standalone solution.

Practical rule: Use a banner stand to support a booth strategy, not to become the whole strategy.

Where it still fits

A vertical banner stand still makes sense in a few cases. Satellite events. Recruiting fairs. Small inline booths. Temporary activations where speed matters more than spectacle. It can also work as a secondary branded element near a product pedestal or a compact display stand for products.

What it doesn’t do well is carry the visual weight of a serious exhibit by itself. That’s where many teams make the wrong call.

Types and Mechanics of a Vertical Banner Stand

Not all banner stands are built the same. Some are solid, stable, and easy to live with. Others wobble, curl, lean, or look tired after a few shows. If you’re buying one, the mechanics matter more than the graphic mockup.

Three different types of blank vertical banner display stands presented against a neutral beige background studio setting.

The main types you’ll run into

Retractable stands are the standard choice. The printed graphic rolls into the base, which protects it during transport and keeps the whole system compact. They are notably simple to manage.

X-frame or tension stands use a lightweight frame that stretches the graphic at the corners. They’re often cheaper, but they can look less polished.

Fabric tube systems rely on a frame-and-pillowcase style graphic. They can look cleaner than entry-level retractables, especially if the print quality is strong.

What separates good hardware from cheap hardware

Quality stand hardware comes down to stability, setup speed, and durability. According to the product specifications summarized in this Accuform vertical banner stand reference, quality models can use 3/8-inch diameter flexible anodized aluminum poles, support one-person setup in under 2 minutes, and reduce weight by up to 40% compared to steel. That same engineering logic is why modular spacing matters in more advanced display systems, where adjustable 24-36 inch pole spacing can help align with LED tile layouts.

That’s not a minor detail. It’s the difference between equipment your staff can set up confidently and equipment they fight with on the show floor.

What to check before you order

Use this checklist before you approve any vertical banner stand:

  • Pole construction: Aluminum is easier to transport and easier for your team to handle than heavier alternatives.
  • Base stability: A slick-looking graphic won’t matter if the stand shifts every time attendees brush past it.
  • Graphic tension: If the material curls or loosens, your message looks cheap fast.
  • Pack-down size: If you exhibit often, storage and shipping convenience matter every time.
  • Replacement graphics: Ask whether you can swap graphics without replacing the full unit.

Cheap banner hardware rarely fails in the showroom. It fails in the convention hall, under time pressure, with your staff already behind.

Why mechanics affect perception

Exhibitors often focus on artwork and ignore the stand itself. Attendees notice both. If the frame leans, if the banner edge curls, or if the base looks flimsy, they read that as a signal about your brand. Hardware quality is branding.

Advantages and Limitations of a Traditional Vertical Banner Stand

A traditional vertical banner stand has real strengths. It’s usually one of the fastest ways to add height, branding, and message control to a booth. It travels well, doesn’t take much floor space, and lets smaller teams look organized without major exhibit infrastructure.

That’s the upside. Now for the part many exhibitors avoid. Banner stands are often over-assigned. Teams expect them to create stopping power, carry product education, and define the booth experience. That’s more than static signage can realistically do in a busy hall.

Where the traditional stand still works

The format earns its place when you need a support piece, not a centerpiece. It can label a zone, reinforce a key message, or clean up an otherwise sparse footprint. It’s especially useful when you need portability and repeat use across multiple smaller events.

For simple environments, that may be enough.

Where it starts to break down

The biggest weakness is that the banner can’t adapt. The message is fixed. The visual is fixed. If you need to shift emphasis during the show, feature a video, rotate product benefits, or respond to audience behavior, the stand gives you nothing.

Outdoor and mixed-use environments are even less forgiving. According to Platon Graphics’ discussion of vertical banner use cases, 65% of events occur in mixed indoor-outdoor venues, standard vinyl banners can fail in 25 mph gusts, and 42% of booth failures at such events stem from display collapse. The same source notes that rigid LED tile solutions can endure 50+ mph winds.

That changes the conversation. The issue isn’t just aesthetics. It’s operational risk.

What a traditional stand does well What it struggles with
Fast to deploy Fixed messaging
Small footprint Limited stopping power
Easy to transport Vulnerable in challenging conditions
Good as a support graphic Weak as a primary booth experience

The hidden cost of choosing static

A banner stand looks inexpensive because the purchase price is straightforward. But the total cost includes missed attention, limited storytelling, and the possibility that your booth looks smaller or less current than the brands around you.

If your event is low stakes, that tradeoff may be acceptable. If the event is important, it usually isn’t.

Beyond Static Why Your Vertical Banner Stand Needs an Upgrade

The vertical banner stand isn’t obsolete. Static-only thinking is. That’s the core issue.

Exhibitors are asking for more because they need more. They need motion, modularity, and content that can carry a sales story without forcing a rep to repeat the same explanation all day. They need displays that work from a distance and still hold attention up close.

vertical fabric banner stand

The market has already moved

Demand for digital integration is no longer niche. According to Signs.com’s retractable banner discussion, 78% of recent trade show-related forum questions asked about “LED upgrades for vertical banner stands,” and a 2026 Nielsen study cited there found that video walls boost attendee dwell time by 47% compared to static displays.

That should end the debate about whether motion matters. It does.

Static print hits a ceiling fast

Even well-designed print has limits. Once attendees understand the headline, the experience is over. There’s nothing left to discover. A digital surface can cycle product views, testimonials, interface demos, launch messaging, or timed sequences for different audience segments.

That doesn’t mean every booth needs giant spectacle. It means every serious exhibitor should think beyond a frozen graphic.

A related issue is asset quality. If you’re still preparing artwork for printed components, this guide on upscale images for print is worth reviewing because poor source files make even expensive displays look second-rate.

What an upgrade actually changes

Upgrading the vertical format changes more than the look of the booth. It changes how your team uses the space.

  • Storytelling improves: You can show the product in use instead of describing it with bullets.
  • Content becomes flexible: You can change loops for different shows, audiences, or campaigns.
  • The booth earns attention: Motion gives people a reason to look before a rep starts talking.
  • Your staff works smarter: The display can carry core talking points while the team focuses on real conversations.

If your booth has to explain something complex, static print makes your staff do all the heavy lifting.

That’s why interactive environments are becoming a smarter path for exhibitors who need more than name recognition. If your team is thinking beyond passive signage, interactive trade show displays are a better benchmark than another roll-up banner.

Vertical Banner Stand vs Our Turnkey LED Video Walls

A vertical banner stand gives you a narrow printed message. Our turnkey LED video walls give you a branded environment. That’s the difference.

If you’re serious about ROI, stop comparing a banner stand to nothing. Compare it to the result you want. Better attention, stronger presentation, easier logistics, cleaner execution, and support when something goes wrong.

vertical banner stands

Resolution matters more than most exhibitors realize

A lot of exhibitors hear “LED wall” and assume all LED is roughly the same. It isn’t. We use 1.9 pitch, while competitors mostly use 2.5 pitch. That means our video walls deliver higher resolution and a cleaner image, especially when attendees are standing close to the booth.

For trade shows, that matters. People don’t view your display from across a parking lot. They view it from the aisle, from inside the booth, and during conversations. Finer pitch holds up better in those real-world distances.

Turnkey service beats DIY every time

Display comparisons often become dishonest at this stage. A banner stand looks simple because your team absorbs the risk. They carry it. They set it up. They troubleshoot it. If the booth underperforms, they live with it.

We don’t work that way. Our pricing includes everything except what the show bills you for directly, such as electricity and material handling. That transparency matters because exhibitors get burned when vendors quote hardware but leave out key execution pieces.

We also provide white glove, turnkey service. We handle the planning, logistics, setup, and execution so your team can focus on customers instead of booth problems.

Here’s the product in action:

On-site support is the part most vendors skip

Most vendors disappear after install. That’s unacceptable for live events.

We keep an audiovisual technician onsite the entire time the trade show is open. If something goes wrong, you text or call, and within minutes an AV technician is at your booth to resolve the problem. That’s a major difference between renting equipment and buying confidence.

Booth hardware is only half the product. Show-day support is the other half.

Feature Face-Off Traditional Banner Stand vs Our LED Video Wall

Feature Traditional Vertical Banner Stand Our Turnkey LED Video Wall
Content format Static printed graphic Dynamic video, motion, and flexible messaging
Visual resolution Limited by print only 1.9 pitch for higher resolution than the more common 2.5 pitch competitor option
Setup responsibility Usually handled by your team White glove, turnkey service
Pricing clarity Hardware may be simple, but support is limited Everything included except direct show charges like electricity and material handling
Problem resolution Your staff handles issues Onsite AV technician stays for all show-open hours
Reconfiguration Fixed format Modular system that can adapt to different booth designs
Best use Basic branding support High-impact presentation and serious event ROI

If you’re evaluating options for a launch, a major expo, or a booth that has to do real work, a simple printed stand isn’t the benchmark. A turnkey LED video wall rental is.

Making the Right Investment for Your Booth in 2026

The vertical banner stand still has a place. It’s just not the right answer when the event is important.

The vertical format itself is powerful. According to Taboola’s overview of vertical banner performance, 120×600 skyscraper formats achieve 30% higher sustained visibility, and in B2B expos, vertical displays have been shown to boost foot traffic by 35%, while bulleted lists on vertical layouts improve scannability by 50%. That’s the case for vertical. The smarter move is taking that same vertical advantage and upgrading it into a digital surface that works harder.

Rent when flexibility matters

Rent if you exhibit occasionally, need a high-impact booth for a launch, or want premium visual presence without owning and storing a system. Renting also makes sense if your booth size changes from show to show.

Buy when exhibiting is a core channel

Buy if you’re on the road constantly, repeat the same exhibit structure, and want long-term control over content and deployment. Ownership works best when the display becomes a recurring part of your sales operation, not a one-off campaign.

If you’re still comparing options, start with total booth performance, not unit price. A booth that attracts more attention and supports better conversations usually justifies the investment more clearly than a cheaper setup that blends in. That’s also why it helps to review the full trade show booth cost picture instead of isolating one display component.


If you’re done settling for a basic banner and want a booth that commands attention, talk to LED Exhibit Booths. We build turnkey LED trade show displays with higher-resolution 1.9 pitch walls, transparent pricing that includes everything except direct show charges like electricity and material handling, white glove service from start to finish, and an onsite AV technician during show hours so your team can focus on selling, not troubleshooting.

LED Video Wall Installation: A Step-by-Step Trade Show Guide

led video wall installation is usually on your to-do list right when everything else is also on fire. The booth design is approved late. Show forms are due. Electrical orders are confusing. Your marketing team wants crisp motion graphics. Your exhibit house says the wall is “easy to install.” Then move-in day arrives, and suddenly “easy” means crates, labor windows, union rules, alignment issues, and a screen that has to work the first time.

That’s why smart exhibitors stop treating the wall as a box of panels and start treating it as a managed system. At a trade show, the hardware matters, but the install process matters more. If the wall looks soft, seams show, content is mapped wrong, or a panel goes dark during show hours, nobody cares what the spec sheet promised.

I’ll be direct. Resolution matters too. We use P1.9 where many competitors still push P2.5, and that difference shows up fast at booth viewing distances. Text is cleaner. Product shots hold up better. Motion looks tighter. If attendees are standing a few feet away, lower resolution is a compromise you’ll notice.

The Exhibitor’s Dilemma Why Installation Is More Than Hardware

Most exhibitors underestimate led video wall installation because they focus on the visible part. They compare screen size, maybe ask about pixel pitch, then assume setup is just labor. It isn’t. Installation is where budgets get chewed up and reputations get tested.

Installation and labor can represent 15 to 20% of total project budgets, according to LED video wall industry statistics. That’s a big enough slice that mistakes stop being annoying and start being expensive. If your install method requires extra hands, extra time, or extra troubleshooting, you feel it in labor bills, drayage, and setup stress.

Why trade show installs fail

Trade show floors are not forgiving. You’re working in a shared venue with strict schedules, crowded aisles, limited dock access, and other vendors competing for the same labor pool. A wall that’s simple in a warehouse can become a headache in a convention center.

The common failure points are usually predictable:

  • Bad assumptions about assembly: Someone assumes the wall will go together like consumer AV gear. It won’t.
  • Low-resolution compromise: A cheaper wall can look acceptable in a rendering and disappointing under hall lighting.
  • Missing scope items: Quotes often leave out pieces you assumed were included.
  • No live support: When something breaks during the show, you’re stuck calling a help desk instead of fixing the problem.

If you need a quick primer on the broader category of audio visual equipment, that resource gives useful context. Trade show LED walls sit at the high-stakes end of that spectrum because they combine structure, power, content, and live presentation in one system.

Practical rule: If your vendor talks mostly about panels and barely talks about labor, show paperwork, content mapping, or support, you’re not buying a solution. You’re buying risk.

What a managed install actually changes

A serious exhibitor needs more than screens. You need a team that plans the booth, coordinates setup, and owns the outcome. That’s the difference between “we rented a wall” and “the booth worked.”

That’s also why a proper trade show set up strategy matters before anyone touches a crate. When the structure and the display are designed together, the result is cleaner, faster to assemble, and less likely to create ugly seams, exposed cables, or emergency fixes on show day.

White glove service wins because it removes the hidden jobs from your list. You shouldn’t be chasing freight, decoding labor rules, or babysitting a playback issue while prospects are walking into your booth. You should be greeting customers.

Pre-Show Planning for a Flawless LED Video Wall Installation

Most led video wall installation problems start long before move-in. They start when somebody skips detailed planning and assumes the venue will be flexible later. It won’t.

led video wall installation

In the US, installation costs can range from $900 to $3,000 per square meter, as outlined in this LED video wall installation guide. That range is exactly why pre-planning matters. If the panel count, power load, and support structure are wrong on paper, you don’t get a small inconvenience. You get change orders, delays, and expensive improvisation.

The work that has to happen before the show

A professional install team should lock down the technical basics early. That includes booth dimensions, structural needs, power requirements, content format, and show paperwork. None of that is glamorous. All of it matters.

Here’s the checklist we insist on before a project moves forward:

  • Confirm exact booth dimensions: Not the rounded version from a sales deck. The actual usable footprint.
  • Match screen size to the booth design: The wall should fit the exhibit, not bully it.
  • Calculate power correctly: You need enough power ordered from the show, with a plan for where it enters the booth.
  • Review venue rules: Every hall has its own labor, rigging, and safety expectations.
  • Map content to the canvas: A unified display wall still fails if the content was designed for a different aspect ratio.
  • Schedule freight and access: Timing mistakes at the dock create a cascade of problems later.

One of the easiest ways to blow a budget is to treat shipping like an afterthought. A proper shipping trade show displays plan should account for crate timing, move-in windows, and the handling conditions at the venue.

What should be included in your quote

Often, buyers get burned. A low quote often looks attractive because it strips out the hard parts. Then the missing costs show up later.

Our advice is simple. Ask for a scope that clearly states what’s included and what the show bills directly. In a clean turnkey model, everything should be included except the charges the show itself imposes on you directly, such as electricity and material handling. That gives you real budget clarity.

Don’t compare LED wall quotes line by line until you know whether both vendors included labor coordination, setup, dismantle, content handling, on-site service, and logistics management.

The hidden planning traps

The dangerous part of DIY isn’t just assembly. It’s administration. You can have excellent hardware and still fail because nobody handled the boring details.

A few common traps:

Planning issue What goes wrong
Late electrical order The wall can’t be powered where you need it
Poor content mapping Logos stretch, text crops, and motion doesn’t align
No venue compliance check Setup stalls while approvals get sorted out
Wrong support assumptions The install team has to redesign on site

The best installs look easy because the hard work happened weeks earlier. That’s the standard you should expect.

On-Site Assembly The Power of a Toolless Magnetic System

Move-in day tells you whether your led video wall installation was designed by people who understand trade shows or by people who just sell screens. You can spot the difference fast.

led video wall installation

A traditional bracket-and-screw build is slow, fussy, and prone to little errors that become very visible once content goes live. A magnetic, toolless system is different. The frame goes in cleanly, the modules snap into place, and the whole process is built around speed and repeatability instead of field improvisation.

Why precision matters on the floor

This isn’t cosmetic nitpicking. A misalignment of just 0.5mm can cause visible seams, and a properly engineered magnetic system can achieve less than 0.2mm gaps and under 1mm flatness tolerance, supporting a 98% first-boot success rate compared with a 75% industry average for complex builds, according to this installation methodology reference.

That’s the difference between a wall that reads as one unified digital canvas and a wall that looks like a patchwork of panels.

How the assembly should happen

A good crew doesn’t rush. They move in the right order.

First, the team establishes the reference lines and builds the support structure so the surface is flat. Then they mount the modules row by row, checking alignment as they go. Data and power are routed cleanly, not draped where they’ll create safety problems or service headaches later.

The best part of a toolless system is not that it feels modern. It’s that it removes unnecessary failure points.

  • Fewer loose parts: Less hardware means fewer chances to lose time on the floor.
  • Cleaner integration: The booth structure can serve as the framework, so you don’t need bulky truss cluttering the design.
  • Faster corrections: If a module needs adjustment, the crew can handle it quickly.
  • Better finish quality: Tight seams and tidy cable paths make the whole booth look intentional.

If you want to understand the hardware category behind this process, this overview of LED panels for video walls gives useful context.

Cheap installs usually look cheap at the edges first. Seams show. Corners drift. Cables peek out. That’s where attendees decide whether your booth feels premium or improvised.

Cable management is part of the install

A lot of exhibitors think cables are an internal technical issue. They’re not. They affect safety, reliability, and the final look of the booth.

A disciplined crew routes data and power so nothing is pinched, visible, or vulnerable to traffic. That matters during setup, and it matters even more when booth staff start moving around with demo gear, literature, and personal bags.

This video gives a useful visual sense of how modular screen builds come together in practice.

Why low-cost labor often backfires

Low-cost options usually save money only on the quote. On the floor, they cost time. The crew may not know the system, may not understand the venue, and may not care whether your content team is waiting on final sign-off.

That’s why I’m opinionated about this. If your wall is central to your booth, don’t outsource assembly to the cheapest available hands and hope they figure it out. Hope is not an installation plan.

Calibration and QA From Pixels to a Perfect Picture

A wall can be physically assembled and still look wrong. That’s where calibration separates a professional led video wall installation from a merely finished one.

A technician using a color calibration sensor on a professional LED video wall for precise color accuracy.

Convention halls are harsh environments for color and brightness. Overhead lighting shifts. Aisle light spills into the booth. Nearby exhibits throw competing color into your space. If nobody calibrates the wall for the actual venue, your expensive content can look flat, mismatched, or washed out.

What calibration actually does

Think of calibration as the last stage of fit and finish. The wall is built. Now the image has to become consistent across every module.

That means checking for:

  • Color uniformity: Reds should match from panel to panel.
  • Brightness balance: One cabinet can’t run hotter than the rest.
  • Dead or weak pixels: Tiny defects become obvious on bold backgrounds.
  • Playback integrity: Motion content has to read cleanly across the full canvas.

Our technicians use professional spectrometers to achieve ΔE of less than 2, and that calibration, paired with redundant controllers, supports a 99.2% uptime record, as described in these LED video wall best practices. For a trade show brand, that means your logo colors stay on-brand instead of drifting into “close enough.”

Why P1.9 earns its keep here

Higher resolution hardware yields benefits. P1.9 gives the calibration team more to work with than P2.5 at close viewing distances. Fine text, product UI screens, and detailed imagery all hold together better when the underlying pixel structure is tighter.

That doesn’t mean hardware alone solves the problem. It means good hardware rewards good setup. Poor calibration can still make a premium wall look average.

For practical answers to common performance questions, this collection of LED video wall FAQs is worth reviewing before a show.

A wall isn’t ready because it powers on. It’s ready when your content looks right under the same lights your buyers will see.

QA before the hall opens

A proper QA pass should happen before your team starts rehearsing or meeting with prospects. The technician should run test patterns, verify input sources, confirm scaling, and review scheduled playback.

I also recommend checking actual show content, not just color bars and generic loops. The ultimate test is whether your launch video, product demo, and branded slides all display correctly at full size. That final review catches the embarrassing stuff before attendees do.

Renting vs Buying Your Video Wall A Strategic Breakdown

Most exhibitors should rent. That’s my view, and I haven’t seen many real-world show schedules that change it.

A comparison chart outlining the strategic advantages of renting versus the considerations for buying LED video walls.

Buying sounds smart because ownership feels efficient. In practice, many brands don’t buy a system. They buy a list of new responsibilities. Storage, maintenance, transport coordination, repair risk, software updates, spare parts, crew training, insurance, and technology aging all become your problem.

The real comparison

A rental model offloads complexity. A purchase model creates obligations.

The most straightforward understanding is:

Decision area Renting Buying
Flexibility Good for varying booth sizes and event schedules Best only if your use case stays consistent
Technology refresh Easier access to newer display options You carry obsolescence risk
Maintenance Handled by the provider Your team owns it
Logistics Usually bundled into service You manage storage and freight strategy
On-site support Often available in turnkey packages Depends on your staffing and vendor contracts

If you’re weighing both options, this guide on owning vs renting an LED video wall is a useful decision aid.

When buying makes sense

I’m not against buying. It fits some exhibitors.

Buying can work if:

  • You exhibit constantly: Repeated use may justify ownership.
  • Your booth format rarely changes: Standardized designs are easier to support.
  • You have internal technical staff: Someone has to own maintenance and deployment.
  • You’re prepared for lifecycle management: The wall will age, and replacement planning matters.

But most small and mid-sized exhibitors don’t have those conditions. They exhibit a few times a year, sizes vary, and marketing teams don’t want to become AV operations managers.

Why rental is usually the stronger trade show move

Rental keeps your focus on outcomes. You get the right size wall for the event, current hardware, installation, service, and teardown without carrying the burden between shows.

That’s especially valuable when your quote is structured as an all-inclusive turnkey package except for the direct show charges. Electricity and material handling are often billed by the show itself. Everything else should be spelled out and covered. That’s the pricing model I trust because it leaves less room for “surprise” invoices after the event.

Renting buys flexibility. It also buys accountability, because one partner owns the result from delivery through dismantle.

If you only remember one thing from this section, remember this: ownership lowers risk only when you already have the infrastructure to support it. If you don’t, rental is the safer and usually smarter business decision.

Your Secret Weapon On-Site Support and Troubleshooting

This is the part exhibitors undervalue until the first thing goes wrong.

You can have a beautiful wall, sharp content, and a clean install. Then the keynote file stutters ten minutes before your big demo. Or a panel starts acting up at opening bell. Or your audio handoff doesn’t sync with the presentation laptop. At that point, the question isn’t whether the vendor was polite during the sales process. The question is who can fix the problem right now.

What live support changes

An on-site AV technician changes the entire show experience because you stop carrying technical anxiety in the background. You don’t need to troubleshoot during a customer conversation. You don’t need to leave the booth manager holding the bag while someone calls a remote help line.

You text or call. A technician comes over. The issue gets handled.

That matters more than most buyers realize because modular, magnetic event systems are becoming more common. Post-2025 CES reports noted 35% growth in demand for modular, magnetic LED systems for events, with setups cutting time by up to 50%, according to this CES-related discussion of event installation trends. Fast setup is great. Fast support is even better.

The problems that show up during live hours

Most on-site issues are manageable if the right person is already in the building. They become stressful when nobody owns them.

Typical live-show problems include:

  • A playback issue: The media file is correct, but the output settings aren’t.
  • A panel anomaly: One cabinet flickers, dims, or needs a quick swap.
  • A source switch problem: The feed from a demo laptop doesn’t hit the wall properly.
  • An audio mismatch: Video is running, but the booth sound path isn’t behaving.
  • A last-minute content edit: Marketing wants to change a slide, loop, or CTA before the afternoon rush.

A staffed booth can’t solve those issues alone. They need a technician who understands the system, knows the signal path, and can act without turning a minor glitch into a floor-wide panic.

Why remote support isn’t enough

Remote support works for software subscriptions. It’s a weak answer for a live trade show environment.

The floor is loud. Inputs get swapped. Salespeople unplug the wrong cable. A laptop goes to sleep. Someone changes a playback schedule. A dock delay pushes setup late and compresses testing time. Physical environments create physical problems, and physical problems need a human being on site.

Here’s the core value of white glove service:

  • You protect the customer-facing team: They stay focused on meetings, demos, and lead capture.
  • You reduce downtime: Problems get addressed before they become public.
  • You avoid blame loops: Nobody wastes time arguing whether the issue is content, hardware, or venue power.
  • You keep momentum: The booth stays open, presentable, and functional.

The best support model is simple. If something goes wrong while the show is open, someone qualified should be able to walk to your booth and fix it.

The peace of mind most quotes omit

A lot of competitors quote the install and disappear after handoff. That’s not support. That’s delivery.

If your booth depends on LED for storytelling, product launches, or lead generation, then on-site technical coverage isn’t an upgrade. It’s part of the core operating plan. You want a technician available for the full time the show is open, someone who can respond within minutes and keep your team from losing face in front of customers.

That kind of support doesn’t just solve problems. It changes how confidently your staff works the booth. They know somebody has their back.

Frequently Asked Questions and Final Thoughts

A few questions come up almost every time.

What if we need to change content at the last minute

It happens all the time. Product teams update messaging. Legal wants a revision. A logo lockup changes. A good turnkey partner plans for late adjustments and has the playback workflow to load, test, and verify updated content without turning it into a crisis.

How is teardown handled

Teardown should be handled by the same team that installed the wall or by a crew working under their direction. That keeps dismantle organized, protects the hardware, and reduces the chance of damage during repacking and outbound freight.

What power do we need to order from the show

That depends on the wall size, content brightness, and the rest of the booth systems. Don’t guess. Have the install partner specify the requirement during planning so you order correctly the first time. If you’re reviewing the electrical side yourself, this checklist of questions to ask an electrician is a practical resource for understanding how to vet that part of the job.

What’s actually included in a proper turnkey price

The cleanest model is simple. Everything is included except the charges billed directly by the show, typically electricity and material handling. That means the quote should already account for the wall, structure integration, logistics coordination, install, dismantle, and service coverage. If the proposal is vague, assume the surprises are still hiding in it.

Final take

led video wall installation is not a commodity task. It’s a high-visibility execution job with technical, logistical, and operational consequences. The wrong partner can leave you with hidden costs, visible seams, and no safety net when something fails. The right partner gives you a crisp wall, a controlled install, all-inclusive clarity, and live support while the hall is open.

For most trade show exhibitors, the smartest choice isn’t just better hardware. It’s a white glove team that handles the full process so you can focus on customers.


If you want a turnkey partner for your next exhibit, LED Exhibit Booths delivers high-resolution P1.9 video wall rentals, all-inclusive project management except direct show charges like electricity and material handling, and on-site AV technician support throughout show hours so your team can focus on selling, not troubleshooting.