Interactive Trade Show Displays A Guide to Stop Traffic

interactive trade show displays

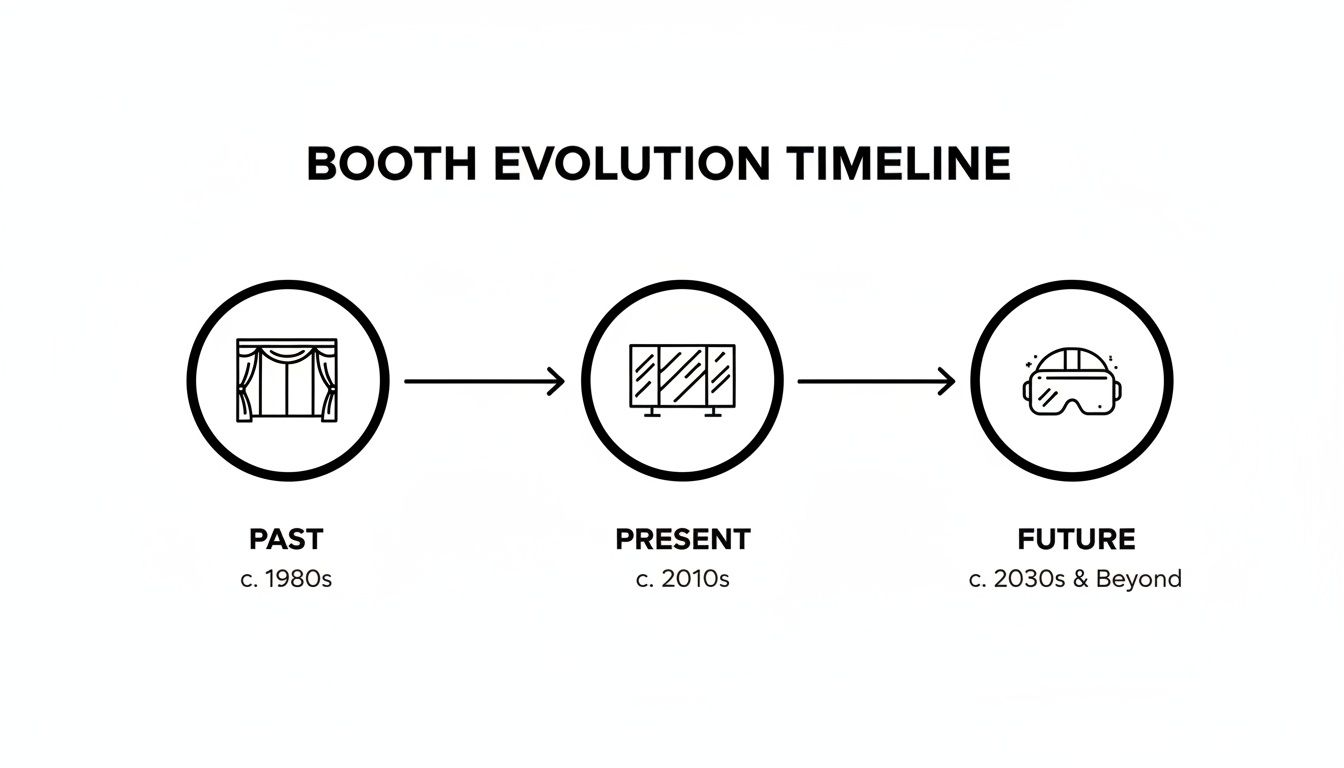
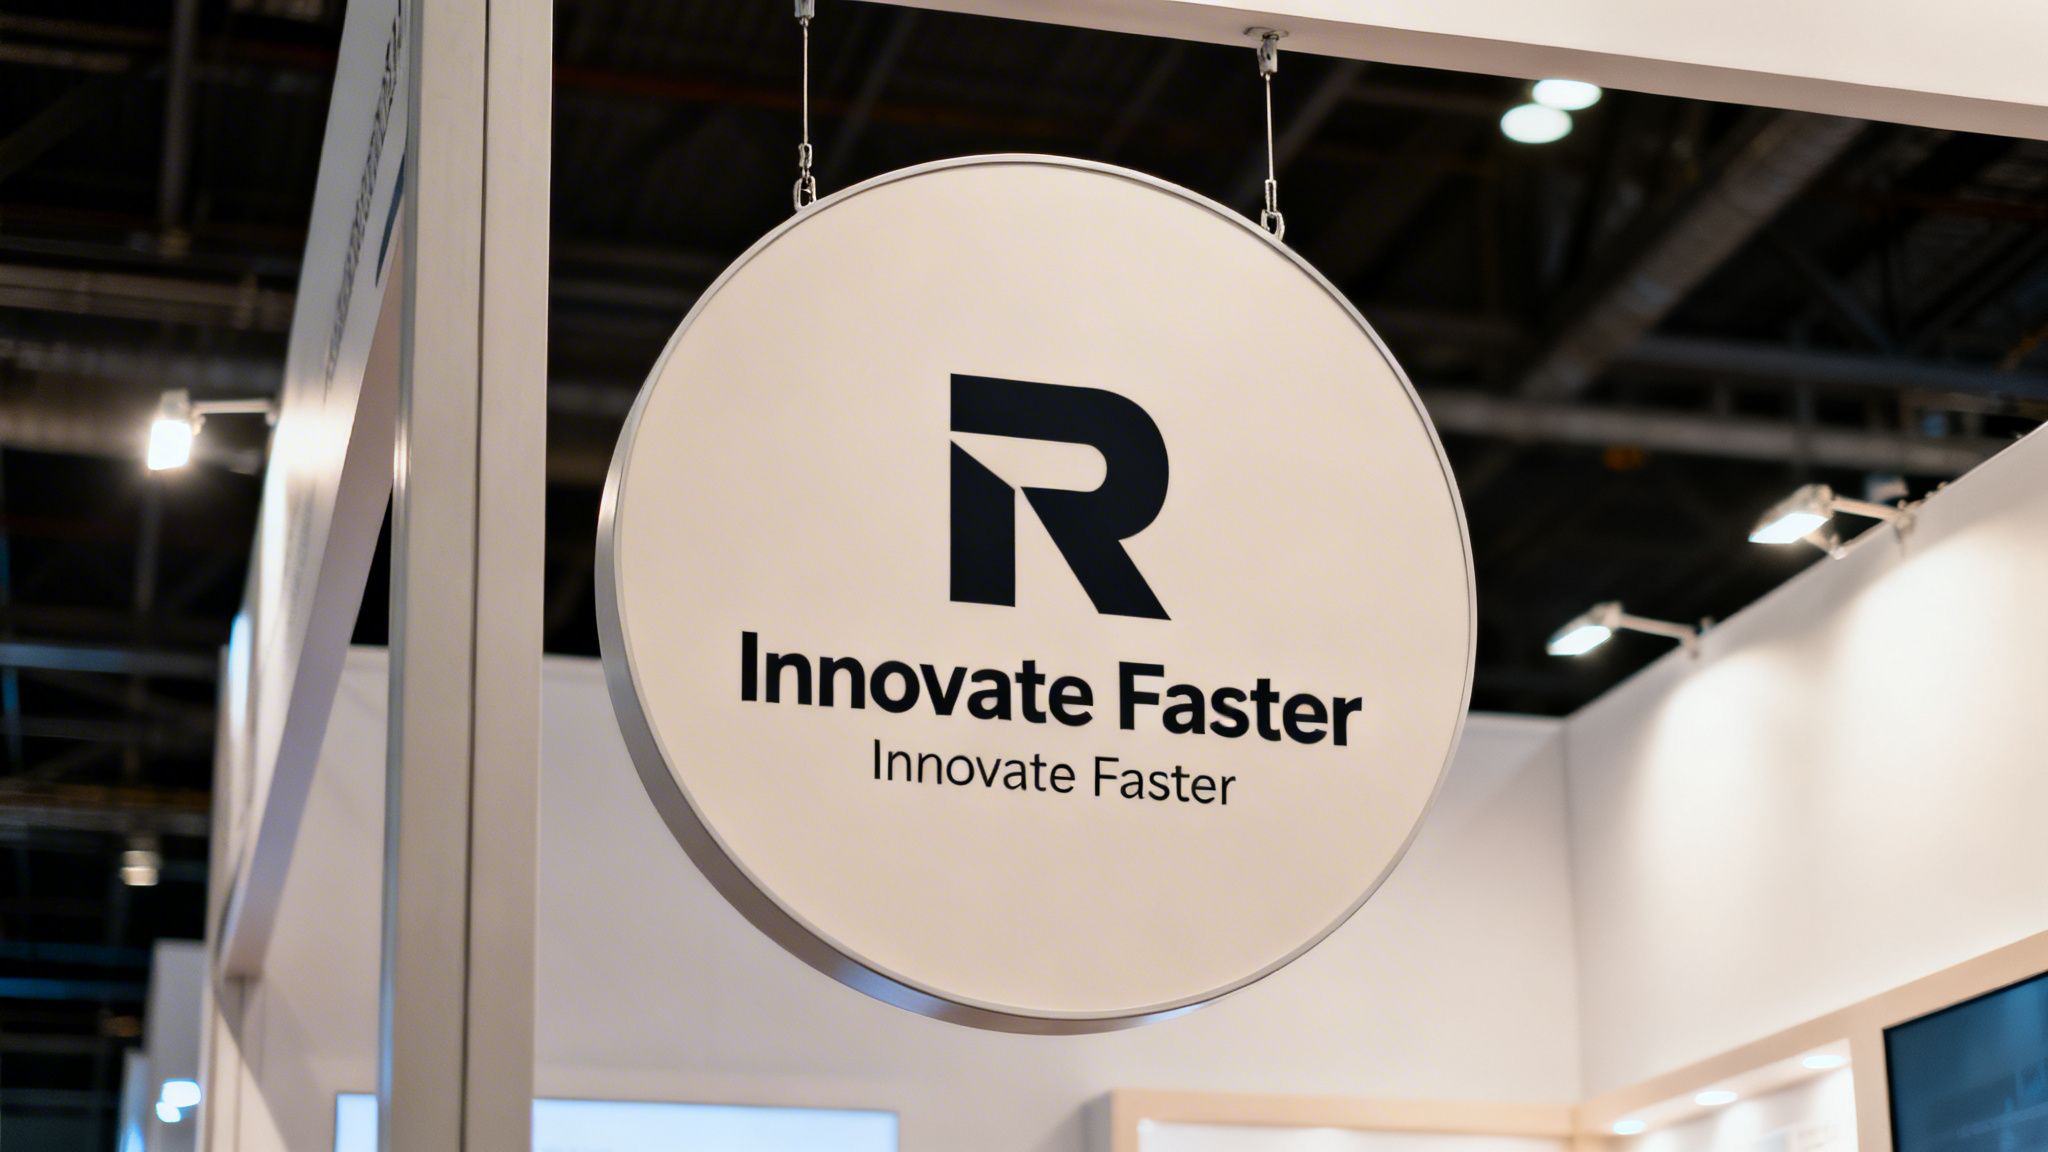
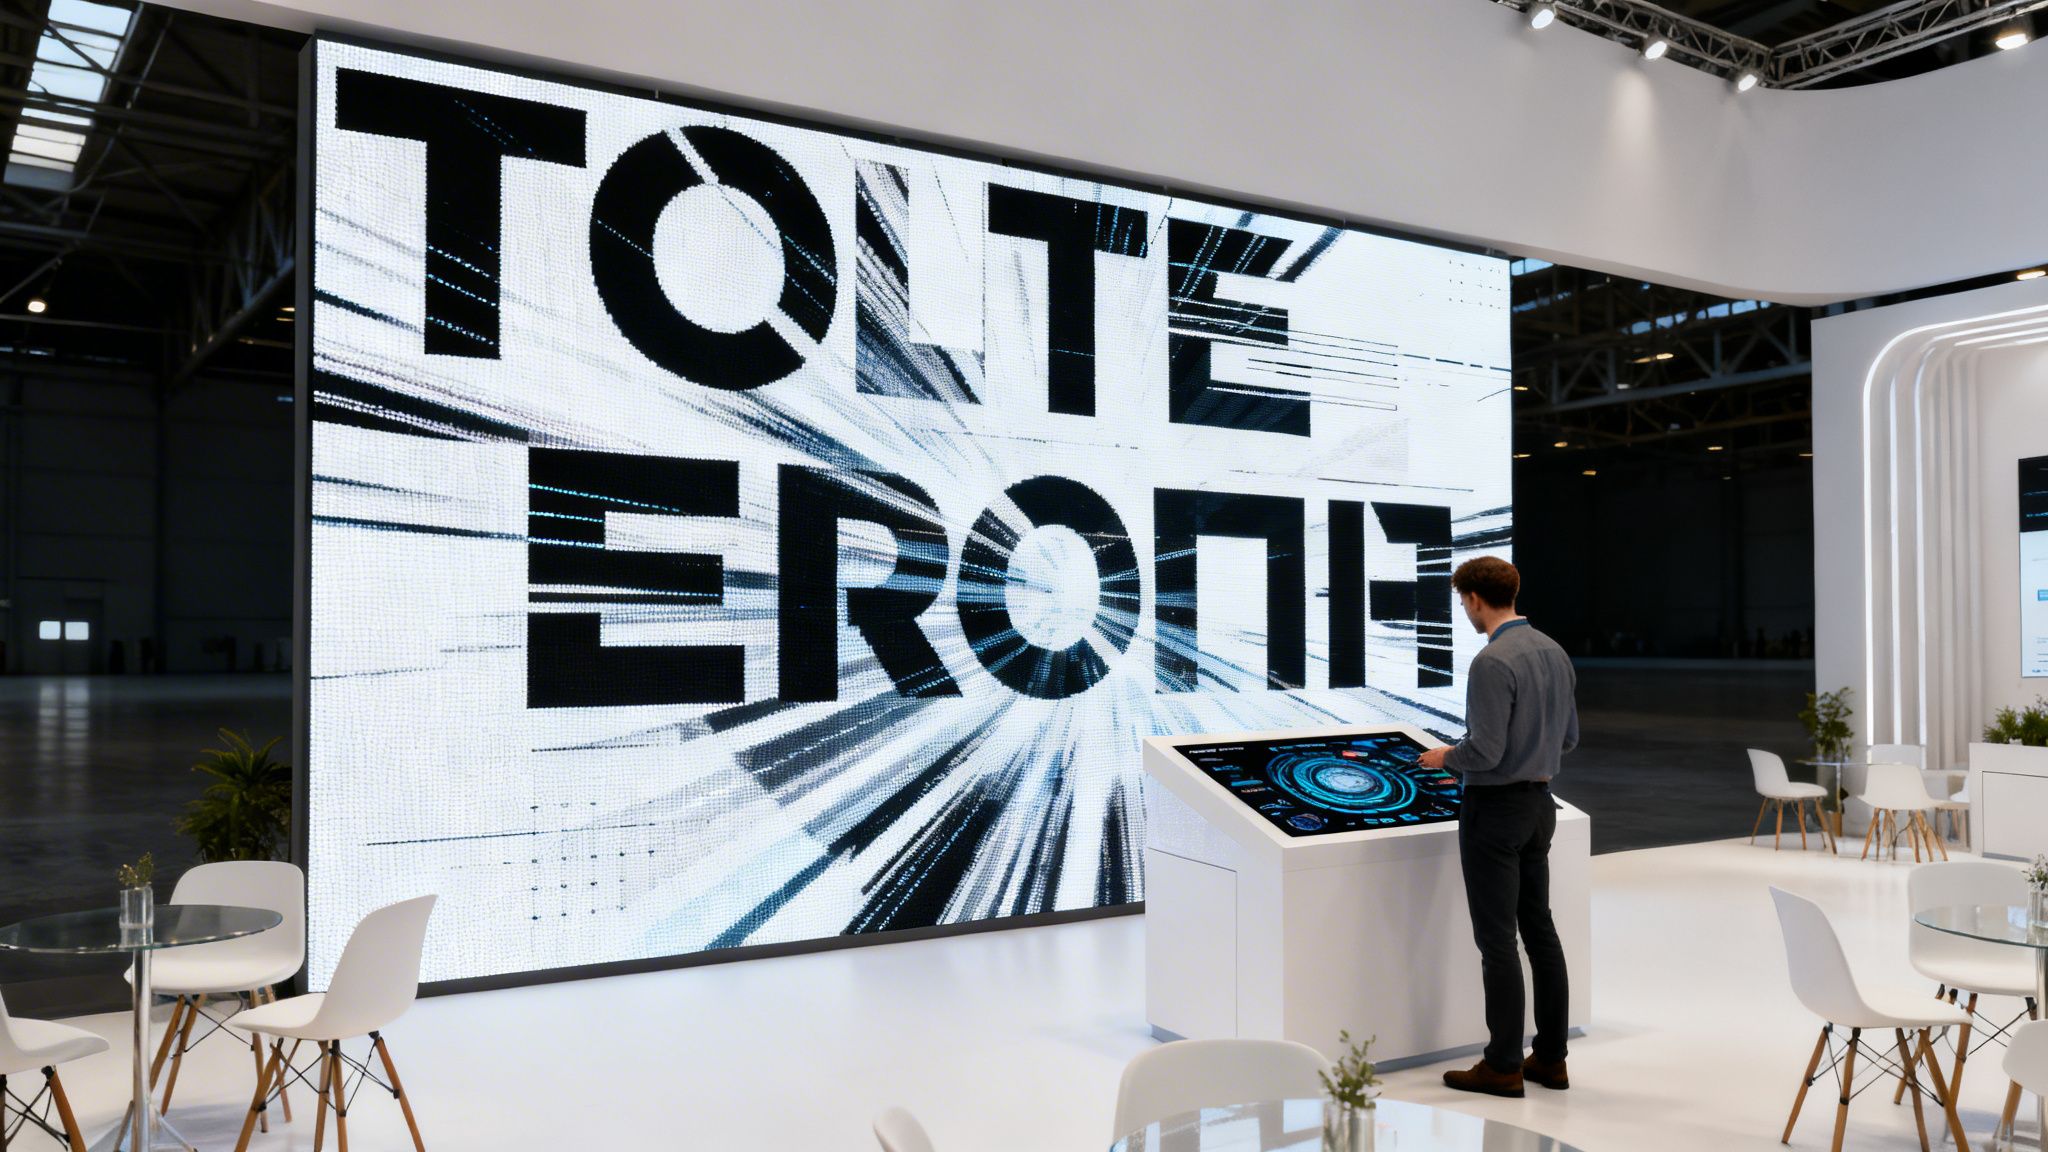
Interactive trade show displays do one thing really well: it turns someone just walking by into someone who stops and plays. Instead of a passive sign, these booths use tech like LED video walls, touchscreens, or even motion sensors to create a hands-on experience. The goal is to be memorable, get people engaged, and ultimately, capture better leads.

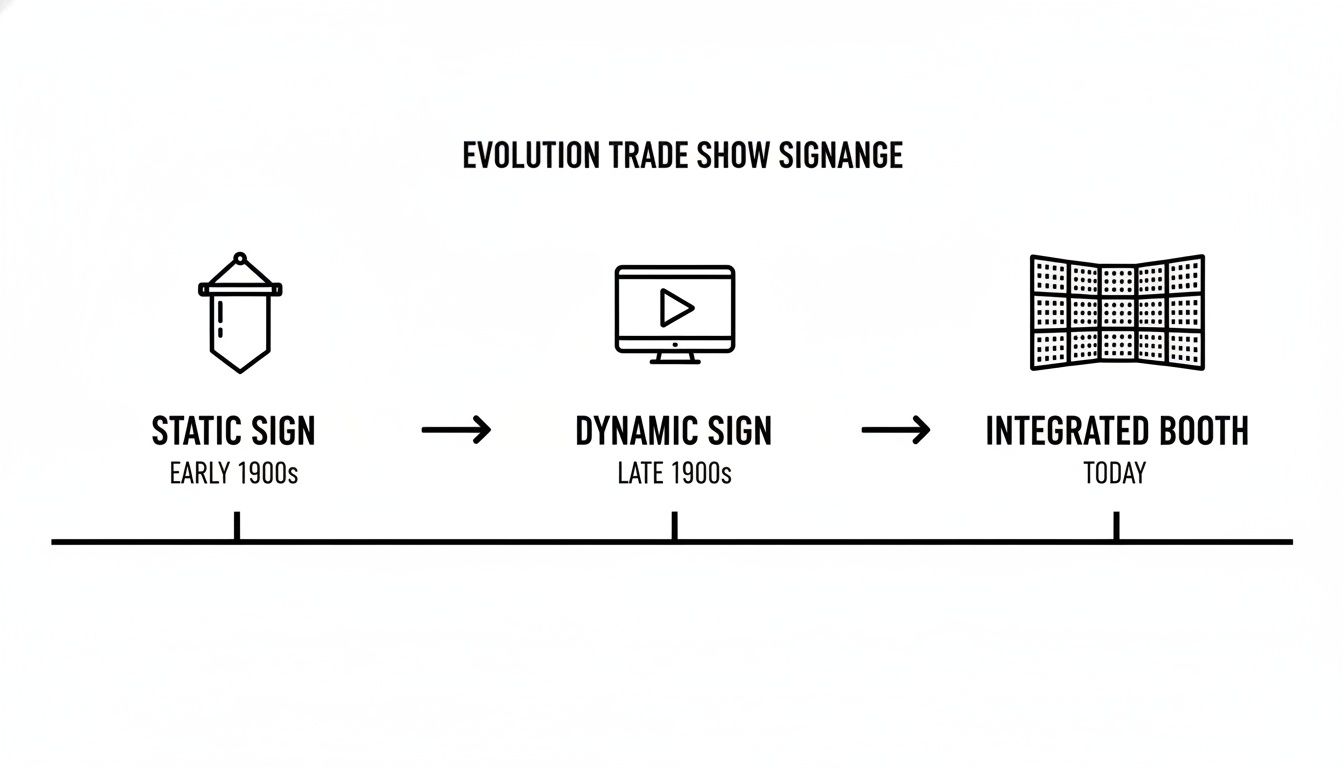
Why Static Booths Get Lost in the Crowd

Think about any trade show floor you’ve walked. It’s a loud, overwhelming blur of lights and sound, with dozens of companies all fighting for a few seconds of your time. Most of them use the same old playbook: a printed backdrop, a few banners, and maybe a bowl of candy. Of course, some will use a custom trade show booth. While that’s the standard approach, it’s like showing up with a flip phone at a smartphone convention—it just doesn’t make an impact.

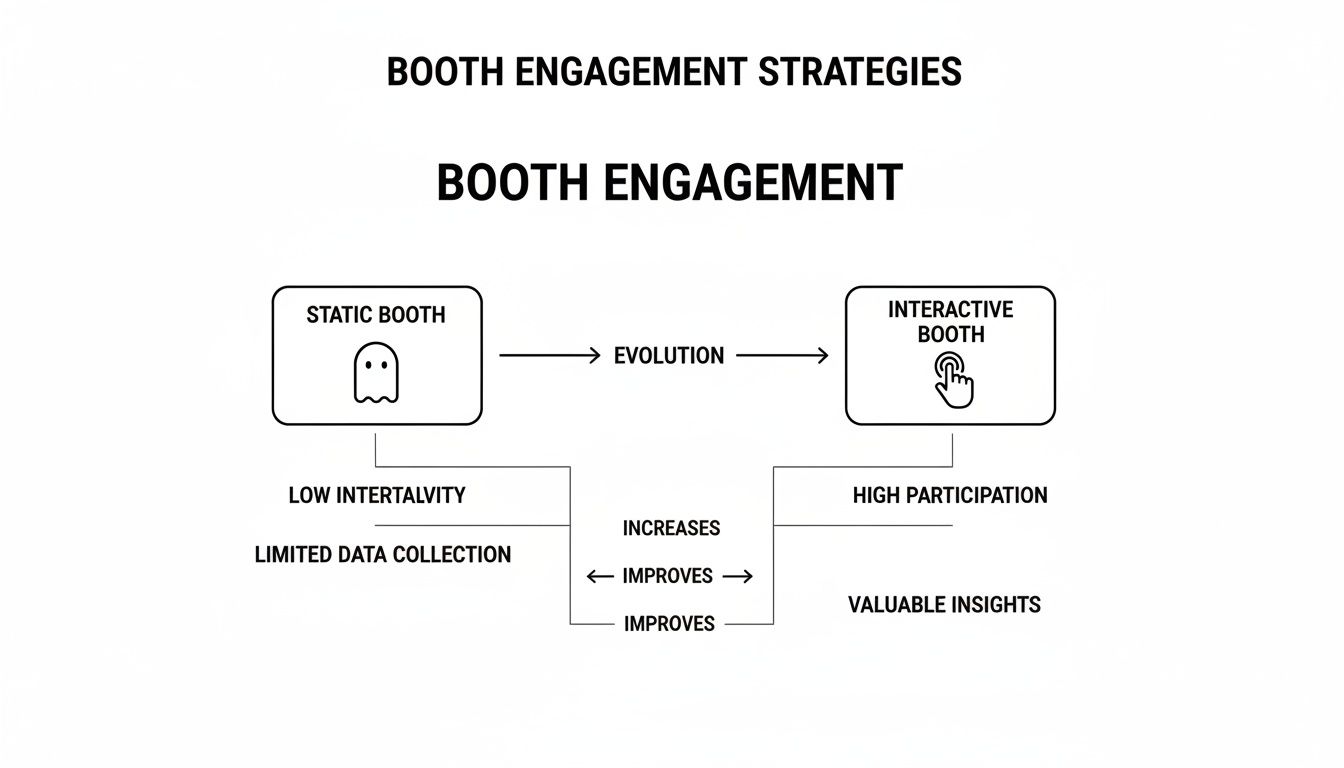
In a sea of look-alike booths, these static displays just become background noise. Attendees stroll past, their eyes glazing over, and nothing really sticks. The whole experience is forgettable and does little to spark a real conversation.

This is exactly where an interactive trade show display completely changes the game. You’re not just telling people what you do; you’re inviting them to experience it firsthand.

From Passive Viewer to Active Participant With Interactive Trade Show Displays

Interactivity gives attendees a reason to stop, touch, and spend their time with you. It’s the difference between looking at a car in a brochure and actually getting to sit in the driver’s seat. An interactive element could be a game, a product configurator that lets them build their own version, or an immersive video that reacts as they move.

This kind of hands-on engagement gives you a few major wins:

  • Increased Dwell Time: When people are busy doing something, they stick around longer. That gives your sales team a bigger window to start a good conversation.
  • Better Brand Recall: We all remember what we do far better than what we just see. A fun, memorable interaction makes sure your brand is the one they’re talking about after the show.
  • Deeper Product Understanding: Letting people explore your products or services on their own terms helps them see the value for themselves, making for a much more powerful connection.

The numbers don’t lie. The trade show industry is massive, expected to reach $171.6 billion by 2032, so standing out is non-negotiable. Here in the US, booths with interactive elements pull in 52% more visitors than static ones. Plus, that engagement leads to a 35% increase in dwell time and a huge lift in qualified leads. You can dig into more numbers in this report on trade show statistics.

Making High-Impact Interactive Trade Show Displays Accessible

It used to be that creating a truly immersive booth required a ton of complicated, heavy, and seriously expensive gear. Today, that’s all changed. Modern LED technology makes building incredible interactive trade show displays easier and more affordable than ever. With our unique system, your entire booth structure actually becomes the digital canvas.

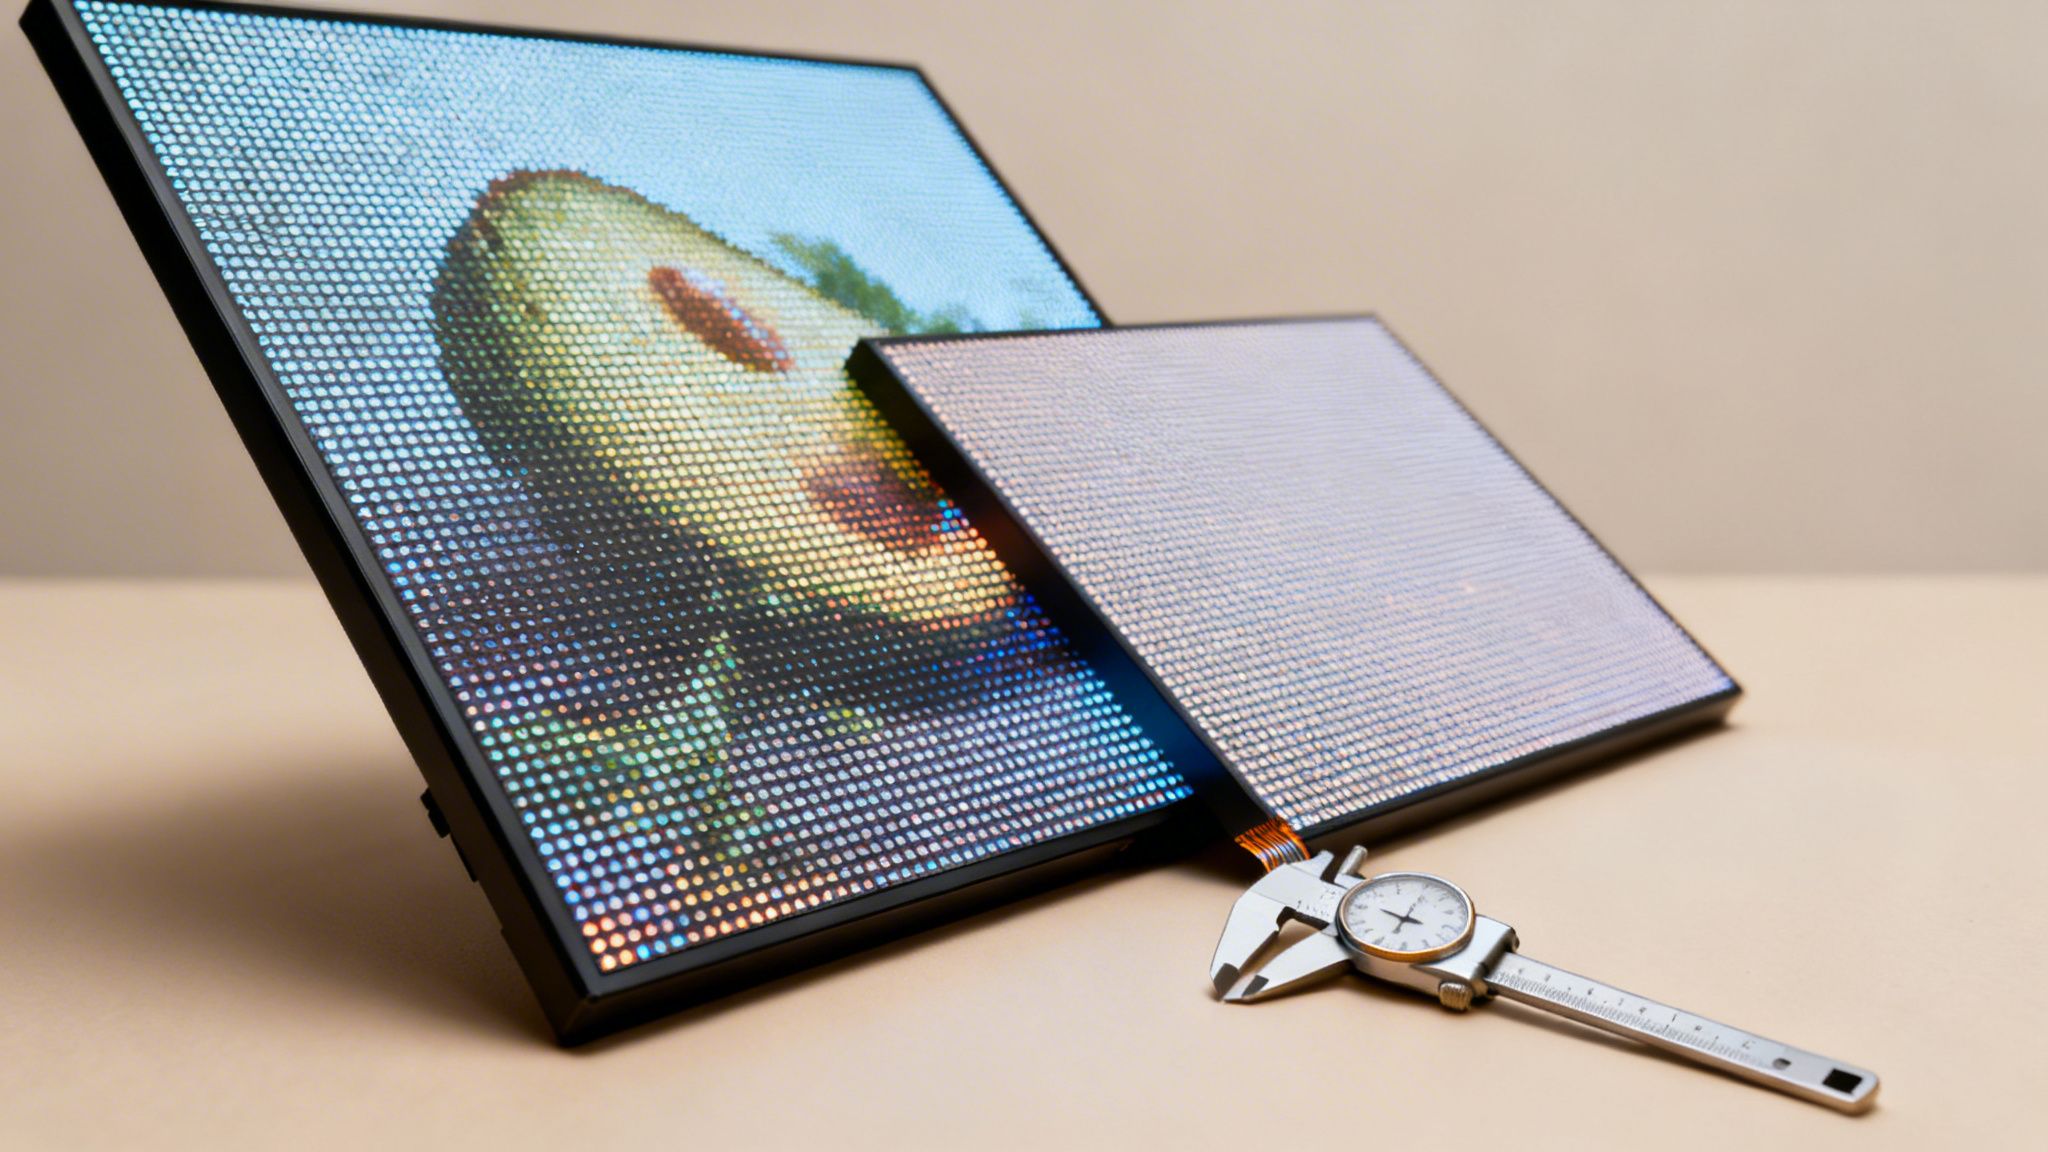
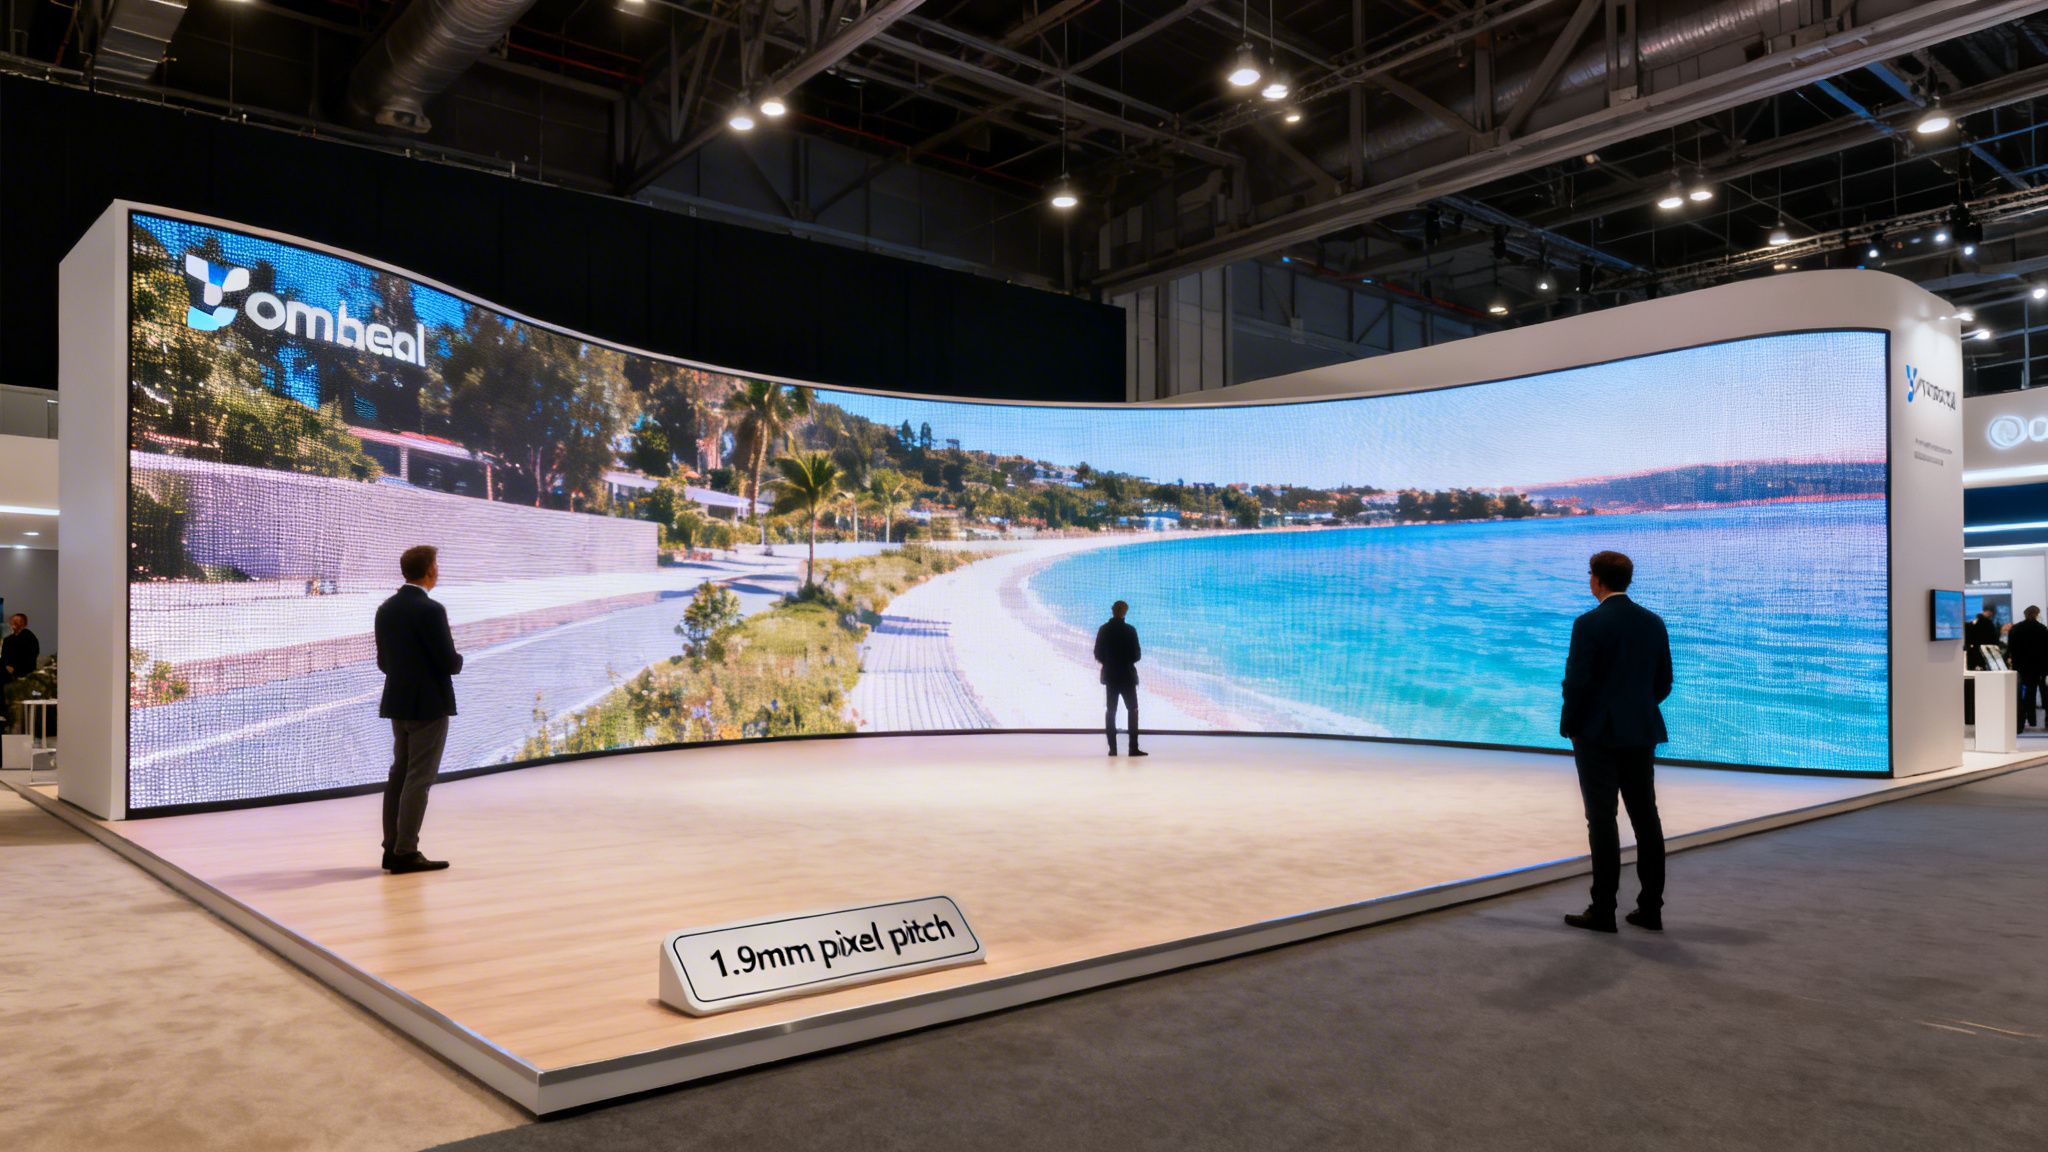
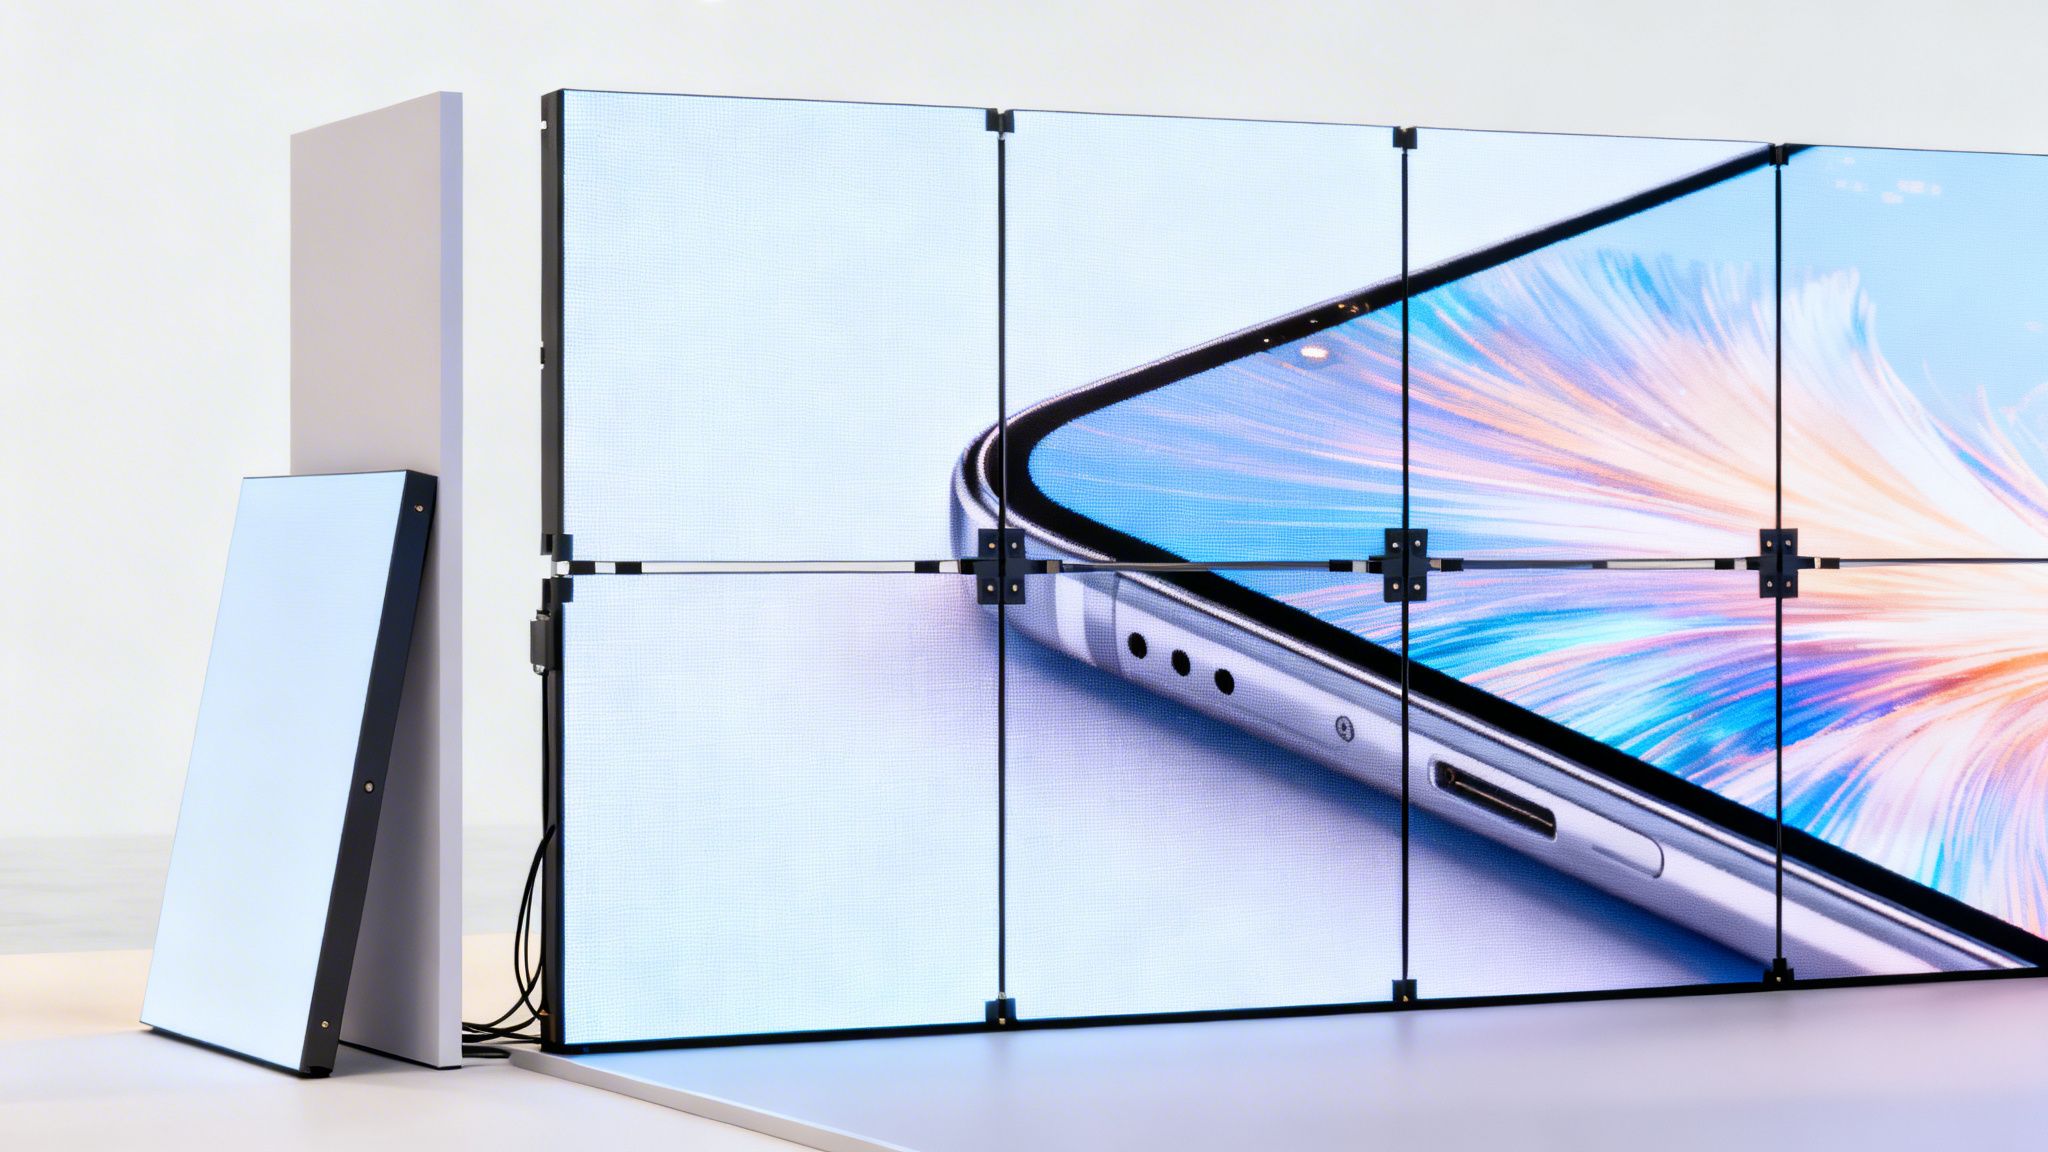
We use video walls with a 1.9mm pixel pitch, which gives you a much higher resolution and a sharper picture than the 2.5mm pitch our competitors often use. What that means for you is your content looks incredibly crisp and professional, even when attendees are standing right up close. Best of all, our pricing is all-inclusive. The price we quote is the price you pay, covering everything except for what the show bills you for directly.

Exploring Interactive Trade Show Display Technologies

Picking the right technology for your interactive trade show displays is a bit like choosing the right tool for a job. A hammer isn’t great for a screw, and a simple tablet won’t create the same jaw-dropping effect as a massive video wall. Understanding your options is the first step to building a booth that works as hard as you do.

The most common interactive tools are standalone devices. Think tablets for one-on-one demos, large touchscreens where people can browse your product line, or self-service kiosks for lead capture. These are fantastic for focused, individual interactions, letting attendees explore at their own speed.

Then you have things like gamification. Turning your demo into a game with a live leaderboard is a surefire way to pull a crowd from the aisles and spark some friendly competition. Augmented Reality (AR) and Virtual Reality (VR) take things even further, creating immersive experiences that let people see your product in their world or step inside a virtual one.

Finding The Right Fit For Your Booth

Every technology has its place, and the best one for you boils down to what you’re trying to achieve.

  • Touchscreens and Tablets: Perfect for letting attendees dig into detailed product catalogs, build custom configurations, or sign up for a newsletter. They’re direct, intuitive, and people already know how to use them.
  • Gamified Demos: Use these to create a buzz. A simple, fun game that connects to your brand can do wonders for brand recall and get people excited about what you do.
  • Augmented and Virtual Reality: AR and VR are your go-to for showing off products that are too big, too complex, or just too conceptual to haul onto the show floor. They create those powerful “wow” moments people remember.

This shift from a passive, static booth to a dynamic, interactive one is a huge leap in effectiveness. Plus, you can have a lightweight trade show booth with a TV monitor to keep costs down.

Diagram illustrating the evolution from static to interactive booths, comparing engagement and data collection benefits.

It’s about turning people who are just walking by into active participants. You’re not just showing them something; you’re giving them something to do.

Choosing the right technology can be tricky. Each has its strengths, weaknesses, and ideal applications. This table breaks down the most common options to help you decide.

Comparing Interactive Trade Show Displays Technologies

Technology Pros Cons Best For
Touchscreens & Tablets Intuitive, great for detailed content, easy for data capture. Limited to one-on-one or small group use, smaller visual impact. Self-guided product catalogs, lead capture forms, personalized demos.
LED Video Walls Massive visual impact, highly versatile, can unify all other tech. Higher cost, requires more power and structural support. Creating a high-impact, immersive booth environment that attracts from afar.
Augmented Reality (AR) Memorable “wow” factor, great for product visualization, no headset required. Requires attendees to use their own phones, app can be a barrier. Demonstrating large or complex products in the attendee’s physical space.
Live Demos & Presenters Human connection, can answer questions in real time, highly engaging. Dependent on presenter skill, can only engage a limited number at a time. In-depth product explanations, building rapport, and handling complex Q&A.

While each of these has its place, the goal is often to create a single, seamless experience rather than a collection of separate activities.

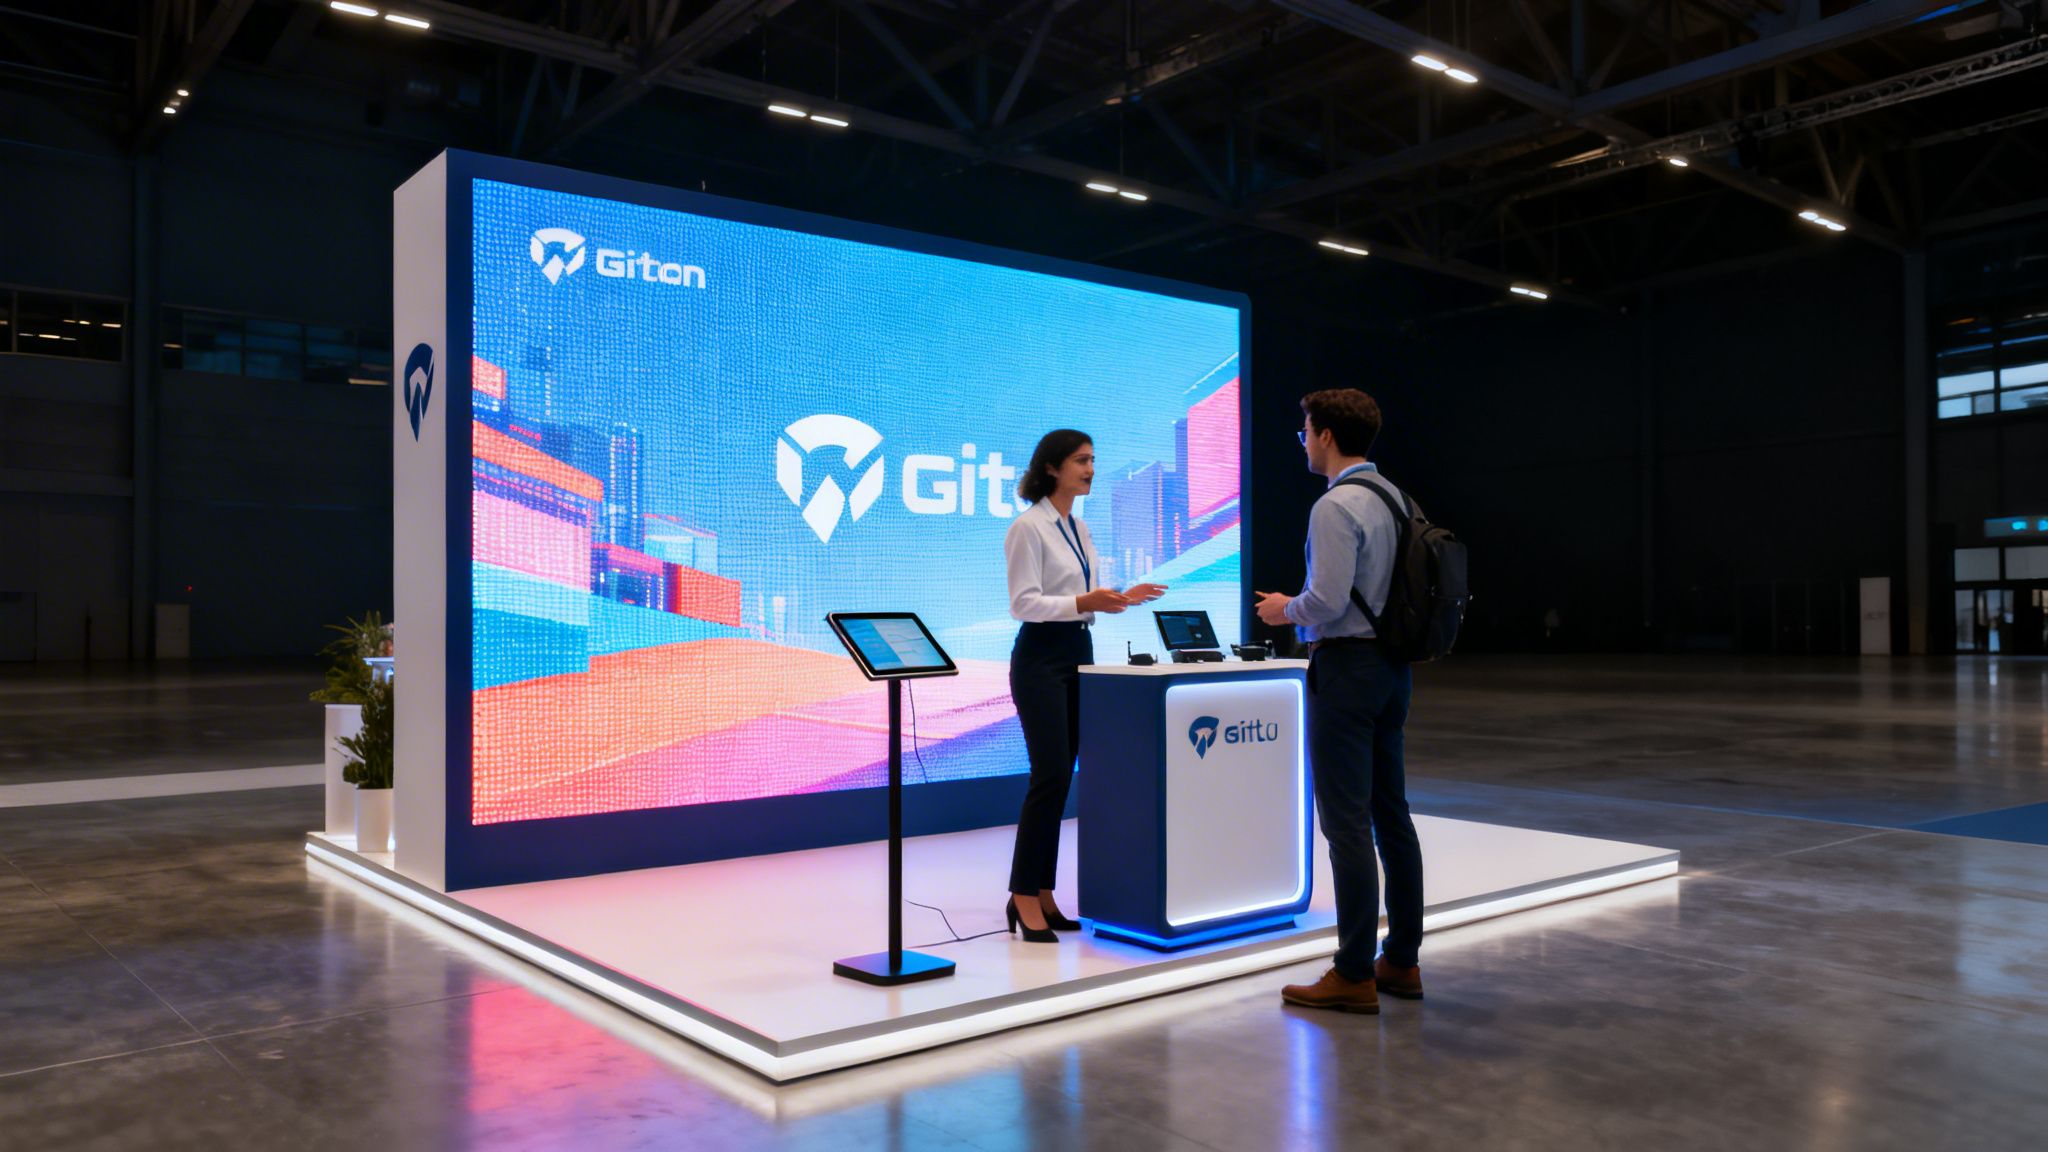
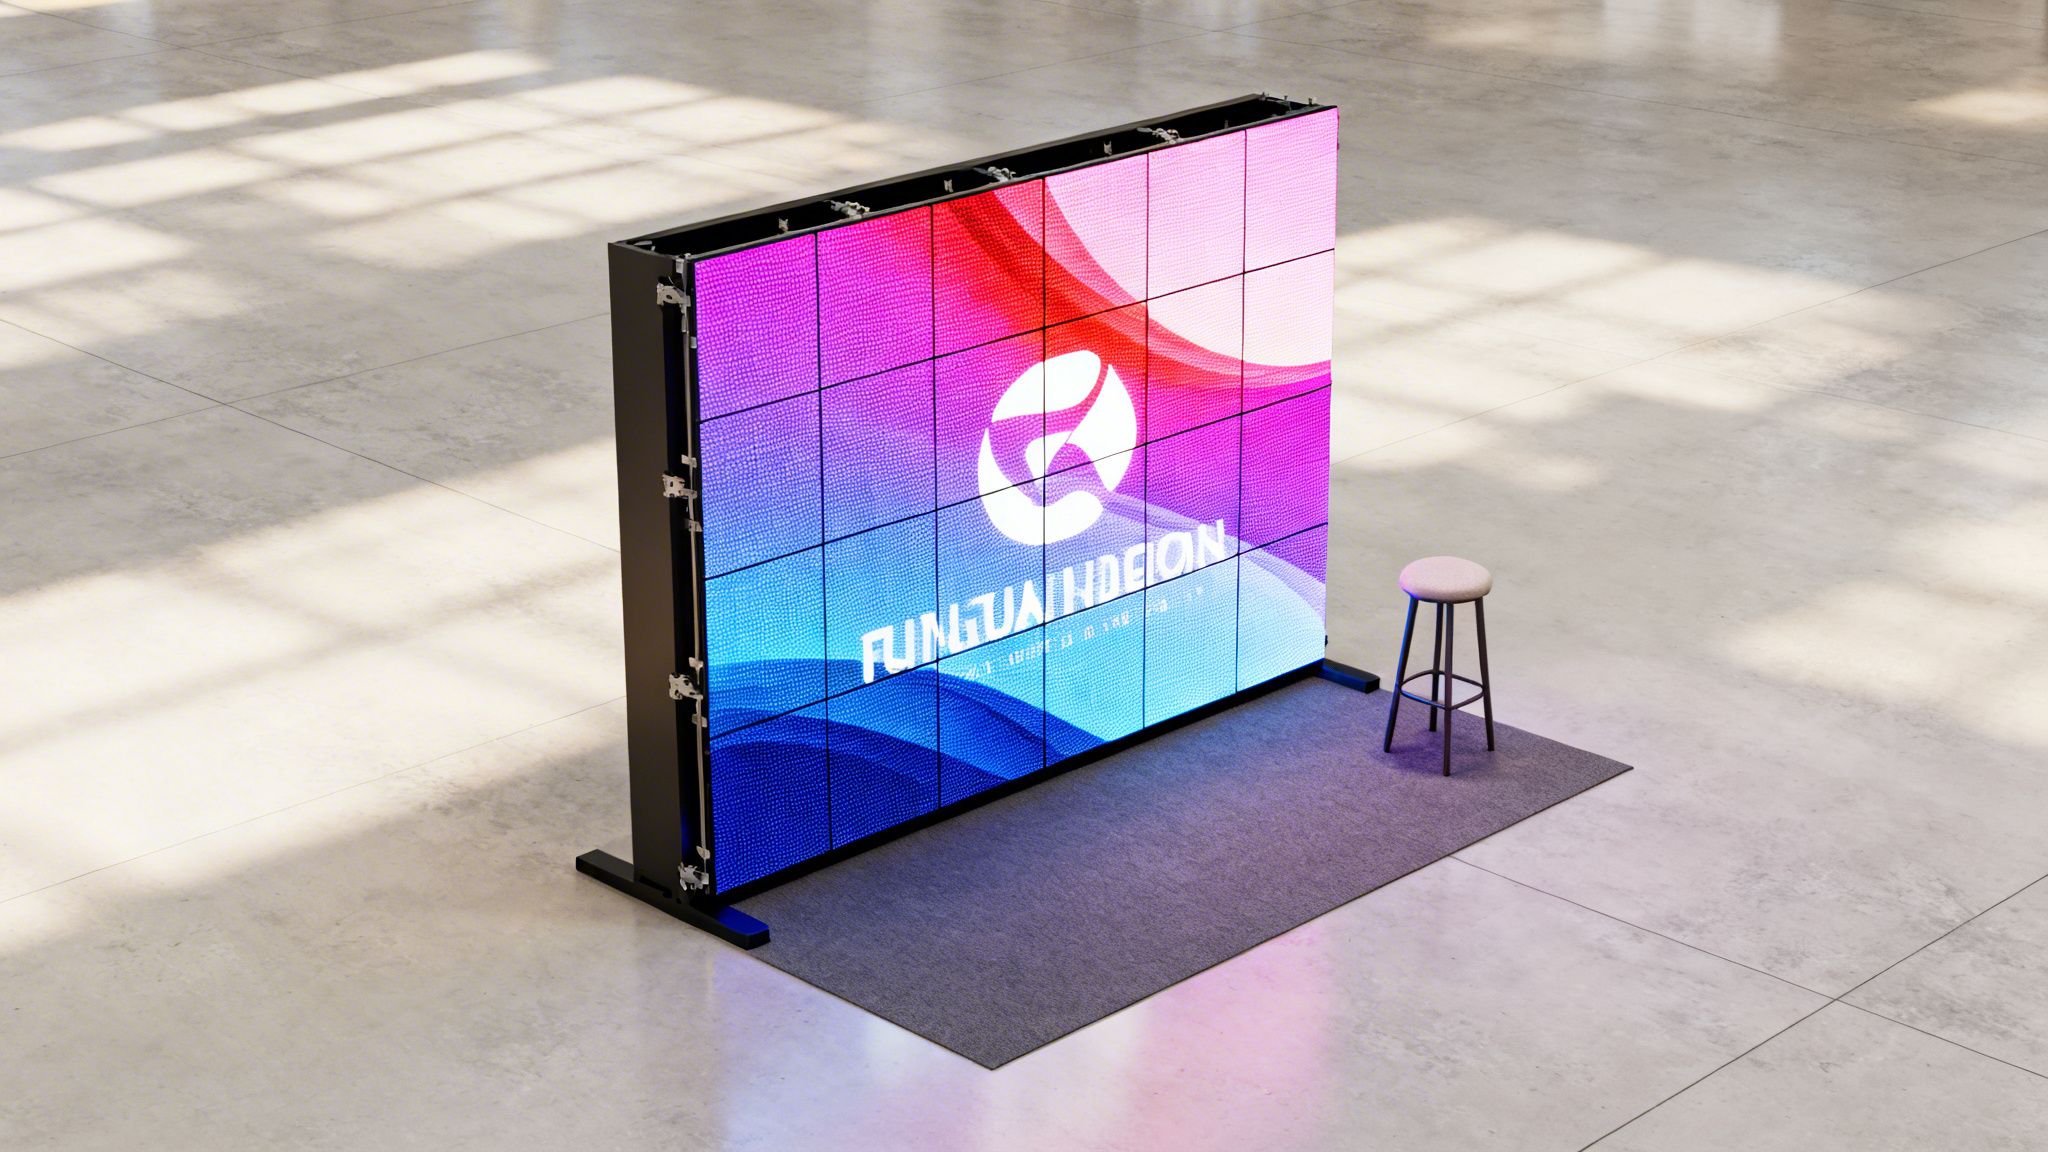
The LED Video Wall: Your Interactive Hub

While all these technologies are effective, they often feel like separate islands in your booth. The ultimate solution brings them all together into one cohesive experience: an integrated LED video wall.

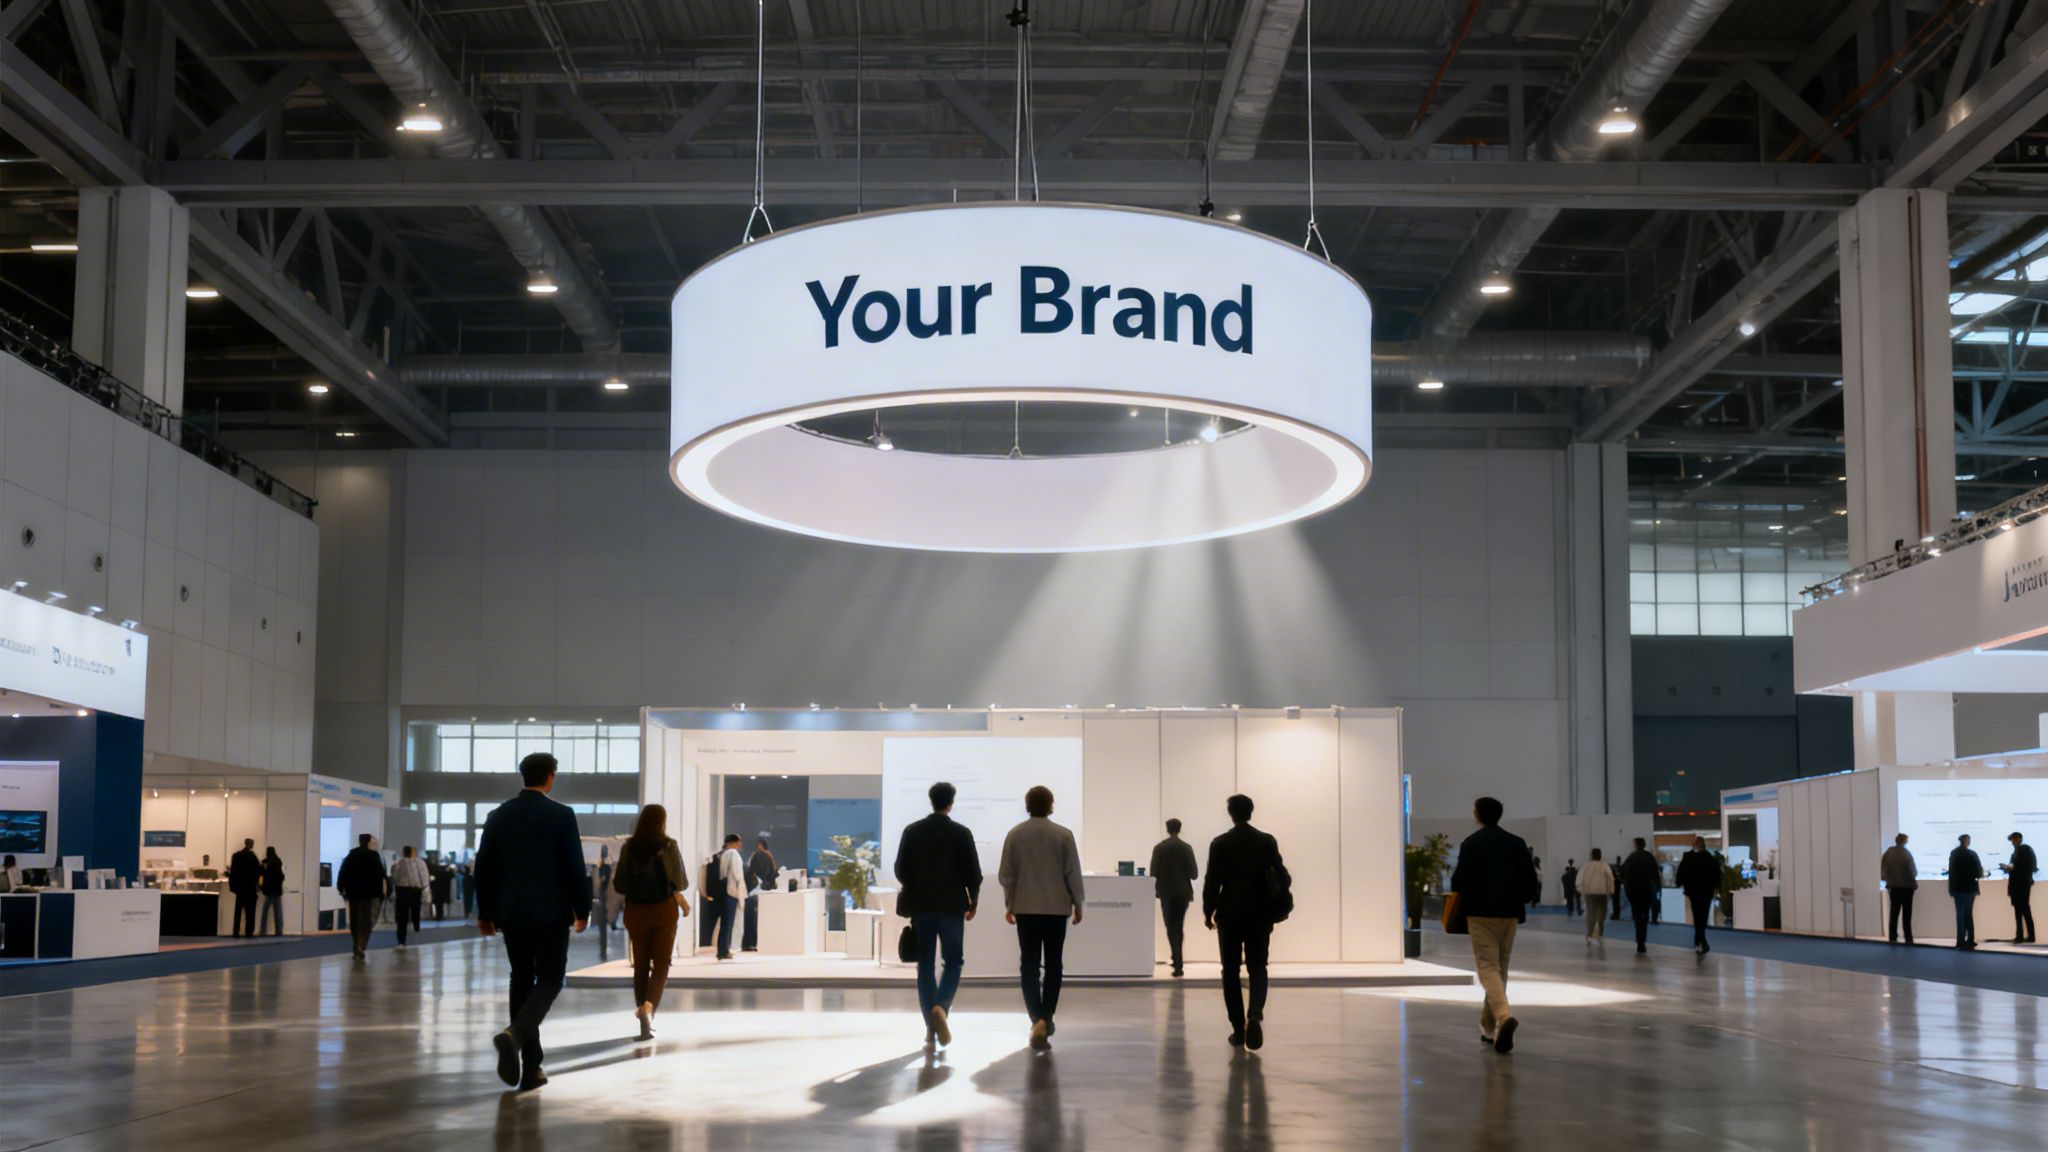
Imagine your entire booth structure isn’t just a static backdrop but a dynamic, digital canvas. That’s the power of a fully integrated video wall. It becomes the centerpiece, the main event, capable of hosting every other interaction you have planned. It’s not just a screen; it’s the entire environment.

With a video wall, you can guide attendees on a journey. First, a bold, motion-graphic animation grabs their attention from across the hall. As they get closer, the wall can prompt them to scan a QR code, launching an AR experience on their phone. Then, it can switch to a live presenter-led demo or display an interactive game for the crowd.

This approach creates a powerful, unified narrative. The video wall is the thread that ties everything together, guiding visitors through different levels of engagement within one stunning space.

Of course, the quality of that visual is everything. Many providers use a 2.5mm pixel pitch for their walls, but our interactive trade show displays are built with a 1.9mm pixel pitch. That smaller distance between pixels gives you a much higher resolution. Your videos and images will look sharper, clearer, and more professional—even when people are standing right up close. That premium look makes sure your brand message lands with maximum impact.

On top of that, our transparent, all-inclusive pricing means the quote you see is the quote you pay. We bundle all the hardware, logistics, and on-site support into one clear price. The only extra costs are what you pay the show directly for, like electricity and internet. This gets rid of surprise fees and makes budgeting a whole lot simpler. You can focus on creating an amazing experience, not worrying about hidden costs.

The Unmatched Advantage of Seamless LED Video Walls

When you decide to build your booth around an LED video wall, you’re doing more than just picking a display—you’re crafting an entire digital environment. This is where your brand’s story comes to life on a huge, dynamic canvas. But not all video walls are created equal. In fact, the tiny technical details can make a world of difference in how attendees see your brand.

The heart of any great LED display is its visual clarity. The single most important factor here is pixel pitch—the distance between each individual LED on the screen. A smaller pixel pitch means the LEDs are packed tighter, creating a denser, more detailed picture. It’s like the thread count in high-end sheets; more threads per inch gives you a smoother, more luxurious feel.

interactive trade show displays

Why a 1.9mm Pixel Pitch Is a Game Changer

Many providers use a standard 2.5mm pixel pitch. From a distance, it works. But for attendees standing right in your booth, it can look pixelated or grainy. Our interactive trade show displays are built with a 1.9mm pixel pitch, giving you a serious visual upgrade.

This means your videos and product shots will look dramatically sharper and more vibrant. For people who are right in your space, the image stays crystal clear. This communicates a sense of quality that reflects directly on your brand. It’s a premium detail that makes sure your message lands with maximum impact, no matter where someone is standing.

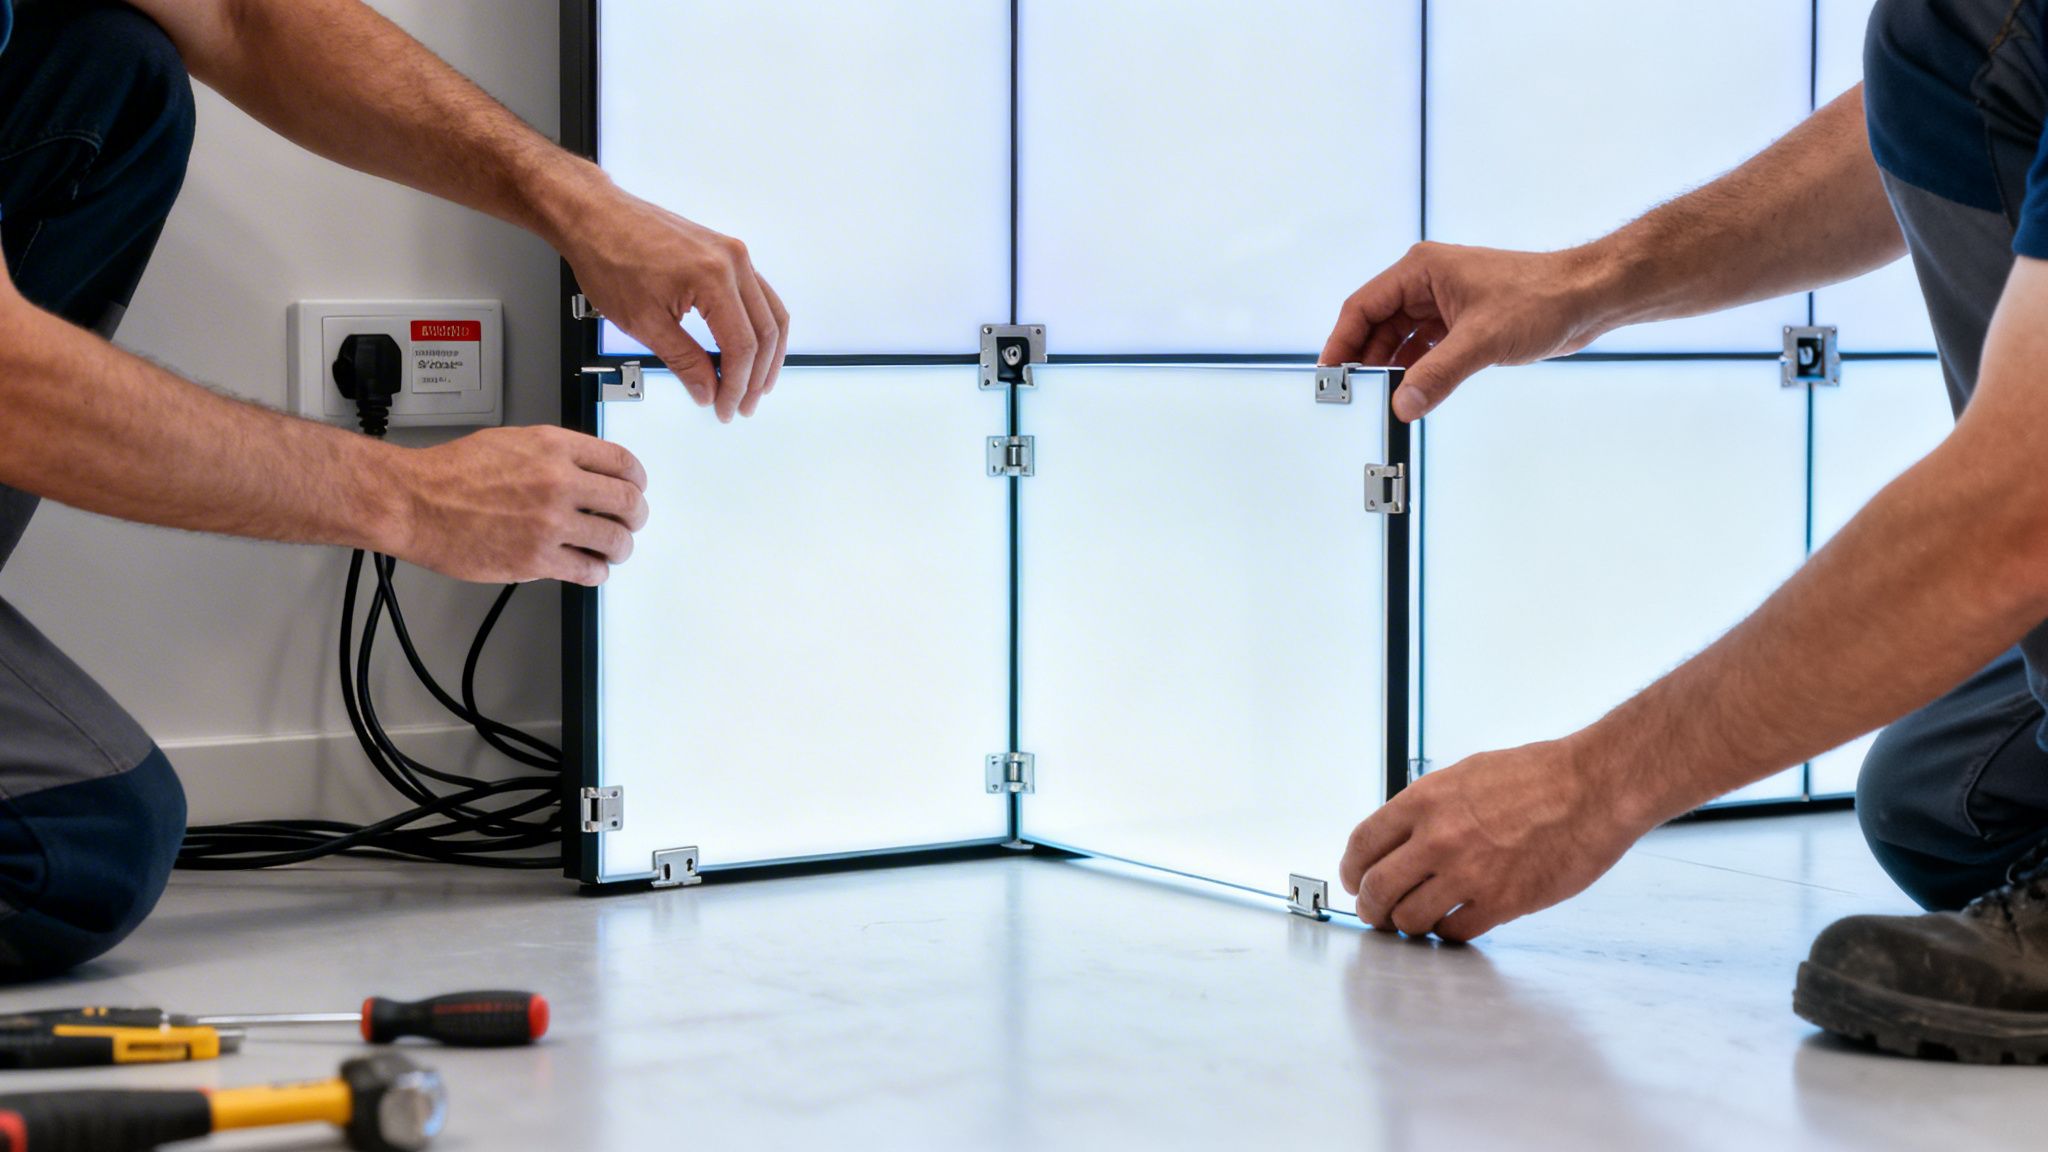
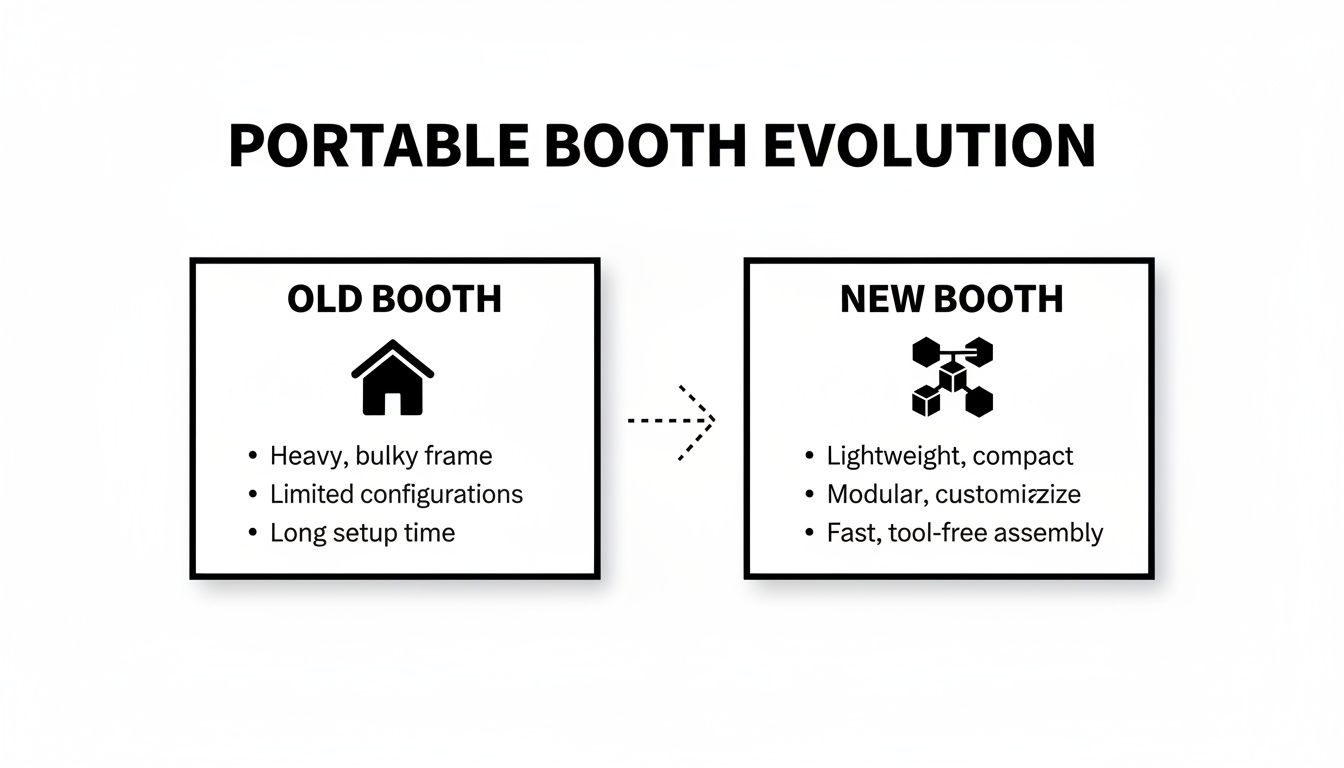
A Smarter Structure Built for the Real World

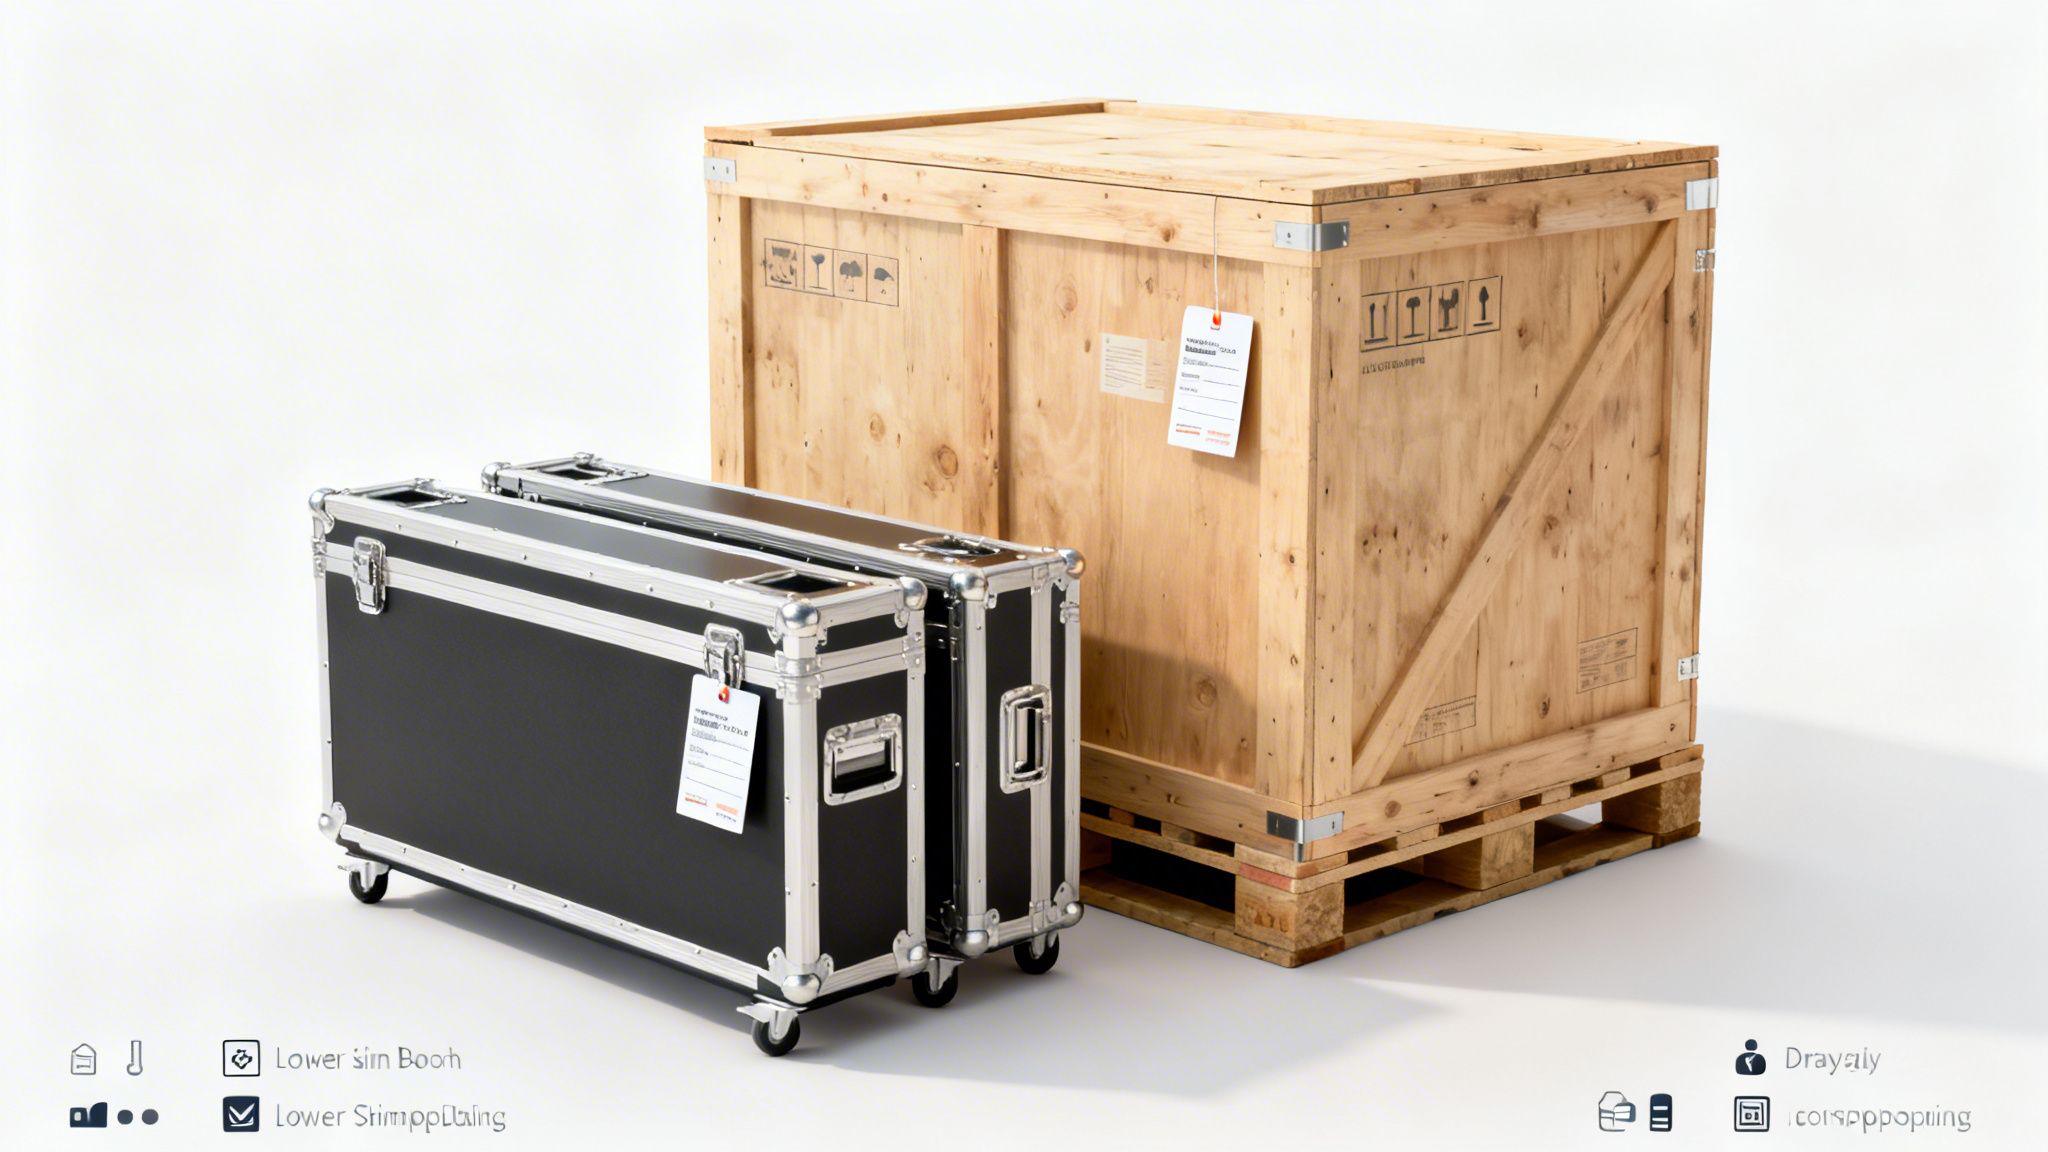
Beyond the screen quality, the physical construction of the booth itself is a critical advantage. Traditional video wall setups are often a logistical nightmare. They involve heavy trusses, complicated rigging, and a spiderweb of cables that need more time, more labor, and more money.

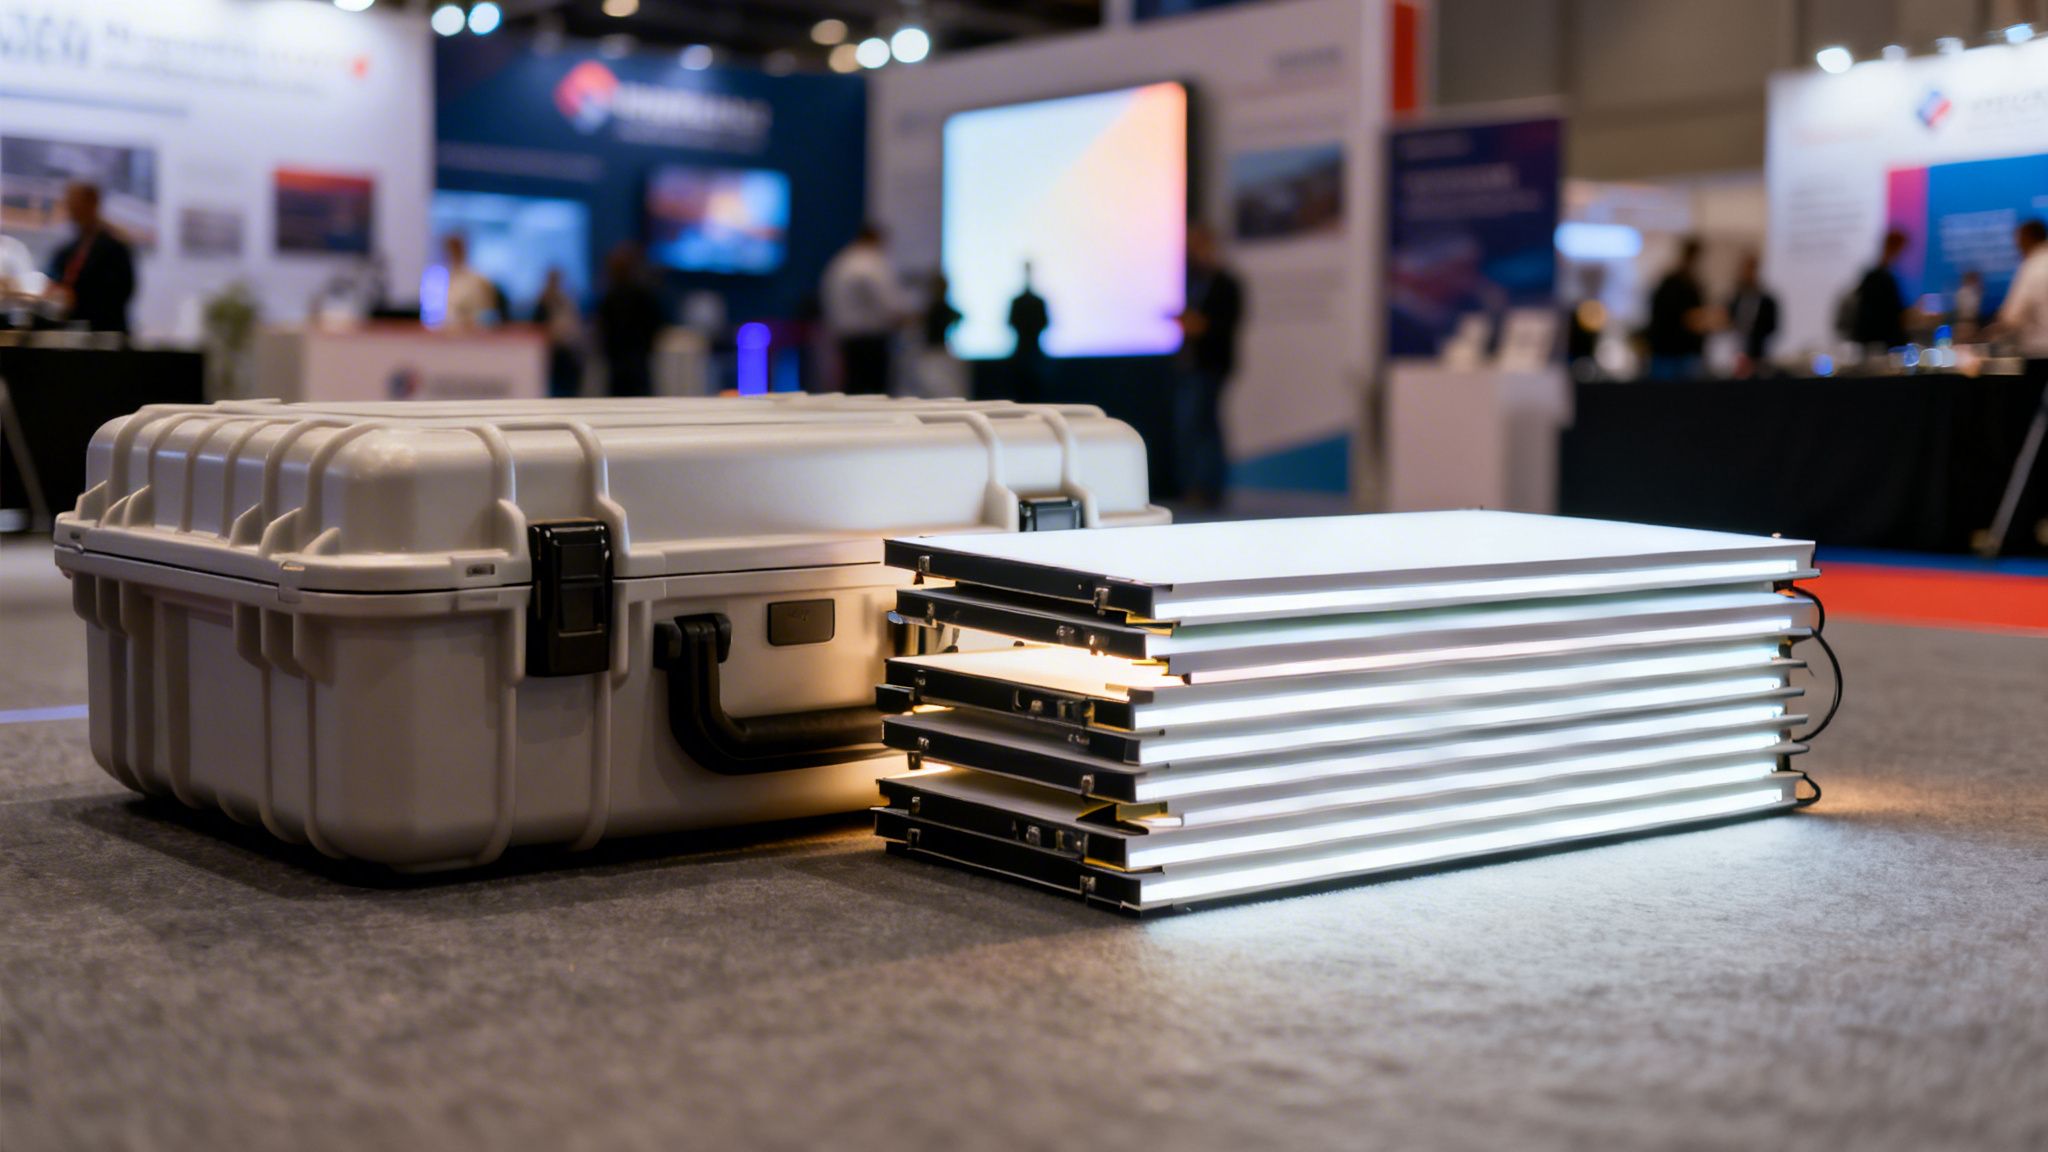
Our approach is different. The booth is the video wall. We use lightweight LED panels that serve as the actual building blocks of your exhibit. These panels snap together effortlessly with high-powered magnets and a toolless locking system.

This integrated design completely gets rid of the ugly bezels, messy wiring, and bulky support structures that ruin the visual experience. The result is a truly seamless digital canvas that wraps attendees in your content.

This smart construction isn’t just about looks; it helps your bottom line. Lightweight panels mean lower shipping and drayage fees, which are often a huge hidden cost. The toolless setup also slashes assembly time, so you’re not spending as much on expensive show floor labor. Plus, we can help with any type of Interactive Trade Show Displays.

Transparency in Pricing and Logistics

Speaking of costs, navigating trade show expenses can be a real headache. We believe in making the process as straightforward as possible. That’s why we include everything in our price except the bills you get directly from the show organizer.

This all-inclusive approach covers:

  • The LED video wall hardware itself.
    Programming of interactive trade show displays.
  • All necessary logistics, including shipping and handling.
  • On-site technical support to make sure everything runs smoothly.

The only things not included are services like electricity and internet, which exhibitors have to order and pay for directly with the show. This transparency takes the guesswork and surprise fees out of your budget, letting you focus on what really matters—connecting with customers. Check out our guide to learn more about the specifics of our video display wall solutions.

Ultimately, a superior video wall isn’t just for showing content; it’s about providing a smarter, more efficient, and visually stunning foundation for your entire trade show strategy. These immersive canvases can increase engagement by 45%, while magnetic locking panel systems can slash shipping costs by 25% and dramatically reduce setup errors. It’s no wonder the market for interactive trade show displays is projected to grow from $52.27 billion in 2025 to $105.53 billion by 2035.

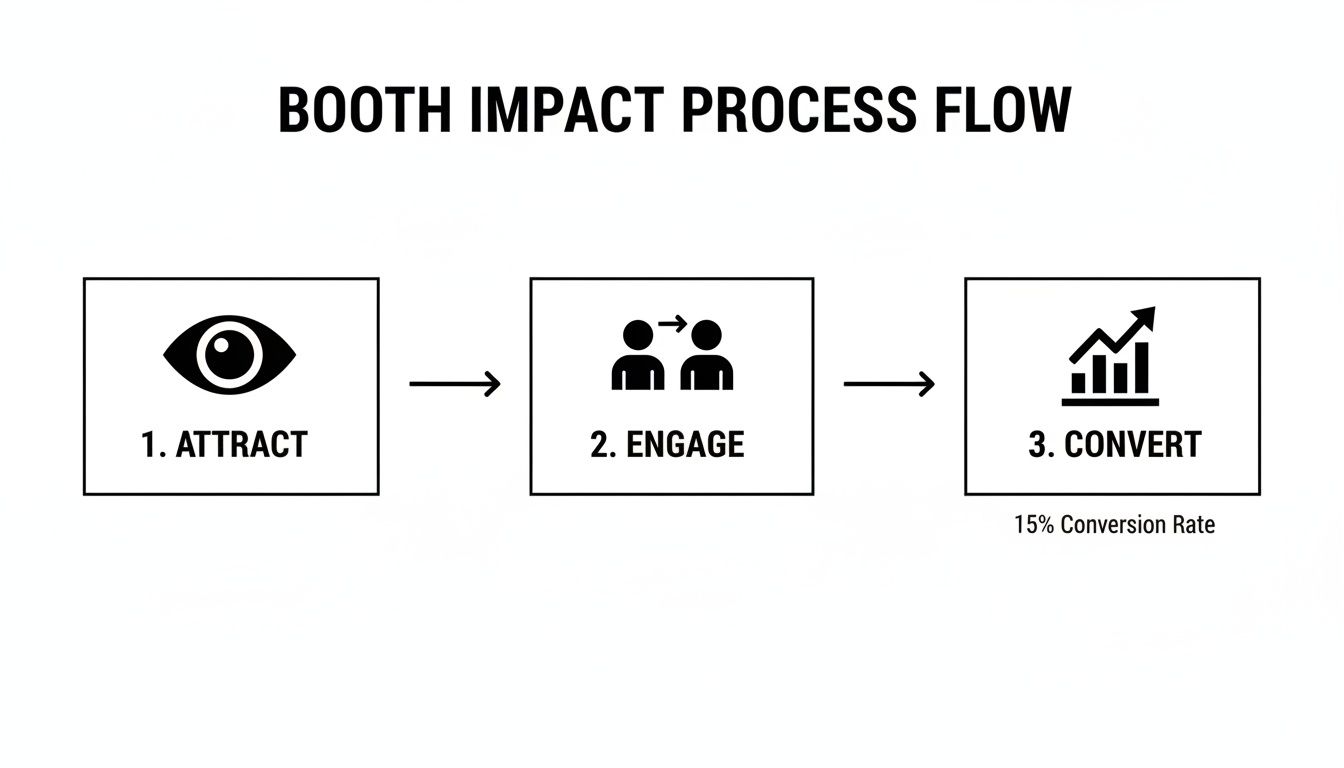
Designing Content That Captures and Converts

Three colleagues collaborate around a table, using a tablet and a strategy grid in a modern office.

You can have the most stunning LED wall on the show floor, but if what’s on screen doesn’t connect, you’ve just got a very expensive, very bright paperweight. The secret is to stop thinking about your content as just a video on a loop. Instead, see it as a complete system designed to pull an attendee out of the aisle and turn them into a qualified lead.

A really effective way to do this is with the ‘Attract, Engage, Inform’ model. It’s a simple framework that breaks your content down into three jobs. This method is all about turning passive walkers into people who genuinely want to talk to you.

The Attract Stage: Your Visual Handshake

First things first, your interactive trade show display has to stop traffic. Cold. At this stage, your content is a visual magnet, pulling people in from the sea of competing booths. You need to be big, bold, and impossible to ignore.

This is your ‘Attract’ content. Its only job is to get eyeballs from a distance with high-energy visuals that make people curious. This is no time for subtlety.

Here are a few ideas for your Attract content:

  • High-Impact Motion Graphics: Think fast-paced animations with your logo, brand colors, and a few powerful words.
  • Cinematic Product Shots: Show your product in a dramatic, larger-than-life style. Make it look like a blockbuster movie trailer.
  • Abstract Visuals: Sometimes, even non-branded, artistic patterns with wild colors and movement can be enough to draw the eye.

The goal is simple: make them stop walking and look your way. Once you have their attention, it’s time to reel them in.

The Engage Stage: Holding Their Attention With Interactive Trade Show Displays

Okay, they’ve stopped. Now what? You have to give them something to do. The ‘Engage’ stage is where the “interactive” part really kicks in. This is where you invite people to touch the screen, play a game, and connect with your brand themselves.

You’re trying to turn a passive viewer into an active participant. You want them to step up and physically interact with your display.

Think of this as the heart of your experience. You’re turning a one-way speech into a two-way conversation, letting people explore what you do on their own terms. That hands-on moment is what they’ll remember.

Effective ‘Engage’ content could be:

  • Product Configurators: Let people build or customize a version of your product right on the screen.
  • Interactive Quizzes or Polls: Ask some fun, industry-specific questions and show the results in real-time.
  • Social Media Feeds: Pull in a live feed of posts using your event hashtag. It builds a sense of community right there in your booth.

The Inform Stage: Delivering Deeper Value

Once someone is actively engaged, they’re much more open to learning. This is the ‘Inform’ stage, where you offer up the good stuff—the in-depth content that explains the why behind what you do.

This content needs to be easy to find and self-guided. It lets interested folks dig deeper without having to grab a sales rep right away. It empowers them to essentially qualify themselves, which makes for a much better conversation when your team does step in. If you need help creating this kind of material, you can get some pointers from our guide on video wall video production.

Examples of ‘Inform’ content include:

  • On-Demand Video Case Studies: Let attendees pick and watch success stories from customers they can relate to.
  • Detailed Product Demos: Offer short, self-paced video tutorials that break down the key features.
  • Expert Interviews: Provide access to quick video clips from your company’s leadership or other industry experts.

By layering your content this way, your interactive trade show display stops being just a screen and becomes a full-blown conversion funnel. It guides attendees from the aisle to your sales team, delivering people who are already educated and interested.

Navigating the Logistics of an Interactive Booth

Let’s be honest, thinking about the logistics of a high-tech, interactive booth can be a real headache. The whole process—from shipping and setup to teardown and billing—is often a maze of confusing charges, surprise fees, and logistical nightmares. Our goal is to cut through all that and give you a clear, stress-free path to a booth that works for your budget.

One of the biggest pain points we hear about from exhibitors is just trying to figure out the final cost. Traditional booth rentals often hit you with a tangled web of charges for hardware, shipping, and labor, leaving you to guess what the final bill will be. We do things differently with a transparent, all-inclusive pricing model.

When we give you a quote, it covers the display hardware, all the shipping and logistics, and on-site support. The only things not included are the services the show organizer bills you for directly, like electricity and internet. This straightforward approach means no hidden fees, which builds trust and lets you budget with absolute confidence.

Decoding Display Quality and Cost Savings

When you’re looking at an interactive booth, the visual quality is every bit as important as the price. We use video walls with a 1.9mm pixel pitch, and that small detail makes a huge difference. A lot of competitors use a 2.5mm pitch, but our smaller pitch means the individual LEDs are packed much closer together. The result? A much higher-resolution image that looks sharp and professional, even when people are standing right up close.

Beyond the visuals, our entire system is designed to save you money on logistics. Our booth structures are built from lightweight, magnetic LED panels that literally snap together without any tools. This design directly attacks two of the biggest and most unpredictable expenses at any trade show: drayage and labor.

  • Reduced Drayage Fees: Drayage, the fee for moving your materials from the loading dock to your booth space, is billed by weight. Our lightweight panels can slash those costs compared to heavy, old-school booth structures.
  • Lower Labor Costs: Because the assembly is toolless and magnetic, it’s incredibly fast. A quicker setup means fewer hours you have to pay for expensive on-site union labor, putting that money right back in your pocket.

The global interactive display market is set to explode from $18.17 billion in 2025 to a projected $30.22 billion by 2030. For exhibitors, the ROI of this technology is clear: LED booths with toolless, magnetized panels can slash setup time by 50%, a critical efficiency in a competitive landscape with over 52,000 event planning firms. Discover more insights on this booming market in this detailed industry report.

A Clear Roadmap from Start to Finish

Our main goal is to make the entire process so seamless that your team can focus on what they do best—talking to potential customers. By handling the logistical headaches and providing a better-looking product, we help you get the most out of your event investment.

This combination of transparent pricing and smart logistical design gives you a clear and predictable path to a successful show. You get a booth that not only looks superior but is also smarter, faster, and cheaper to get on the show floor. For more details on the practical benefits, take a look at our guide on LED video wall rental solutions.

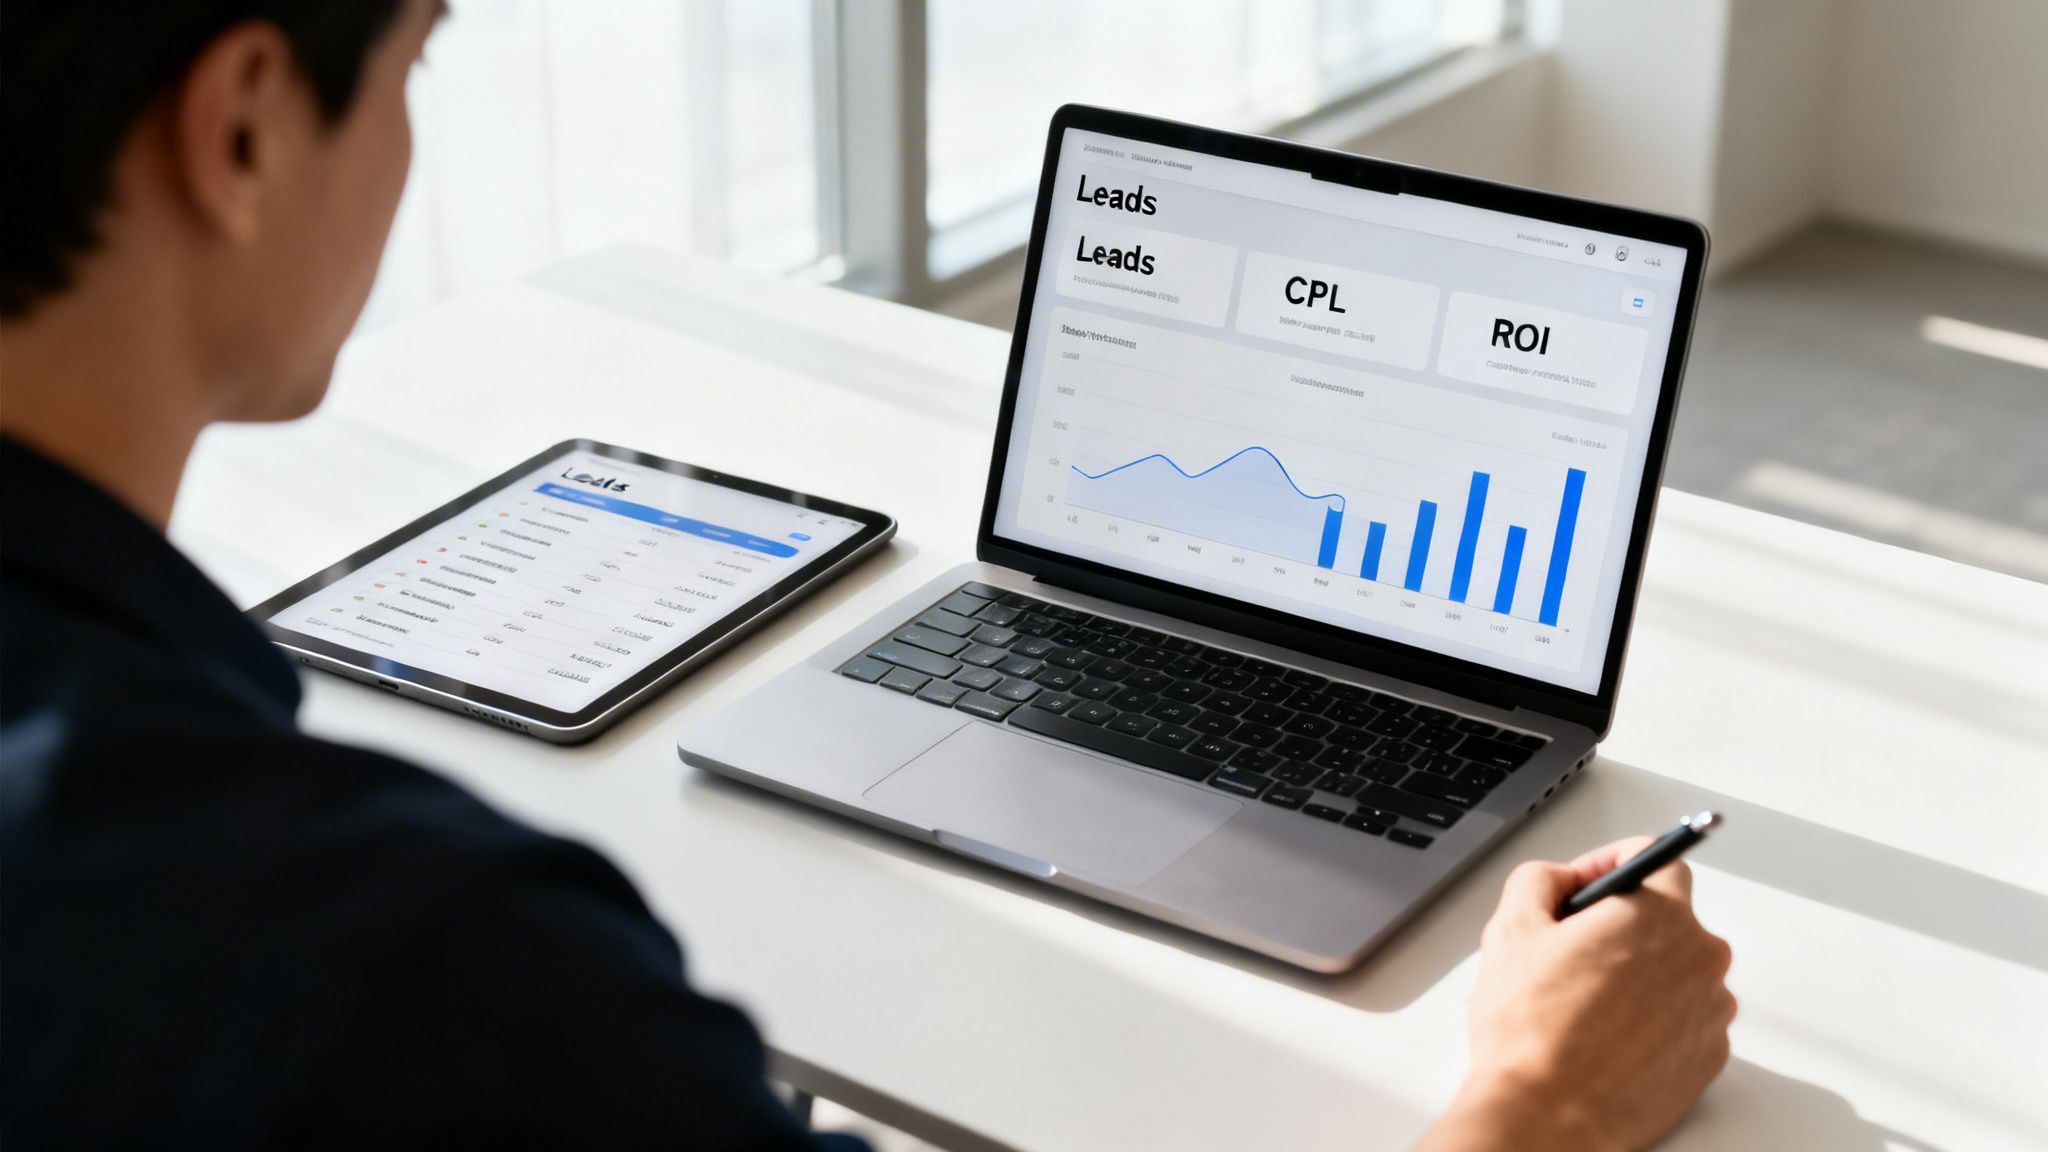
Measuring the ROI of Your Interactive Display

So you’ve invested in a high-impact, interactive trade show display. It’s a big decision. But after the show lights go down and the last crate is on the truck, you have to prove it was a smart one. How do you measure success when just counting badge scans doesn’t cut it?

The real key is connecting what happens at your interactive display directly to your business goals. Justifying the spend starts with tracking the right stuff. Of course, lead count is a number everyone wants to see, but interactive tech lets you dig so much deeper. You can actually gather data on how people are behaving in your space, which gives you a much richer picture of how your event really went.

Key Metrics to Track

To get to the real value of your interactive booth, you need to focus on metrics that measure how engaged people are and how much influence you had.

  • Dwell Time: How long are people actually sticking around in your booth? You can use sensors and analytics to track this. It shows if your content is grabbing and holding their attention. The longer they stay, the more chances your sales team has to start a conversation.
  • Interaction Rates: This one’s simple. How many people are actually touching the screen, playing your game, or messing with the product configurator? This metric is direct proof that your display is pulling people in and getting them to participate.
  • Lead Quality: You have to look past the sheer number of leads and figure out how good they are. Interactive software can log which products or case studies a specific person looked at. This is gold for your sales team—it helps them prioritize follow-ups with the prospects who are already highly interested.

Tying Metrics to Business Outcomes

Once you have this data, the next step is connecting it to what really matters: business outcomes. This is how you build a rock-solid case for the money you spent. For instance, divide your total booth cost by the number of high-quality leads you generated. Now you have a much more accurate cost per qualified lead.

You can also measure the impact on your brand awareness. A simple post-show survey can ask attendees if they remember your brand. A memorable interactive experience is a great way to make sure your company stands out from all the noise.

Remember, the goal here is to get past the vanity metrics. A high interaction rate is great, but its true value is only clear when you can show it led to more meaningful sales conversations and a lower customer acquisition cost than you had at previous shows.

This data-driven approach isn’t just about justifying what you’ve already spent; it gives you a clear roadmap for what to do next. You can see exactly which interactive elements and content pieces worked best, letting you refine your strategy and make even smarter choices for your next show.

An interactive trade show display isn’t just a pretty centerpiece—it’s a powerful data collection tool that helps you get better and better.

Answers to Your Questions About Interactive Displays

When you’re gearing up for a big show, you’ve got a million decisions to make. Deciding to ditch a static booth for an interactive trade show display can bring up a lot of questions. We get it.

Here are the straight answers to the most common questions we hear from exhibitors. We want you to have the confidence to make the right call for your brand.

How Much Does an Interactive LED Video Wall Booth Cost?

Costs can vary, of course, depending on the size and complexity you’re after. However, our all-inclusive model is built to be surprisingly cost-effective.

Our pricing wraps up the hardware, shipping, setup, and on-site support into one number. No hidden fees, no surprises. The only things you handle separately are the direct show services like electricity and internet, which you’ll arrange with the show organizer.

Because our system is lightweight and toolless, it slashes shipping weight, drayage fees, and labor hours. The total investment is often a lot more competitive than you’d think. We can build anything from a compact 10-foot booth to a massive custom exhibit to match your budget.

What Makes Your Video Wall Resolution Better?

The secret to a sharp, professional-looking video wall is something called pixel pitch. It’s just the distance between each tiny LED bulb. A smaller number means the bulbs are packed tighter, creating a much clearer, higher-resolution picture.

Many competitors use a standard 2.5mm pixel pitch, which can look a little grainy or pixelated when you’re up close. We use a 1.9mm pixel pitch, which delivers a dramatically sharper and more vibrant image. It’s a premium feature that makes a huge difference.

This ensures your branding and product shots are crystal clear, even for attendees standing right at the booth. That superior quality reflects directly back on your brand.

Is the Technology Hard to Run During the Show?

Not at all. Your team needs to be talking to customers, not messing with tech. We designed our service to be completely turnkey so you never have to worry about the technical stuff.

We handle the entire setup and teardown and provide on-site support. Our technicians make sure all your content is loaded, tested, and running perfectly before the show doors ever open. The systems are built to be rock-solid, freeing up your team to do what they do best: build relationships and close deals.

What Kind of Content Works Best on a Video Wall?

The best content strategy is a layered one that takes attendees on a little journey. Think of it in three simple stages: attract, engage, and inform.

  • Attract: From the aisle, you need to stop traffic. Use big, bold motion graphics and eye-catching cinematic video to grab their attention and make them turn their heads.
  • Engage: Once they’re at your booth, give them something to do. Interactive product demos, fun quizzes, or games will hold their attention and get them involved.
  • Inform: For visitors who want to dig deeper, provide on-demand content. Think video testimonials, detailed case studies, or product walkthroughs they can explore themselves.

Our team can help you map out a content plan that uses this model to hit your show goals and spark those important conversations.


Ready to transform your trade show presence with a booth that stops traffic and starts conversations? The team at LED Exhibit Booths is here to help you design an immersive, high-impact experience that delivers real results. Explore our turnkey solutions and see how we make world-class interactive displays accessible for any exhibitor. Visit us at https://ledexhibitbooths.com to get started.

A Guide to Flawless Trade Show Set Up

Your trade show set  up is the make-or-break moment for your entire event budget. It’s what turns an empty patch of carpet into an experience that grabs people’s attention. This isn’t just about putting up some walls and a table; it’s a careful mix of design, logistics, and presentation that determines whether you attract attendees, get good leads, or just waste a ton of money.

Why Your Booth Setup Is Everything at a Trade Show

Let’s be honest, the days of getting by with a simple pipe-and-drape backdrop are long gone. Today’s trade show floors are a sensory overload. Attendees are walking through a sea of exhibitors, and if your booth looks generic or uninspired, you become invisible. All that money you spent on floor space, travel, and staff goes right down the drain.

Thinking strategically about your setup is a critical marketing decision. It’s your first handshake, communicating your brand’s value before you even say a word. Your booth is a physical advertisement that has to stop busy people in their tracks and pull them in for a conversation.

Trade Show Set Up is About Creating an Environment, Not Just a Booth

The exhibitors who really get it know their booth isn’t just a space—it’s an environment. The goal is to create a cohesive experience that tells a story. This is where modern tech, especially our seamless LED video walls, has completely changed the game.

Instead of old-school static graphics, you can have:

  • Dynamic product demos that actually show how your complex features work.
  • Real customer testimonials that build instant trust.
  • Eye-catching brand animations that pull visitors in from across the aisle.

In a packed convention hall, a bright, moving display is always going to beat a printed banner. It’s not even a fair fight.

Making a Statement with High-Impact Visuals

The quality of your visuals says a lot about your brand. This is where the technical details give you a real edge. A lot of our competitors are still using standard video walls with a 2.5mm pixel pitch. Our displays, however, feature a much higher-resolution 1.9mm pitch. It might sound like a small difference, but the result is a dramatically sharper and more professional image that looks crisp even when someone is standing right in front of it.

Think of it as the difference between standard-def and high-def TV.

A higher-resolution display is a direct investment in how people perceive your brand’s quality. A blurry or pixelated video wall makes you look cheap, while a sharp, seamless image screams professionalism and attention to detail.

We carry that commitment to quality all the way to our pricing. We believe in being upfront, which is why we include everything in our price except the bills the show bills you for directly, like electricity and material handling. This straightforward approach means you can budget with confidence and not worry about the hidden fees that are so common with traditional booth builders.

The numbers don’t lie. The global exhibition industry is expected to hit $67.4 billion by 2033, with almost 5 million exhibitors fighting for the attention of 318 million attendees worldwide. In a market that massive, just showing up isn’t enough. You have to stand out.

This guide will walk you through turning your trade show setup from a logistical headache into your most powerful sales tool. You can discover more about the scale of the global exhibition market and what it means for exhibitors to understand just how crucial this is.

Your Pre-Show Planning Timeline for a Seamless Trade Show Set Up

A great trade show setup doesn’t just happen. It’s the result of solid planning that starts months before you ever step onto the show floor. Trust me, a good timeline is your best friend to avoid that last-minute panic and make sure every detail gets handled right.

The trick is to break the whole process down into smaller, manageable chunks. When you start early, you make smarter choices, dodge those painful rush fees, and can actually focus on the creative stuff that will make your booth the one everyone talks about.

90-Day Pre-Show Setup Checklist

Pulling off a killer trade show presence is a marathon, not a sprint. Naturally, to keep things from getting overwhelming, we break down the three months leading up to the show into a clear, actionable plan. This timeline covers everything from big-picture strategy to making sure your booth actually gets to the venue on time. Think of it as your roadmap to a stress-free trade show set up.

Timeframe Key Task Pro Tip for LED Booths
90 Days Out Set Goals & Budget Decide what success looks like (leads, sales, etc.). Lock in your total budget, and I mean everything—floor space, shipping, power, and drayage.
60 Days Out Finalize Booth & Content This is when your booth design gets locked in. Start creating the video content that will play on your LED walls. Don’t leave this to the last minute!
30 Days Out Handle Logistics Book travel and hotels for your team. Finalize the booth staff schedule. Most importantly, arrange shipping to the advance warehouse.

By tackling these key items in phases, you’re not just preparing; you’re setting yourself up for a much smoother, more successful show from start to finish.

90 Days Out: The Big Picture Strategy for Optimal Trade Show Set up

Three months out is when you lay the groundwork. This is where you figure out the “why” for your show. Without clear goals, your trade show set up is just an expensive gamble.

First, define what a win looks like. Are you trying to get a specific number of qualified leads? Launching something new? Just trying to make a splash in a new market? Your answers here will shape every other decision you make.

Next, you have to lock down your budget. A real budget, not just a guess. You need to account for the booth space, the booth itself, shipping, drayage (that’s the fee for moving your stuff from the dock to your booth), electricity, internet, and all your team’s travel costs. Getting this right now saves a lot of headaches later.

A huge budget-killer can be drayage fees. These are often one of the biggest and most unpredictable costs. Heavier, old-school booths get slammed with massive drayage bills. Choosing a lightweight, modern booth system from the start is one of the smartest money-saving moves you can make.

60 Days Out: Design, Content, and Standing Out

Okay, with your strategy and budget sorted, it’s time for the fun part. At the 60-day mark, you need to finalize your booth layout and start working on the content that will bring your LED video walls to life.

For an LED booth, your content is everything. This is your chance to create something that literally stops people in their tracks. What story do you want to tell? Are you going to show off flashy product demos, customer success stories, or just some bold, eye-catching animations?

This is also where the tech details really matter. We build our video walls with a 1.9mm pixel pitch. Many competitors mostly have a 2.5mm pitch, which is a lower resolution. That higher resolution from our 1.9mm pitch means your videos have a superior sharpness that looks crisp and professional, even when people are standing right in your booth. It screams quality.

To see how far things have come, just look at how booths have evolved over the years. We’ve gone from drapes and banners to the kind of immersive digital experiences you can create today.

Timeline showing booth evolution: past (curtains, 1980s), present (digital displays, 2010s), future (VR headset, 2030s+).

The trend is obvious: displays are getting more dynamic and tech-heavy, which is why a killer LED wall is no longer a luxury—it’s a necessity to compete.

30 Days Out: Logistics and Final Details of Your Trade Show Set Up

The last month is all about getting the details locked and your logistics buttoned up. Your booth design is done, your video content is ready, and your team is picked. Now, it’s all about getting everything—and everyone—to the show on time.

Here’s what you should be focused on in the final stretch:

  • Book Travel & Hotels: Get flights and rooms for your team booked now to avoid jacked-up prices and limited options.
  • Finalize Staff Schedule: Map out who is working the booth and when. Don’t forget to schedule breaks.
  • Arrange Shipping: Talk to your shipping partner and get your booth crates to the advance warehouse. It’s almost always cheaper and less stressful than shipping directly to the show.
  • Order Show Services: Get your forms in for electricity, internet, and anything else you need on-site. Missing these deadlines means you’ll pay a fortune in late fees.

It’s no secret the B2B trade show market is on fire, blowing past $40 billion in 2023. In fact, a whopping 92% of folks in the U.S. exhibition industry saw market growth in 2025 and feel good about the year after. All that growth means more competition on the show floor. A well-planned, high-impact trade show set up has never been more important.

One thing we do to make this final month easier is simplify our pricing. We include everything in our price except the bills the show bills you for directly, like electricity and material handling. That kind of transparency makes managing your budget a lot less of a guessing game.

If you’re still hunting for ideas, you might get some inspiration from our guide on building an exceptional exhibition stand.

Mastering Booth Assembly with Toolless LED Walls

This is where all your pre-show planning really pays off. Your crates are at the booth, forklifts are buzzing around the show floor, and it’s go-time. In the past, the physical trade show set up was a massive headache—think complex tools, confusing instructions, and eye-watering labor bills. But a modern toolless LED wall system turns what used to be a construction project into a straightforward assembly job.

Forget wrestling with heavy, clunky frames or needing to call in a specialized rigging crew just for a standard booth. The real beauty of a toolless system is just how simple it is. The core of the booth, the video walls themselves, are made from lightweight LED panels that just a couple of people can easily handle.

Two men assemble illuminated modular display panels, connecting them to form a large light wall.

The Magic of Magnets and Locks

The assembly all comes down to two simple things: powerful magnets and hand-operated locking mechanisms. As you bring two panels close, the magnets grab hold and pull them into perfect alignment. Then, a quick turn of a few locks secures them tightly, creating a connection so flush it’s completely seamless.

You just repeat this process—panel by panel, row by row—until your wall is built. There are no screws to drop and lose, no Allen wrenches to fumble with, and no need for complex trusses in most standard setups. It’s an intuitive system that dramatically cuts down on mistakes and makes the build go way faster.

The whole point of a toolless system is to empower your own team. While you’ll still need union labor for things like electrical hookups and drayage, the booth construction is so simple your staff can often do it themselves. This can save you thousands in specialized labor costs.

That efficiency means less time building and more time prepping for what actually matters—selling. Instead of a full day of stressful construction, you can get a standard 10×10 or 10×20 LED booth put together in just a few hours.

Your On-Site Assembly Game Plan

Even with a simple system, you still need a game plan to make sure your trade show set up is completely stress-free. Once your crates arrive, here are a few real-world tips to follow.

  • Confirm Your Power Drop: Before you even think about unboxing a panel, find your electrical drop. Make sure it’s where you specified on your floor plan. The last thing you want is to build the whole booth and realize your power is on the completely wrong side.
  • Lay Out Your Base: Start by laying the first row of panels on the floor. This sets your footprint and guarantees everything is perfectly aligned before you start building up.
  • Build, Connect, and Test as You Go: As you finish a section of the wall, plug in the data and power cables for those panels. Trust me, it’s much easier than trying to reach behind a fully assembled wall later.
  • Run a Full Content Check: Once the wall is built and powered up, run through all of your video content. Look for any dead pixels or connection glitches. It’s a lot easier to swap a panel during setup than in the middle of the show.

This methodical approach prevents nasty surprises and makes sure your booth is ready for action long before the doors open. If you want to dive deeper into the nuts and bolts, checking out different options for an LED video wall rental can give you a lot more insight into the tech and the process.

The Visual Payoff and Budget Clarity

All that quick assembly work leads to one thing: a stunning, high-impact visual canvas. Because the design is seamless, your content flows without any breaks across the entire wall, creating an immersive experience that static graphics just can’t touch.

This is where our focus on quality really shows. Many competitors use walls with a 2.5mm pixel pitch, which can look grainy up close. We insist on a 1.9mm pixel pitch. That smaller gap between pixels creates a much higher-resolution image, ensuring your videos look sharp and professional—even for attendees standing right next to the wall. It’s a premium detail that makes your brand look its best.

This commitment extends to our pricing, too. We believe in being completely transparent. In fact, we include everything in our price except the bills the show bills you for directly, like your electricity and material handling (drayage). This all-inclusive approach means you can budget with confidence, knowing there won’t be any unpleasant surprises on the final invoice.

Running Your Booth for Maximum Impact

Two people interact at a modern Giton trade show booth with a large, vibrant LED screen.

The booth is built, your LED walls are lit up, and the show doors are about to swing open. The heavy lifting of the trade show set up is done. Now, the real work begins—making sure your team uses this incredible space to its full potential. A beautiful booth gets people to stop, but it’s how your team engages them that turns foot traffic into qualified leads.

That dynamic video wall isn’t just a pretty background; it’s the most powerful tool in your booth. Your staff needs to be trained to use it, not just stand in front of it. They should know the content schedule inside and out, what visuals tie into which talking points, and how to use the screen to literally show a prospect what they’re talking about. This turns a static pitch into a dynamic, guided conversation.

Activating Your Space and Managing Flow

An immersive LED booth is a magnet for attendees, but you need a plan to handle the crowd. The goal isn’t just to get people to stare from the aisle, but to draw them in and start a conversation. Your layout is key here—it needs a clear entry point and an intuitive path for people to follow once they’re inside.

Think about the journey. Where will people have quick chats, and where can they sit down for a real demo? Your video content can act as a traffic cop. For instance, a looping animation on a corner screen can be the hook that grabs their attention, while the main wall directs them deeper into the booth for the good stuff.

Our all-inclusive pricing model is designed so you can focus on exactly these kinds of run-of-show strategies. Since we include everything in our price except for direct show bills, you can plan your day without getting blindsided by surprise booth costs.

This lets you put your resources where they count: creating a killer attendee experience. Your booth is your stage, and your team are the stars.

On-Site Troubleshooting and Extending Your Reach

Look, modern LED systems are workhorses, but with any tech, hiccups can happen. Giving your team a basic troubleshooting checklist is one of the smartest things you can do. It’s all about peace of mind.

Quick On-Site Fixes:

  • Check the Cables: Honestly, the most common culprit is a data or power cable that got wiggled loose behind a panel. A quick check and firmly re-seating the cable fixes it 9 times out of 10.
  • Reboot Everything: Just like your laptop, a simple restart of the media player can solve a host of minor software glitches or content freezes.
  • Is it On? Make sure the laptop or media player sending the signal is actually on and hasn’t gone into sleep mode. It happens more than you’d think.

Knowing these simple steps prevents a minor issue from turning into a full-blown panic on the show floor. Better yet, don’t let your booth’s impact stay within the convention center. That stunning video wall is a professional-grade broadcast set. Use it! Host a livestream on social media or run virtual demos for clients who couldn’t make the trip. Suddenly, your reach extends far beyond the show floor.

Capturing High-Intent Leads

Today’s trade show attendee isn’t just wandering around collecting free pens. They’re on a mission. The data is clear: 46% of attendees are in the final stages of their buying decision, and they are 72% more likely to buy from an exhibitor they’ve met in person. You can dig into more of these trade show stats and trends to see why face-to-face is still king.

This is where your video wall becomes your secret weapon for closing deals. Our screens feature a high-resolution 1.9mm pixel pitch—a huge upgrade from the 2.5mm standard you’ll see from competitors. That superior clarity makes your products and branding look incredibly sharp, which reinforces the quality these serious buyers are looking for. Pair this with your lead capture app, and you can scan a badge and know exactly which product video a prospect was just watching. That lets your team jump into a hyper-relevant conversation right on the spot.

Efficient Teardown and Measuring Your Event ROI

When the last attendee has gone home and the show floor lights flicker on, you might think your work is finished. But a quick, efficient teardown and a smart post-show analysis are just as important as your initial trade show set up. This is where you protect your gear for the next show and, more importantly, figure out if it was all worth it.

The toolless design that made your setup so smooth is your best friend during teardown. You’ll see other exhibitors frantically looking for union labor to help with a complicated disassembly, but your team can pack up methodically and quickly. That chaotic move-out rush is exactly where labor costs can get out of control, so a fast, simple dismantle saves you real money.

The Teardown Checklist for Protecting Your Assets

Your LED panels are a serious investment, and packing them up the right way is non-negotiable. If you rush this part, you’re asking for damaged pixels or broken connection points, which means expensive repairs before your next event. You need to treat the teardown with the same focus as the setup.

A step-by-step process prevents damage and makes your next assembly even easier. Here’s a quick checklist we always follow:

  • Document Before You Disconnect: Snap a quick photo of the back of the wall to see how all the cables are connected. Trust me, this “wiring map” is a lifesaver for the next setup.
  • Power Down Completely: Before you touch a single cable, shut the entire system down from the main power source.
  • Disconnect and Bundle Cables: Carefully unplug all the data and power jumper cables. We always bundle them by type and length and put them right back into their designated slots in the flight case.
  • Dismantle Top-Down: Just work in reverse. Remove panels row by row, starting from the top. It works best to have one person unlock the panel while another supports it and lifts it away.
  • Pack Panels Securely: Each panel goes immediately into its custom-fit flight case. Make sure they are snug and protected. Now they’re ready for transport.

This organized approach does more than just protect your equipment. It gets you off the show floor faster, which can cut down on those annoying wait time charges from the venue.

Beyond the Booth: Tearing Down to the Numbers

Now for the part that really matters: connecting the money you spent on the booth to your business goals. A beautiful booth is one thing, but it has to deliver a return on your investment. Measuring your event’s ROI isn’t optional.

Don’t just count the number of badges you scanned. A true ROI analysis looks at the quality of those leads and their journey to becoming customers. It’s about measuring impact, not just activity.

First, you need to calculate your total investment. This means adding up the booth rental, shipping, drayage, electricity, staff travel, and even salaries. Our pricing model makes this part a lot easier, as we include everything in our price except the bills the show bills you for directly. That means fewer surprise costs to hunt down when you’re putting together your expense report.

Key Metrics to Measure Your Trade Show Success

Once you have your total cost, you can start looking at the return. You want to focus on real numbers that tie directly to revenue and brand awareness.

Metric How to Measure It Why It Matters
Cost Per Lead (CPL) Total Event Cost / Number of Qualified Leads This tells you exactly how much you paid to acquire each potential customer at the show.
Lead-to-Customer Conversion Rate (Number of New Customers from Event / Number of Qualified Leads) x 100 This is the ultimate measure of lead quality and how effective your sales team was.
Social Media Engagement Track mentions, hashtags, and shares related to your booth. A stunning booth, like one with a 1.9mm pixel pitch video wall, naturally becomes a photo backdrop for attendees, spreading your brand all over social media for free.
Sales Pipeline Influence Tag leads from the show in your CRM and track their progress through the sales funnel. This shows how the event helped your overall sales pipeline, even for deals that might not close for months.

By digging into these numbers, you can prove the value of your trade show program and make smarter, data-backed decisions for your next event. You can learn more about how to boost your trade show ROI with an LED booth in our detailed guide.

Frequently Asked Questions About Trade Show Set Up

No matter how well you plan, questions always pop up on the show floor. It’s just part of the game, especially if this is your first time using a full LED video wall booth. Let’s tackle some of the most common questions we hear from exhibitors so you can head to the show feeling ready for anything.

What Is Pixel Pitch and Why Does a 1.9mm Pitch Matter?

You’ll hear the term “pixel pitch” thrown around a lot. It’s simply the distance in millimeters from the center of one tiny LED light to the center of the next. A smaller number means the lights are packed closer together, which gives you a much sharper, higher-resolution picture.

Many rental companies out there are still offering walls with a 2.5mm pitch. From a distance, they look okay. But up close, where your prospects will be standing, the image can get blocky and pixelated. That’s why we insist on a 1.9mm pixel pitch for our rentals. This ensures your videos and graphics stay perfectly crisp, even if someone is standing just a couple of feet from the screen.

Think of it this way: a 1.9mm pitch is like watching in high definition, while a 2.5mm pitch is closer to standard definition. When you’re trying to project quality and precision, that higher resolution makes a huge difference in how people perceive your brand on the show floor.

How Much Time Should I Budget for Assembling an LED Booth?

This is one of the best parts. A traditional custom-built booth can easily eat up a full day or more, requiring a large and expensive labor crew. The speed of a modern, toolless LED system is a total game-changer.

Our magnetic, snap-together panels mean you don’t need any special tools or complex rigging. For a 10×10 or 10×20 booth, two people can typically have the entire thing assembled in just a few hours.

We always suggest budgeting about half a day just to be safe. That gives you a comfortable cushion to get it built, test all your content, and add any final touches without the stress—or the shocking labor bills—that come with older booth styles. You’ll be off the show floor faster, letting your team focus on preparing for the actual event.

What’s Included in Your Price and What Are the Hidden Costs?

Budget surprises are probably the biggest headache in the trade show world. We specifically designed our pricing to eliminate them. Our rental price is all-inclusive, which means it covers the complete LED wall system, all the hardware, and even shipping to the advance warehouse.

The only costs you’ll see that aren’t on our invoice are the ones billed directly by the official show decorator. These are things we have no control over:

  • Electricity: The power drop to your booth space.
  • Internet: A hardwired connection if you need one.
  • Material Handling (Drayage): The fee the show charges to move your crates from the loading dock to your booth space and back.

We even help you keep those drayage fees as low as possible by engineering a lightweight system that packs down into compact crates. Our goal is simple, straightforward pricing so you can build your budget with confidence.


Ready to stand out at your next event with a high-impact, easy-to-assemble display? LED Exhibit Booths provides turnkey video wall solutions that transform your space into an immersive brand experience.

Explore our video wall booth options and get a quote today!

Your Guide to the Ultimate Trade Show Shipping Case

Think of a trade show shipping case as more than just a box. It’s your exhibit’s bodyguard, your insurance policy, and the first step to a successful show. It’s purpose-built to shield your valuable LED video walls and other gear from the brutal reality of freight shipping, ensuring your booth makes a flawless first impression.

Why Your Exhibit’s First Impression Starts with Its Case

Open road case displaying a vibrant LED light panel, ready for event setup or shipping.

We’ve all heard the horror stories. Your team arrives at the convention hall, pumped and ready to build a show-stopping booth. But when they crack open the crates, they find a disaster: cracked LED panels, scratched graphics, and broken fixtures.

That gut-wrenching moment proves a simple truth in the event world. The journey to the show floor is just as critical as the trade show booth design itself. This guide isn’t just about getting from point A to B; it’s about making sure what arrives is perfect and ready to impress. A quality case is the difference between a smooth setup and a last-minute scramble.

Protecting Your Most Valuable Assets

For today’s exhibitors, the most expensive parts of the booth are often the most delicate. High-tech gear like a seamless LED video wall is a massive investment and the heart of your booth’s appeal. Protecting it isn’t a “nice-to-have,” it’s absolutely essential. A real shipping case with custom-cut foam stops the shock and vibration damage that happens all too easily in transit.

Here at LED Exhibit Booths, we’re focused on both protection and performance. That’s why we do two things differently:

  • Superior Visuals: Our video walls use a 1.9mm pixel pitch, giving you a much higher resolution with sharper, brighter images than the 2.5mm pitch our competitors mostly have. You have to protect that superior quality.
  • Transparent Pricing: We keep things simple. We include everything in our price except the bills the show sends you directly, like drayage and electricity. No hidden fees for the important stuff.

A well-protected exhibit is an effective exhibit. Spending money on a proper shipping case is the first move to make sure your technology and brand message show up exactly as you planned. It has a direct impact on your event ROI.

More Than Just a Box

Thinking ahead about your shipping cases does more than just prevent damage. The right cases make life easier for your setup crew, speeding up both install and dismantle. When everything is organized in its proper place, your team isn’t wasting time hunting for parts under a tight deadline.

This connection between planning and on-site execution is huge. You can see how every piece fits together, from the case to the final layout, by taking a look at our complete guide to trade show booth design. It’ll help you understand how every detail contributes to a stress-free, successful show.

The Strategic Value of Investing in a Quality Shipping Case

Thinking of a trade show shipping case as just another expense is a big mistake. It’s not a cost; it’s an investment in your brand’s reputation and a safety net for your most valuable assets. Think of it as armor for your high-definition LED video wall.

This isn’t just our opinion; the whole industry is moving in this direction. The market for specialized transport cases is set to explode from USD 9.3 billion in 2026 to a staggering USD 25.5 billion by 2036. You can dig into the numbers yourself in this comprehensive analysis of the transport cases market. This boom is happening for one simple reason: more companies are using delicate, high-value gear like video walls and need to get them to the show floor in one piece. Alternatively, you may just want to change everything and go for a lightweight trade show display. Plus, we offer custom trade show booths.

Mitigating Catastrophic Financial Risks

The real cost of a trade show isn’t just what you pay for the booth space. The true disaster happens when your equipment shows up broken. A cheap or damaged case can set off a chain reaction of problems that make any initial savings look tiny. A proper trade show shipping case is your best defense against these budget-killers.

Imagine these all-too-common nightmares that a quality case helps you avoid:

  • Emergency Repairs: One cracked LED panel can easily cost you thousands to fix on-site, assuming you can even find someone to do it in time.
  • Last-Minute Rentals: If a critical part is broken, you’re stuck renting whatever is available at an outrageous markup, just so your booth isn’t a total dud.
  • Wasted Staff Time: Your team should be prepping for meetings, not scrambling on the phone trying to fix a broken exhibit. Their time is expensive, and stress is high.

Investing in a durable, well-designed case is fundamentally an act of risk management. It safeguards your exhibit investment, protects your brand reputation, and ensures your team can focus on what they do best: connecting with customers.

At LED Exhibit Booths, we know how crucial it is to protect your assets. Our video walls are built with a tight 1.9mm pixel pitch, which gives you a much higher resolution and a sharper image than the 2.5mm pitch our competitors often use. You don’t invest in that kind of quality just to have it destroyed in transit. That’s why a rock-solid shipping solution is non-negotiable.

The Hidden Costs of a Damaged Exhibit

Let’s be blunt: a broken exhibit is a financial black hole. The direct costs of repairs are bad enough, but the indirect costs—like a tarnished brand image and lost sales—are even worse. Here’s a stark comparison of what you’re really risking by cutting corners on a case.

Damaged Exhibit Costs vs Quality Case Investment

Expense Category Without a Quality Case (Potential Costs) With a Quality Case (Controlled Costs)
Equipment Damage High risk of costly repairs or full replacement of LED panels, graphics, and structures. Minimal risk of damage, preserving the value of your assets.
Show-Site Labor Increased labor hours for troubleshooting, repairs, and frantic modifications. Efficient, predictable setup and teardown, keeping labor costs in check.
Brand Perception A damaged or incomplete booth looks unprofessional and signals unreliability to potential clients. A polished, fully functional exhibit reinforces a strong, competent brand image.
Lead Generation Missed opportunities as your team is distracted and the booth fails to attract attendees. Maximized foot traffic and engagement, leading to more qualified leads.

As you can see, skimping on a case is a gamble you’re almost guaranteed to lose eventually.

Plus, we make budgeting simple. Our price includes everything you need for a functional booth. The only extra costs you’ll see are the direct bills from the show organizer for things like electricity and material handling. This all-in approach takes the guesswork out of the equation and lets you focus your budget on what really matters.

How to Choose the Right Shipping Case for Your Exhibit

Picking the perfect trade show shipping case isn’t just about finding the biggest, toughest box on the market. It’s a careful calculation, balancing protection against weight and cost. The case you choose has a huge impact on everything from keeping your exhibit safe to how much you’ll owe on that final drayage bill.

This guide will walk you through the essential things you need to think about. We’ll cover everything from materials and construction to the foam inside, giving you a clear path to making a smart decision—especially when you’re protecting a high-value asset like an LED video wall.

Case Materials and Construction

The material your case is made from is your first line of defense. The two most common choices have their own pros and cons when it comes to durability, weight, and price. Understanding them is the key to a good investment.

  • ATA-Rated Plywood Cases: These are the old-school workhorses of the trade show world. They’re built with heavy-duty plywood that’s laminated with plastic or aluminum, making them incredibly tough and easy to build to any custom size. They offer maximum protection, but they’re also the heaviest option, which will definitely drive up your shipping and drayage fees.

  • Lightweight Molded Plastic Cases: These modern cases, usually made from high-density polyethylene (HDPE), are created through a process called roto-molding. This technique makes a seamless, single-piece case that’s tough against impacts, water, and chemicals but is way lighter than a plywood case.

For most exhibitors today, especially if you have a modular system, lightweight plastic cases are the sweet spot between protection and cost. They cut down on the weight you’re billed for without risking the safety of what’s inside.

This little decision tree shows exactly how choosing between a cheap case and a quality one hits your bottom line.

Flowchart illustrating shipping decisions: damaged packages incur costs, intact packages yield ROI.

It’s pretty clear—investing in a good trade show shipping case isn’t just an expense. It’s how you protect your investment and make sure you get a positive return.

The Critical Role of Interior Foam

What’s on the inside of the case is every bit as important as the outside shell. Without the right interior support, your expensive LED panels and parts will just rattle, vibrate, and slam into each other during transit, which is a recipe for disaster. This is where custom foam inserts are a must-have.

Custom-cut foam cradles each component, holding it securely in place and absorbing all the shocks from the road. Think of it as a custom-tailored suit of armor for every piece of your booth. This is absolutely vital for delicate electronics like our video wall panels, which have an incredibly sharp 1.9mm pixel pitch. That’s a huge step up from the competitor standard of 2.5mm and delivers a much clearer, higher-resolution picture. You need precision-fit foam to protect that level of quality.

A great trade show shipping case is a complete system. The hard exterior shell protects from external forces, while the custom foam interior protects from internal movement and vibration. You need both to guarantee your exhibit arrives in perfect condition.

Balancing Size, Weight, and Cost

Finally, it all comes down to the delicate balance between the size and weight of your cases and your budget. Every extra pound and every extra inch adds up on your freight and drayage bills. The goal is simple: get the best protection with the least amount of bulk.

Here are a few tips to get that balance right:

  1. Choose the Smallest Case Possible: Pick a case that fits your equipment snugly, with just enough room for the right amount of foam padding. Any empty space is just wasted money.
  2. Optimize Your Packing: Wherever you can, consolidate items to cut down on the total number of cases you need to ship. Fewer cases mean simpler logistics and lower handling fees.
  3. Prioritize Lightweight Systems: Of course, the best way to reduce case weight is to start with a lighter exhibit in the first place. Our modular, magnetic LED panel systems are designed to be lightweight, which lets us use smaller, more efficient cases from the get-go.

By carefully thinking through these factors—material, interior foam, and the size-to-weight ratio—you can find a trade show shipping case that not only protects your valuable booth but also helps keep your logistics costs from spiraling out of control. Remember, we make budgeting easier by including everything in our pricing except for direct show bills.

Navigating the Hidden Costs of Trade Show Shipping

If you’ve been around the trade show circuit, you know the two words that can sink a budget: “freight” and “drayage.” These are often the biggest and most unpredictable costs you’ll face, and getting a handle on them is your first step to a smarter event strategy.

Freight is pretty simple. It’s what you pay to get your booth from your warehouse to the convention center’s loading dock. But that’s where the simplicity ends.

Drayage, also known as material handling, is a whole different animal. This is the fee charged by the show’s official contractor to move your trade show shipping case from the dock to your booth space. They also store your empty cases during the show and bring them back for tear-down. And this fee is often much, much higher than your freight bill.

Why Drayage Is the Real Budget Breaker

Here’s the surprise that gets a lot of first-timers: drayage can easily cost more than the freight to ship your booth across the country. The fee isn’t based on how far they move your cases, but on how much they weigh.

The calculation is based on CWT, or cost per 100 pounds. The heavier your cases, the more you pay. Since these rates are set by the show’s exclusive contractor, there’s no shopping around for a better deal.

Shipping logistics are a huge headache for exhibitors. In fact, industry data shows that drayage and freight can eat up 15-25% of an entire exhibit budget. The good news is that smart choices in your exhibit system can slash these costs. Some companies have saved up to 35% on logistics just by switching to more efficient, lighter cases that also speed up their setup times. You can see more data on how modern cases are changing the game in this in-depth market report.

A Real-World Cost Comparison

Let’s put some real numbers to this. Imagine you’re at a show where the drayage rate is a nice, round $100 per CWT.

  • Exhibit A (Traditional Build): This shipment is a hefty 500 lbs. Your drayage bill comes out to (500 lbs / 100) x $100 = $500.
  • Exhibit B (Lightweight System): This modern, modular setup weighs just 350 lbs. The drayage is (350 lbs / 100) x $100 = $350.

That’s an instant $150 savings on a single fee for just one show. When you consider that national vendors attend an average of 12.5 shows a year, those savings add up fast.

The most effective way to control your drayage bill is to control your shipping weight. Every pound you shave off your exhibit directly translates into money back in your marketing budget.

Strategies for Smarter Shipping

You don’t have to just accept massive drayage fees. With a little planning before your booth even leaves the warehouse, you can make a huge dent in your final bill. The key is to think lighter and pack smarter.

Actionable Steps for Cost Reduction:

  1. Choose Lightweight Case Materials: As we’ve talked about, modern roto-molded plastic cases give you all the protection you need but weigh a fraction of old-school wood crates. This is your easiest win.
  2. Consolidate Shipments: The fewer individual pieces the crew has to handle, the better. Pack everything into the fewest cases possible. This not only saves weight but can also simplify the billing process.
  3. Invest in a Lighter Exhibit System: Naturally, the biggest impact comes from the weight of your booth itself. Our LED Exhibit Booths use lightweight, magnetic panels that are far less bulky than traditional walls, which means smaller cases and lower shipping weights. You can see exactly how this works in our guide on portable tradeshow booths.

This focus on efficiency is central to our philosophy. We design our booths to make an impact on the show floor, not on your shipping invoice. It’s the same reason our video walls use a superior 1.9mm pixel pitch for a sharper, higher-resolution image than the common 2.5mm pitch, and why our pricing is transparent—we include everything except the direct show bills. This way, you can budget with confidence and focus on what really matters: your ROI.

Packing Your Exhibit Like a Pro

A person opens a professional silver case containing LED light panels, cables, and an adapter, with a document and smartphone nearby.

Having the right trade show shipping case is a great first step, but how you actually pack it makes all the difference. It’s what separates a calm, easy setup from a full-blown panic on the show floor.

Good packing is a system. It’s a repeatable process that protects your expensive gear, makes life easier for the handling crews, and ensures your team isn’t fumbling around when the clock is ticking.

The Pre-Pack Inventory and Protection Plan

Before anything goes into the case, you need to lay it all out and do a full inventory. This is your last chance to make sure every single component is there and in perfect working order. You’ll thank yourself for catching a faulty cable or a chipped panel before it gets to the show.

While you have everything out, think about how to protect each piece. This is especially true for the expensive stuff, like your LED panels.

  • Wrap Individual Components: Give every sensitive part its own layer of bubble wrap or foam sheeting. This is your first line of defense against scratches and dings inside the case.
  • Secure Cables and Accessories: Use velcro straps or zip ties to bundle all your cables and power supplies. Keep them in their own bags or compartments so they don’t turn into a tangled mess or get lost.
  • Document Everything: Take photos of your equipment before you pack it. Then, take another photo of the open case once it’s fully packed. These pictures are a lifesaver for insurance claims and also act as a perfect repacking guide for your team.

This level of care is just common sense when you’re dealing with high-end tech. For instance, our video walls use a high-resolution 1.9mm pixel pitch, which is a huge step up in sharpness from the 2.5mm pitch you often see from competitors. You have to pack that kind of quality carefully to make sure it arrives looking perfect.

A great repacking guide is one of the most underrated tools in an exhibitor’s arsenal. Creating a simple, laminated sheet with photos and step-by-step instructions for teardown ensures that the booth is packed correctly every time, no matter who is on the crew.

Smart Packing for Weight and Handling

Once everything is wrapped and ready, it’s time to load the case. Your goal is to pack it tight so nothing can shift, rattle, or slide around in transit. An unbalanced case is more likely to tip over and cause problems for the freight crew.

Start with the heaviest, sturdiest items at the bottom. Lighter, more delicate pieces always go on top. Fill any gaps with extra foam blocks or padding to make sure everything is snug. For a deeper dive into how this fits with the overall process, our guide on exhibition stand building is a great resource.

Finally, we make budgeting for all this much simpler with clear, all-inclusive pricing. Our price covers everything you need for a working exhibit. The only extra costs are the direct bills the show sends you, like electricity and drayage. This way, you can focus on packing your booth perfectly without worrying about surprise fees.

The LED Exhibit Booths Advantage: Less Case, More Impact

Rugged grey shipping case and a stack of glowing LED light panels at a trade show.

Sure, picking the right trade show shipping case is important. But what if your exhibit was designed from the start to make shipping less of a nightmare? This is where modern booth technology makes a world of difference. A smarter booth means a simpler, cheaper logistics process right out of the gate.

We designed our LED Exhibit Booths system to get around all the usual headaches of trade show shipping. Forget those old-school, back-breaking displays that need enormous, heavy cases. Our whole booth is built using lightweight, modular LED panels.

Smarter Design Leads to Smarter Shipping

The entire system is built around efficiency. Every panel is engineered to be as light as possible without giving up an ounce of durability or picture quality. They connect with a powerful magnetic and toolless locking system, so your crew can snap a full video wall together in no time.

This modular approach has a huge, direct impact on your shipping plan. Since the panels are so compact and light, they fit into smaller, more manageable cases.

  • Drastically Reduced Weight: Lighter panels mean lighter cases. This directly slashes your freight and drayage bills.
  • Smaller Case Footprint: Tighter packing means you need fewer cases, or smaller ones, cutting down the total volume of your shipment.
  • Faster Setup and Teardown: The toolless, magnetic assembly saves a ton of labor time on both ends of the show, which saves you money.

By rethinking the booth itself, we’ve built a system that naturally reduces your need for a big, heavy, and expensive trade show shipping case.

Quality That Demands Attention

We didn’t cut corners on performance just to make things convenient. In fact, our panels are made to deliver a stunning visual that will make you stand out on a packed show floor. You can see this commitment to quality in our specs.

We use a 1.9mm pixel pitch for our video walls. This is a lot finer than the 2.5mm pitch many of our competitors use. A smaller pitch just means the pixels are closer together. The result is a much higher resolution, sharper images, and brilliant colors that make your content jump off the screen.

This top-tier image quality guarantees your brand message is delivered with real power. You get all the logistical perks of a lightweight system without sacrificing the “wow” factor that pulls attendees into your booth.

Radical Transparency in Pricing

Finally, we think your budget shouldn’t be a guessing game. One of the biggest frustrations for exhibitors is getting hit with a ton of surprise fees after the show is over. Our pricing is designed to get rid of that stress.

We include everything you need for a complete, working video wall booth in our initial price. This all-inclusive model means no hidden upcharges for parts you obviously need. As we always say, we include everything in our price except the bills the show sends you directly, like electricity and material handling.

This straight-up transparency lets you budget with confidence. You can focus on what actually matters: making a great impression on your future customers.

Your Top Questions About Exhibit Shipping, Answered

When you get into the world of trade show exhibiting, you quickly find that logistics can be a real headache. We get a lot of questions about shipping, so we’ve put together some straightforward answers to the most common ones we hear about using a trade show shipping case and handling the entire process.

What Is the Difference Between Freight and Drayage?

This is a big one, and the difference hits your wallet hard. Freight is what you pay a shipping company to get your booth from your warehouse to the convention center’s loading dock. Simple enough.

But then comes drayage. This is the fee, often an eye-watering one, charged by the show’s hand-picked contractor to move your cases from that dock to your specific spot on the floor. They also store your empty cases during the event and bring them back for load-out. Because drayage is based on weight (charged per 100 pounds, or CWT), a lightweight booth and cases are your number one defense against a shocking bill.

How Does Booth Quality Affect Shipping?

The quality of your booth hardware has a huge impact on both your shipping needs and how your brand is perceived on the show floor. For example, our video walls use a premium 1.9mm pixel pitch. This gives you a much crisper, higher-resolution image compared to the 2.5mm pitch you’ll often see from competitors.

Naturally, to protect that superior technology, you need a seriously durable and well-designed trade show shipping case. It’s not just about moving stuff; it’s about making sure the high-end visuals that make you stand out arrive in perfect, show-ready condition.

How Can I Simplify My Budgeting Process?

Budgeting for a trade show can feel impossible with all the hidden fees that pop up. The best way to get a handle on it is to work with a partner who actually believes in transparent, all-in pricing.

At LED Exhibit Booths, we make this incredibly simple by giving you one price that covers almost everything.

Our promise is simple: we include everything in our price except the bills the show sends you directly, like your electricity hookup or drayage fees. This takes all the guesswork out of the equation. You can budget confidently, knowing you won’t get hit with surprise charges from us for the gear and services you need.


Ready to make a bigger impact with less shipping stress? The team at LED Exhibit Booths can help you design a stunning video wall booth that’s lighter, smarter, and more cost-effective. Learn more about our turnkey rental and purchase options at https://ledexhibitbooths.com.

A Complete Guide to Hanging Signs for Trade Shows in 2026

Hanging signs for trade shows are those big, custom-branded displays you see suspended from the ceiling high above an exhibitor’s booth. Think of them as a massive aerial beacon, making your brand impossible to miss, even from clear across a packed convention center. Their whole job is to ensure attendees can find you, no matter how chaotic the show floor gets.

Why Hanging Signs Are Your Booth’s Lighthouse

A large circular 'Your Brand' sign hangs prominently above people walking through a busy trade show hall.

Picture a sprawling trade show floor, crammed with thousands of people and hundreds of your competitors. It’s a sea of visual noise. In that kind of environment, even a great 10×10 or 20×20 booth can completely disappear. A hanging sign for your trade show booth acts like a lighthouse, cutting right through the chaos to guide prospects directly to you.

This isn’t just about being seen, either. It’s about establishing a real presence and authority. An overhead sign tells everyone that your brand is a serious player, confident enough to invest in being seen. It’s often the very first impression you make on an attendee scanning the horizon for industry leaders.

Maximizing Visibility and Attracting Foot Traffic

The main job of a hanging sign is to solve the problem of ground-level marketing. While your booth staff and displays are great for engaging visitors up close, the hanging sign does the heavy lifting of pulling them in from far away. Its elevated position guarantees your logo isn’t blocked by crowds or other booths.

This long-distance visibility directly boosts your foot traffic. Attendees often use big hanging signs as landmarks to get their bearings on the floor. By making your brand a key reference point, you grab the attention of people actively looking for you and those just wandering the event.

A well-designed hanging sign transforms your booth from a destination that must be found on a map to a landmark that can be seen from almost anywhere on the show floor.

That initial visual contact is crucial. It plants a seed in an attendee’s mind, making them more likely to swing by your booth later, even if they were originally headed somewhere else. It’s an investment in constant, passive brand exposure. As you look at your options, you might also want to explore the various types of LED trade show signs that offer dynamic and even more eye-catching alternatives.

The Power of Superior Visual Technology

While traditional fabric signs are pretty common, the technology behind them makes a huge difference—especially when you get into digital options. For instance, the clarity of an LED hanging sign or video wall is all about its pixel pitch. Our video walls feature a tight 1.9 pitch, while many competitors are still using a less detailed 2.5 pitch. What that means for you is our displays deliver much higher resolution for sharper graphics and smoother video that really stops people in their tracks.

We also know that navigating the costs can be a headache. We simplify it by including everything in our pricing except for the bills you get directly from the show itself, like for electricity or rigging. This straightforward approach gives you budget certainty and gets rid of any nasty surprises from hidden fees.

To help you keep these points straight, here’s a quick reference guide.

Hanging Sign Quick Reference Guide

This table sums up the key things to think about when considering a hanging sign for your next event.

Consideration Key Takeaway
Visibility Acts as a “lighthouse” to guide attendees to your booth from across the show floor.
Foot Traffic Directly increases the number of visitors by making your booth an easy-to-find landmark.
Brand Perception Projects an image of authority, confidence, and leadership within your industry.
Technology The pixel pitch of an LED sign (like our 1.9 pitch) determines visual quality. Lower is better.
Budgeting Look for transparent pricing that bundles costs to avoid hidden fees from rigging and labor.

Ultimately, a hanging sign is one of the most effective tools for standing out and making sure your investment in a trade show pays off. However, if you need a more affordable trade show booth we have those too!

Designing a Hanging Sign That Captivates and Converts

A white circular hanging sign at a trade show with a black 'R' logo and 'Innovate Faster' text.

A hanging sign’s size gets you seen, but it’s the design that actually pulls people into your booth. In the chaos of a trade show floor, you’ve got just a few seconds to make an impression from a distance. An effective design isn’t just about looking good; it’s about turning a faraway glance into a real conversation.

The main goal here is instant recognition. We call it the “5-second rule“: someone standing 100 feet away should be able to see who you are and what you do in five seconds or less. To pull that off, you have to keep things simple and clear.

You might be tempted to cram your sign with every last feature and benefit. Don’t. Stick to the absolute must-haves—your logo and a very short, punchy tagline. This clean approach makes sure your message gets through loud and clear, even when an attendee is just walking by.

The Foundation of an Effective Design

The most important things for long-distance visibility are contrast and legibility. Your hanging sign is no place for subtle color shifts or fancy, delicate fonts. Success comes from making bold choices that won’t get lost in the bright lights and visual clutter of a convention hall.

Here are the key elements to get right:

  • Bold Typography: You’ll want to use clean, sans-serif fonts that are easy to make out from across the hall. The font needs to be thick enough to stay sharp and not look blurry from a distance.
  • High-Contrast Colors: This is crucial. Pair light and dark colors so your logo and text really pop. Think classic black on white, yellow on black, or a dark blue on a pale background. Stay away from low-contrast combos that look washed out under bright expo lighting.
  • Minimalist Messaging: Focus on one powerful message. Your logo is the star of the show. Back it up with a tagline of no more than three to five words that nails your value proposition.

Think of your sign like a highway billboard. A driver has only a split second to read it, so the message has to be incredibly simple and direct. Your trade show hanging sign operates on the exact same principle.

Effective hanging sign design isn’t about showing everything your company does; it’s about creating enough intrigue from 100 feet away to make an attendee want to walk over and learn more.

This focused approach lets your sign do its one job: act as a giant beacon that guides interested prospects straight to your booth. Once they get there, your booth displays and your team can take it from there.

Choosing a Shape That Reinforces Your Brand

The shape of your hanging sign is another chance to make a statement. A standard square or circle is always a safe choice, but thinking outside the box can help you stand out and reinforce what your brand is all about.

Here’s how different shapes are often perceived:

  • Circular Signs: Circles tend to give off a feeling of unity, community, and forward motion. They are easy on the eyes and can feel modern and friendly.
  • Square/Rectangular Signs: These classic shapes project stability, trustworthiness, and professionalism. Their straight lines offer a more traditional and structured look.
  • Pinwheel/Multi-Faceted Signs: These are dynamic and give you visibility from several angles at once. They’re a great option for island booths sitting at busy aisle intersections.
  • Custom Shapes: If you really want to be remembered, a sign shaped like your logo or a key product can become an unforgettable landmark on the show floor. This is the best way to make your brand instantly recognizable.

The shape you pick should be a strategic choice that matches your brand’s personality and the location of your booth. By working with your design team and keeping these tips in mind, you can create a hanging sign that not only grabs attention but also sticks in people’s minds, turning that valuable foot traffic into solid leads.

Navigating Venue Rules Rigging and Logistics

Man in safety vest inspecting overhead rigging and a hanging sign at a trade show.

A beautifully designed hanging sign is a fantastic tool, but it’s completely useless if it never leaves its shipping crate. Before you can wow attendees from across the hall, you first have to get through the maze of venue regulations, rigging contractors, and show logistics. This is where a little bit of planning saves you from a world of hurt.

Think of the convention center as its own kingdom with its own set of laws for anything hanging from the ceiling. Your absolute first step is to get your hands on the exhibitor manual or services kit. This document is your bible for what the venue allows—and what it forbids—for hanging signs for trade shows.

Ignoring this manual is probably the single biggest mistake you can make. It contains all the critical details on height limits, weight restrictions, and deadlines that can absolutely make or break your installation.

Decoding the Language of Rigging

When you finally open that exhibitor manual, you’ll run into specific terms that dictate how your sign gets into the air. Don’t let the jargon intimidate you; it all comes down to safety and making sure everyone gets a fair shot at being seen.

Here are the key terms you really need to know:

  • Rigging: This is just the overall process of hoisting and suspending your sign from the convention hall’s ceiling structure. It involves a lot of cables, motors, and specialized gear.
  • Rigging Points: These are the specific, pre-approved spots on the ceiling grid where your sign can be hung. You can’t just hang a sign anywhere; it has to attach to these load-bearing points.
  • Load Capacity: This is simply the maximum weight a rigging point can safely hold. Your sign’s total weight, including any lights or motors, has to be well under this limit.
  • Sightline Restrictions: These are the rules of the road that make sure your sign doesn’t block the view of another exhibitor’s sign. They usually dictate maximum heights and where you can place the sign relative to your booth’s borders.

The most crucial takeaway is this: you are not allowed to hang your own sign. For very serious safety and liability reasons, all overhead rigging must be done by the official rigging contractor chosen by the venue or show organizer.

This contractor becomes your partner in the process. You’ll send them your sign’s specs and a detailed rigging plan for their approval, and you need to do it well before the show starts.

Managing Costs and Timelines

The logistics of hanging signs for trade shows involve more than just rules; they have a major impact on your budget and schedule. Getting a detailed, all-in quote is essential if you want to avoid nasty surprises. For instance, it’s important to know the full scope of what you’re paying for. With our video walls, we make a point to include everything in our price except for direct show bills. This gives you a clear budget from the start, which is a sharp contrast to other services where hidden fees can pile up fast.

Beyond the sign itself, you’re going to get billed for several different services. These often include:

  • Labor: You’ll pay an hourly rate for the riggers who put your sign up and take it down. Be very aware of overtime charges for work done outside of normal business hours.
  • Equipment Rental: This can include the motors, hoists, and trusses needed to get your sign in the air.
  • Drayage: This is the material handling fee for moving your sign from the loading dock to your booth space and back again.

To stay on track and on budget, you have to start this process early. For a deeper look at the entire process from the ground up, our guide on exhibition stand building can offer some valuable context. Make sure you submit your rigging plans by the deadline. This locks in better rates and ensures the crew and equipment will actually be available. Missing those deadlines can lead to rush fees that can sometimes double your costs.

Hanging Signs for Trade Shows

Of course, every marketing manager is going to get asked the big question: “Is a hanging sign really worth the money?” It’s a fair question. To get that budget approved, you have to show it’s more than just a pretty decoration. You need to break down the real costs and connect that spending to actual results.

A hanging sign isn’t just about looking good; it’s a powerful magnet for pulling attendees to your booth and bringing in leads. First, let’s get a handle on what you’re actually paying for. The total price isn’t just the sign itself—it’s a whole package of services that makes that big, beautiful sign a reality.

Unpacking the Full Cost of a Hanging Sign

When you’re budgeting for a hanging sign, you have to think about a few different line items. If you miss one, you can get hit with some nasty surprise bills that will blow your budget out of the water.

Here’s what you can typically expect to pay for:

  • Fabrication: This is the cost to actually make the sign. It covers the frame, the printed fabric graphics, and any lighting inside.
  • Design: You’ll have fees for a graphic designer to create the artwork that fits the sign’s specific template.
  • Shipping & Drayage: This covers getting the sign to the convention center and, more importantly, the mandatory fee to have the show’s crew move it from the loading dock to your booth space.
  • Rigging & Labor: Like we’ve talked about, you have to hire the official show contractor for installation and teardown. This is often the biggest cost, billed by the hour, and can rack up serious overtime charges if you’re not careful.

One thing we really believe in is price transparency. A critical factor in your budgeting should be all-inclusive pricing where everything is covered except for the bills you pay directly to the show, like rigging. This way, you know the real cost upfront and can manage your budget without worrying about hidden fees.

Proving the Value and Calculating ROI

Once you have a clear picture of the total cost, you can figure out its return on investment (ROI). The whole point is to prove the sign did more than just hang there looking impressive; you want to show it actively helped you hit your goals. This means you need to set some clear, measurable targets before the show even starts.

Don’t just hope for more foot traffic—get specific. For instance, you could aim to increase qualified booth visits by 25% compared to your last show where you didn’t have a hanging sign. Or, you could set a target for a specific number of leads that came directly from the sign’s visibility.

You can easily track this by having your booth staff ask a simple question: “How did you find us today?” When you add up all the people who say, “I saw your sign from across the hall,” you have direct proof of its impact.

A simple formula to get started is:

(Gain from Investment – Cost of Investment) / Cost of Investment

The “Gain from Investment” is the value of the new business you landed. Let’s say your sign cost a total of $10,000 (fabrication, rigging, the works) and you brought in $50,000 in new business from leads who saw the sign. Your ROI would be a massive 400%. When you can show numbers like that, your budget request for the next show stops being a hopeful expense and becomes a proven way to make money.

The Future of Overhead Signage Integrated LED Video Walls

Traditional hanging signs are great for getting noticed from across the hall, but let’s be honest, they’re static. What if your sign wasn’t just floating above your booth, but actually was your booth? That’s the big shift we’re seeing right now—moving away from fabric banners and toward fully integrated LED video walls that make your entire structure a high-def display.

This isn’t just swapping out a sign for a screen. It’s a whole new way of thinking about your booth’s design as a tool for telling your story. Think of it like this: you can put a billboard on a building, or you can turn the entire face of the building into a massive digital screen like you see in Times Square. The impact is on a completely different level.

Instead of one static message hanging up in the rafters, the walls, arches, and even the counters of your booth become one seamless video canvas. This lets you grab attendees’ attention from anywhere on the floor with motion and color that a printed sign just can’t compete with.

The Critical Difference in Visual Quality

When you start looking at digital displays, you’ll quickly find that not all LED tech is the same. The most important thing to look at for visual quality is the pixel pitch—that’s just the distance in millimeters between the little LED lights (pixels) on the screen. A smaller pixel pitch means the pixels are closer together, which gives you a much higher-resolution image.

This technical detail makes a huge difference in the real world. A lot of companies in the trade show business use LED panels with a 2.5mm pixel pitch. It works, but up close, the image can look a little grainy or pixelated.

We only use a 1.9mm pixel pitch for our video walls. That gives you a 30% finer resolution, creating a dramatically sharper and more professional image that makes your brand look its best.

That superior clarity means your logos are razor-sharp, your text is easy to read, and your videos look smooth and lifelike. With higher resolution, you can run detailed product demos and create really immersive visuals that pull people in from far away and keep them hooked once they’re in your booth.

Simplifying Your Budget with All-Inclusive Pricing

Beyond just looking great, one of the biggest headaches with advanced booths is trying to manage a complicated and unpredictable budget. You get one quote for the booth structure, then a separate bill for labor, another for shipping, and a dozen other little things that can add up fast.

We think there’s a much more straightforward way to do it. We’ve set up our pricing to be as all-inclusive as possible so you have total certainty about your budget right from the start.

When you get a quote from us for an LED video wall booth, it includes:

  • The complete LED wall structure.
  • All the hardware, processors, and cables needed to run it.
  • Shipping and transportation to the show venue.
  • All the labor for both installation and dismantle.

The only costs not in our quotes are the bills you’d be paying directly to the show anyway, like rigging, electricity, and internet. This transparent approach gets rid of the risk of hidden fees and surprise charges, which is a common frustration in this industry. It lets you focus on your event strategy, not on trying to figure out a confusing invoice.

Choosing an integrated LED display is more than just a modern look; it’s a strategic move. You’re investing in a powerful tool that guarantees you’ll be seen, delivers your message with incredible clarity, and makes the budgeting process a whole lot simpler. To see how these dynamic structures can transform your trade show presence, you can learn more about our LED video wall rental solutions and see what’s possible.

Your Essential Hanging Sign Planning Checklist

Getting a hanging sign approved and installed at a trade show isn’t something you can do at the last minute. In fact, it requires a lot of careful planning months in advance. One wrong move, and you could be looking at massive rush fees, breaking show rules, or worse—not being allowed to hang your sign at all. This checklist will walk you through the process, step-by-step, to make sure everything goes smoothly.

The whole world of trade show signage has changed over the years. We’ve gone from simple banners to these incredible, dynamic experiences that are woven right into the booth itself. This timeline gives you a good idea of how much things have evolved.

A timeline illustrates the evolution of trade show signage, from static signs to dynamic displays and integrated booths.

It’s pretty clear that the trend is moving away from just getting your name seen. Now, it’s all about creating an entire brand experience that pulls people in.

6+ Months Out: Initial Research

Your homework starts the second you book your booth. Seriously, don’t put this off.

  • Review the Exhibitor Manual: Find and download the show’s exhibitor manual. You need to read every word in the sections on hanging signs, rigging, and sightlines. Look for all the details: height restrictions, weight limits, and any rules about how far your sign must be from the aisle.
  • Identify the Official Contractor: The show will have an exclusive rigging contractor. You have to use them. Find their contact info, as they’ll be your go-to for installation and any technical questions.

4 to 5 Months Out: Design and Quotes

Now it’s time to get your vision down on paper and figure out the numbers.

  • Finalize Sign Design: Work with your design team to create a sign that looks amazing but also follows every single rule from the manual. For a hanging sign, the key is a big, bold logo and as little text as possible so people can read it from across the hall.
  • Obtain Quotes: Get detailed quotes for everything: making the sign, shipping it, and the rigging labor. If you’re considering an LED video wall, make sure you know exactly what’s included. We make this simple by offering all-inclusive pricing that covers everything except the direct show bills. This way, you know your budget is solid. Plus, our 1.9 pitch displays offer a much sharper image than the common 2.5 pitch you see elsewhere.

2 to 3 Months Out: Submissions and Approvals

This is where you make it official. Hitting the deadlines here is absolutely critical if you want to avoid late fees.

Submit your completed rigging plan, including the sign’s final weight and dimensions, to the official show contractor before the early-bird deadline. This one step can literally save you hundreds, or even thousands, of dollars.

Don’t move on to the next step until you have written approval from the contractor.

1 Month Out: Final Logistics

With the show just around the corner, it’s time to lock down all the final details.

  • Confirm Shipping and Drayage: Set up shipping for your sign to the advance warehouse. You’ll also need to confirm the drayage (that’s the material handling fee) for getting the crate from the loading dock to your booth space.
  • Schedule Installation: Get in touch with the rigging crew and nail down the exact date and time for your sign installation.

On-Site: Final Execution

When you get to the show floor, your job is to make sure everything goes according to plan. Be there to supervise the rigging crew during the setup. Once it’s up, test any lights or electrical parts and double-check that the sign is hanging at the approved height and in the correct spot.

Hanging Signs for Trade Shows FAQ

When it comes to hanging signs at trade shows, you’re bound to have questions. It’s a world filled with rigging rules, design choices, and a whole lot of details you have to get right for a successful show. Let’s tackle some of the most common questions we hear from exhibitors.

A big question is always how to make a huge impact without a huge budget. Of course, traditional hanging signs work, but newer tech offers much more exciting solutions. For instance, instead of a simple static sign, you can make your entire booth a moving, dynamic display with an integrated LED wall.

This approach actually makes budgeting simpler. Our model wraps everything—the structure, the labor, and the transport—into a single price. The only extra costs are what you pay the show directly for things like electricity. It’s a great way to avoid those nasty surprise fees.

How High Should a Hanging Sign Be

Figuring out the right height for your hanging sign is a balancing act between the venue’s rules and making sure people can actually see you. Most convention centers set a maximum height limit, often somewhere around 20 to 30 feet from the floor to the very top of your sign. You want to get high enough to be seen over your neighbors but still be visible from the main aisles.

Your first step, always, is to read the exhibitor manual. That document is your bible for the specific “floor to top of sign” rules and, just as importantly, the sightline regulations that stop you from blocking another exhibitor’s view. Your final rigging plan has to follow these rules to the letter.

Can I Use a Digital Screen as a Hanging Sign

Yes, and using digital screens as hanging signs is getting more popular every year. It’s an incredible way to stand out with content that moves and changes. However, it definitely adds a few more layers of complexity. You have to think about the screen’s weight, how much power it needs, and even the heat it might put out.

The venue’s official rigging contractor has to sign off on the total weight and the hanging method. A much more modern way to do it is to build LED video walls right into your booth’s structure. This effectively turns your whole exhibit into the sign and often lets you skip the hassle of separate, complicated overhead rigging.

We specialize in these integrated systems and use a superior 1.9 pitch for our video walls. Competitors often use a 2.5 pitch, meaning our screens deliver a significantly higher resolution for sharper, more professional visuals that make your brand look its best.

What Is the Biggest Mistake Exhibitors Make

The single most common and costly mistake is not reading the exhibitor services manual—and not reading it thoroughly right at the beginning of the planning process. This one oversight leads to all kinds of problems, like designing a sign that’s too big, too heavy, or breaks the sightline rules.

The fallout can be rough. It can mean paying for expensive, last-minute changes on-site or, in the worst-case scenario, being told you can’t hang your sign at all. A close second is trying to cram too much text onto the sign. From a distance, it just becomes an unreadable blob, which completely defeats the purpose of having a long-range beacon for your brand.


Ready to create a trade show presence that can’t be ignored? At LED Exhibit Booths, we transform your entire booth into a seamless, high-resolution video canvas that captivates attendees from every angle. turnkey LED video wall

Elevate Your Event with conference booths displays: Stunning, High-Impact Booths

Let’s be honest. On a crowded trade show floor, your booth is your one and only chance to grab someone’s attention. If you’re still relying on the old-school setup of static banners and pop-up signs, you’re practically invisible. The game has changed, and modern displays use dynamic LED video walls to create a living, breathing brand experience that literally stops people in their tracks.

Why Your Booth Display Is Your Most Powerful Asset

Blending in at a packed convention is the kiss of death for your ROI. Your booth isn’t just a patch of rented carpet; it’s the single most important marketing tool you have on-site. Its job is to pull people in, tell your story fast, and turn a casual passerby into a hot lead. A printed sign can show your logo, sure, but it can’t run a product demo, create an emotional connection, or change its message on the fly. This is exactly where modern LED video walls make all the difference.

A dynamic LED wall transforms your booth from a passive, forgettable backdrop into an active brand magnet. Think of it as the difference between a magazine ad and a Super Bowl commercial. The seamless, high-resolution motion graphics catch eyes from clear across the aisle and get your main point across in seconds.

Turning Foot Traffic into Real Engagement

A killer display has a direct impact on how many people walk into your booth and how long they stick around. When attendees are genuinely captivated by what they see, they’re far more likely to step inside, talk to your team, and actually remember you after the show.

  • Build an Immersive World: You can wrap your entire space in visuals to create an atmosphere that screams your brand. Whether you’re going for a sleek, high-tech vibe or a vibrant, artistic feel, the video wall sets the stage.
  • Tell a Story That Sells: Use motion graphics to walk visitors through a product journey, show off glowing customer testimonials, or hammer home your key selling points.
  • Make Your Brand Unforgettable: People remember what they see and interact with. In fact, a whopping 70% of attendees report that they remember brands with interactive displays much more effectively than those with static ones.

This whole approach turns your booth from a simple “hello” into a powerful lead-generation machine. The market is screaming this trend, with the global Exhibition & Booth Design Market expected to jump from USD 10.62 billion in 2026 to USD 14.90 billion by 2032. This isn’t just random spending; it shows a clear shift where exhibitors are putting serious money into setups that demand attention and deliver real, measurable results. You can read more about the growth of the exhibition design industry and see how it’s completely reshaping event strategies.

The real goal is to get past just being seen. A great booth display starts the conversation before your team even says a word. It draws in the right people and gets them excited for a real discussion.

Static Banners vs. Dynamic LED Walls: A Performance Snapshot

When you break it down, the advantages of a modern LED setup become crystal clear. It’s not just about looking cool; it’s about performance across every important metric. Traditional banners just can’t compete.

Metric Traditional Displays (Banners, Pop-ups) Modern LED Displays (Seamless Video Walls)
Attention-Grabbing Power Low. Blends into the visual noise of the show floor. High. Bright, dynamic motion captures attention from a distance.
Content Flexibility None. A printed message is permanent for the entire show. Total. Update content in real-time for different demos or times of day.
Attendee Engagement Passive. Relies entirely on staff to initiate contact. Active. Draws people in with video, interactive elements, and demos.
Brand Recall Minimal. Easily forgotten among dozens of other booths. Strong. Memorable, high-impact visuals create a lasting impression.
Storytelling Ability Limited to static text and images. Unlimited. Can show product animations, testimonials, and brand stories.

As you can see, the choice is pretty stark. While a banner might fill a space, an LED wall fills a space with opportunity, turning your booth into a hub of activity and interest.

Planning Your High-Impact LED Booth Experience

A jaw-dropping booth that stops people in the aisles doesn’t just materialize out of thin air. It’s the product of serious planning that has to start months before the show floor even opens. This is where you take your marketing goals and turn them into a physical, three-dimensional experience that people won’t forget.

The very first thing you need to do is a practical, no-nonsense assessment of your booth space. Get a copy of the detailed floor plan and the exhibitor manual. This isn’t just about knowing you have a 20×20 space; it’s about finding out where the power drops are, what the rules are for rigging, and other critical details. Figuring this stuff out early on prevents expensive headaches and last-minute changes.

Aligning Design With Marketing Goals

Once you have the technical specs handled, you can get to the fun part: designing the actual experience. You have to ask yourself: what’s the number one thing we want to accomplish with this booth? Are you launching a new product? Are you trying to generate a specific number of qualified leads? Or is this all about building brand awareness? Your answer will dictate the entire layout.

For instance, a fintech company rolling out new software will likely want a massive, central video wall for live demos. This puts the product right in the spotlight. A lifestyle brand, on the other hand, might go for elegant, curved LED columns to create an immersive vibe that sells a feeling, not a feature list.

This simple flow shows how an effective booth should work.

A three-step booth impact process flow: Attract, Engage, and Convert with a 15% conversion rate.

As you can see, every design decision you make should funnel attendees from being attracted to your booth, to engaging with your team, and finally, to converting.

Choosing the Right Configuration for Maximum Impact

How you configure your LED panels is your biggest tool for managing your booth’s footprint and directing how people move through your space. You’re not just hanging a TV; you’re building an architectural feature that tells your brand’s story.

  • LED Video Walls: This is the go-to for a huge backdrop. It’s perfect for running brand videos, product demonstrations, or looping presentations.
  • Curved Columns or Arches: These are great for creating a more intimate, enclosed feel. They invite people to literally step into your world.
  • Interactive LED Floors: If you really want to stop the show, this is it. It adds a layer of fun and surprise that gets people to physically engage with your space.

We’ve seen that the clarity of your display is something you just can’t compromise on. That’s why our standard LED panels come with a 1.9mm pixel pitch. A lot of our competitors use a 2.5mm pitch, and while that doesn’t sound like a big difference, it’s huge in person. A lower pitch means our video walls have higher resolution, so your videos and graphics look unbelievably crisp, even when people are standing right up close.

Another big piece of the planning puzzle is your budget. The last thing you want are financial surprises during a show. We make this simple by bundling everything—the LED hardware, the support structure, shipping, and labor—into our rental price. The only extra costs are what the show itself bills you for directly, like your electricity usage. This transparency makes your budget predictable. To see how this works, you might want to read our guide on turnkey LED video wall rentals for your next event.

Selecting Hardware That Makes Your Content Shine

The tech specs on your LED panels are what make the difference between a pro-level display and one that just looks cheap. If you don’t get the hardware right, even the best content will fall flat. Understanding a few key terms is crucial to making sure your investment pays off with a stunning display that actually stops people in the aisles.

Two advanced display panels, one showing an avocado image, with a caliper for precise measurement.

While you’ll hear people talk about brightness and refresh rates, the single most important factor for a trade show booth is pixel pitch. This is just the distance, in millimeters, between the center of one LED and the center of the one next to it. A smaller number means the pixels are packed tighter together, which gives you a much sharper, higher-resolution picture.

Why Pixel Pitch Is So Important

Think about it. At a conference, people aren’t watching your screen from across a stadium. They’re standing just a few feet away, right in your booth. This is where a low-quality pixel pitch becomes a huge problem. A bigger pitch might look okay from 30 feet back, but up close, the image looks blocky and pixelated. It completely undermines your brand’s image.

We’ve seen this happen way too many times, which is why we’ve standardized on a 1.9mm pixel pitch for our conference displays. You’ll find a lot of competitors using 2.5mm or even 3.9mm panels to cut costs. The 1.9mm pitch gives our video walls a significantly higher resolution.

A 1.9mm pitch gives you a smooth, crisp picture that looks like a high-def TV, even when someone is standing right next to it. It keeps your content looking sharp and professional, which tells everyone you care about quality.

The entire industry is moving in this direction. The global LED display market was worth a massive USD 8.96 billion in 2023, growing by 12% in just one year. A huge part of that growth is from small pixel pitch LEDs (P2.5 and under), which saw shipments jump by 16.7% in 2023. As you can discover more insights about LED market trends, it’s obvious that higher resolution is the future.

Making Smart Financial Decisions

Beyond the tech, you have to decide if renting or buying your LED wall makes more sense. The answer really just comes down to how many shows you do each year.

  • Renting Makes Sense If: You’re only at one or two major events a year. Renting gets you the best and latest tech without a massive upfront cost. Plus, you don’t have to worry about where to store it, how to maintain it, or shipping it around.
  • Purchasing Makes Sense If: You exhibit at three or more shows annually. The upfront investment starts to pay for itself pretty quickly, and you get total control over your display in the long run.

Another big piece of the puzzle is pricing. Our approach is to keep it simple with one all-inclusive price. That means the LED hardware, the support structure, shipping, and all the labor for setup and teardown are baked into one number. Our price includes everything except for what the show bills you for directly. This way, you can budget accurately without getting hit with surprise fees later.

Creating Content That Stops Attendees in Their Tracks

That incredible, high-resolution LED video wall is just an expensive black rectangle until you tell it what to do. The screen is only as good as the content you put on it, so just looping your company logo isn’t going to cut it. You need a real plan to turn people walking down the aisle into actual prospects in your booth.

A man interacts with a digital kiosk in front of a large LED display showing 'TOLTE ERONP' in a modern conference space.

You have to think about two different audiences: people walking by from a distance, and the people who have already stepped into your space. Each one needs a totally different message to get them interested.

Attracting Attention from the Aisle

First, you have to break through the visual chaos of the trade show floor. This means your content needs to be designed to be seen from far away. Think big, bold, and high-contrast.

  • Ambient Animations: Simple, abstract motion graphics using your brand colors are great for setting a mood. They create an inviting atmosphere without screaming for attention.
  • Bold Typography: Your main tagline or what you do should be readable from across the hall. Use a big, clean font and keep the message short and sweet.
  • High-Contrast Motion: Slow, deliberate movement works much better than fast, chaotic video. People’s eyes are naturally drawn to motion, so use that to your advantage.

The impact of dynamic content is no joke. A well-designed digital sign can increase brand recall by a staggering 83%. When you combine that with a modern LED wall, you’ve got a powerful tool. Some reports even show it can double the amount of time an attendee spends at your booth.

Engaging Visitors Inside the Booth

Once someone is in your booth, your content needs to change. It’s time to switch from attracting attention to educating them. You can even schedule different types of content to play at different times to keep things fresh.

A common mistake we see is people playing one long corporate video on a continuous loop. A much better way is to create a “content playlist” with a mix of different things, like ambient graphics, product demos, customer testimonials, or even a countdown to a live presentation.

For visitors who are up close, think about these types of content:

  • Detailed Product Demos: Show exactly how your product works with close-up shots and feature call-outs.
  • Expert Presentations: You can schedule short talks with your team and use the video wall for slides and visuals.
  • Visual Brand Storytelling: A short, animated video that explains your company’s mission or the problem you solve can be very effective.

Creating this kind of professional content takes real expertise. If you don’t have a team for this in-house, looking into professional video production for your video wall is a smart move. It ensures your big investment in the screen actually pays off. Remember, the content is the fuel for your lead-generation engine at the show.

Navigating Booth Logistics Without the Headaches

The moment you start thinking about the actual logistics—shipping, drayage, installation labor, and show services—the excitement for your video wall can fade. It often feels like a mountain of paperwork and hidden costs. However, if you plan ahead with the right partner, this process can be surprisingly smooth.

A huge part of making logistics easier comes down to the hardware. Modern LED systems are designed to be lightweight and portable. This directly cuts down on two of the biggest budget killers: shipping and drayage (the fee to move your stuff from the loading dock to your booth space). Lighter, more compact panels mean lower costs. That leaves more money for what you actually care about—creating a jaw-dropping display.

Streamlining Setup and Slashing Labor Costs

It’s not just about weight; the assembly process is a massive factor. Older or cheaper display systems can require specialized tools and eat up a ton of time on the show floor, which sends your labor bill through the roof. Thankfully, new designs like toolless, magnetic locking mechanisms have completely changed how things are done.

Our panels are built to snap together quickly and securely. This gives you a few major wins:

  • Faster Installation: Your booth is up and running in a fraction of the time, which means you pay for fewer labor hours.
  • Fewer Errors: The simple locking system pretty much eliminates mistakes or damage during setup.
  • Less Specialized Labor: The design is so intuitive that you often don’t need a huge, highly specialized crew to put your wall together.

We build this efficiency into our service because we want you on the show floor talking to customers, not stressing about the build.

One of the biggest fears for exhibitors is getting hit with a hidden fee. That’s why we’ve made our pricing model as transparent as we can. We include everything in our price except the services the show bills you for directly, like electricity and drayage. Your quote from us covers the hardware, transport, and labor—no last-minute surprises.

A Clearer Picture and A Clearer Price

Speaking of clarity, let’s talk visuals. Many competitors offer panels with a 2.5mm pixel pitch, but our standard for conference booths displays is a much sharper 1.9mm pitch. This isn’t just a number on a spec sheet. It means our video walls have a significantly higher resolution.

When your attendees are standing just a few feet from your screen, that difference is what makes your content look crisp and professional instead of pixelated and cheap. It’s the difference between looking high-end and looking like you cut corners.

This blend of top-tier visual quality and all-inclusive pricing gives you a real advantage. You get a display that truly reflects your brand’s quality without the budget nightmares that can ruin a trade show. It’s about getting a premium experience from the first quote all the way to the final tear-down. When you pick a partner that bundles all these critical logistics, you can plan your budget with confidence and put your energy where it belongs: connecting with your audience.

Budgeting Your Booth and Measuring True ROI

Let’s talk about the bottom line. A spectacular video wall booth is a fantastic investment, but it’s crucial to know what you’re actually paying for and how to tell if it was worth it.

The real cost of a trade show booth is never just the price of renting the hardware. You’ve got to think about creating the video content, shipping, labor for setup and teardown, and all the other show services. This is where a lot of exhibitors get tripped up by surprise fees that can wreck their budget.

No More Hidden Fees

We make this part simple. Our pricing is straightforward and transparent so you can budget without any guesswork. We include everything in our price except the show bills you for directly.

This all-in-one approach bundles all the major costs into a single, clear number. Here’s what’s included:

  • LED Hardware: Every panel, processor, and cable needed for your video wall.
  • Support Structure: The custom frame that holds everything together safely.
  • Transportation: Shipping the whole system to the convention center and back.
  • Labor: Our professional crew for both the installation and the dismantle.

This means your only other costs are the mandatory show services, like electricity and material handling (drayage). Those are always billed directly by the event organizer. You won’t get any surprise invoices from us. Ever. This kind of clarity is a huge advantage and lets you plan your spending with confidence.

One of the most important things we provide is superior visual quality. Many of our competitors use panels with a 2.5mm pixel pitch. Our standard, however, is 1.9mm. That smaller pitch means our video walls have a much higher resolution, so your videos and graphics look incredibly sharp and clear, even when people are standing right next to them.

Measuring Success: It’s More Than Just Badge Scans

So, the show’s over. How do you figure out if your investment paid off? Just counting the number of badges you scanned won’t give you the full picture. You need to look a little deeper to see the real impact on your business.

A better way to measure success is to look at the quality of your leads, not just the quantity. Track how many people who visited your booth actually scheduled a demo or a sales meeting afterward. You should also check social media for mentions, see if people posted photos of your booth, and look for spikes in your brand’s hashtags during the show.

For a more detailed breakdown, check out our guide on how LED exhibit booths increase ROI. When you connect these data points to your sales pipeline after the show, you’ll get a much clearer picture of what success really looked like.

Answering Your Top Questions About LED Booth Displays

Even if you’ve been exhibiting for years, jumping into the world of LED video walls can bring up a lot of questions. That’s perfectly normal. Getting straight answers is the only way to make a smart decision for your trade show program. We’ve heard just about every question there is, so let’s tackle a few of the most common ones.

What Is Pixel Pitch and Why Is Our 1.9mm a Big Deal?

You’ll hear the term “pixel pitch” thrown around a lot. It’s simply the distance between the center of one LED pixel and the center of the next, measured in millimeters. The smaller the number, the closer the pixels are packed together, and the sharper your image will be.

At a trade show, people are walking right up to your booth, sometimes standing just a few feet away. This is where pixel pitch becomes critical.

Our standard is a 1.9mm pitch. This ensures that even up close, your videos and graphics look incredibly crisp and seamless. A lot of providers still use a more common 2.5mm pitch, which might sound like a tiny difference, but it’s not. From close viewing distances, a 2.5mm wall can look grainy or pixelated, which can make your brand look cheap. Our 1.9mm pitch means our video walls have a much higher resolution.

What’s Actually in a “Turnkey” Rental Price for Conference Booths Displays?

We hate surprise fees as much as you do. That’s why our turnkey rental pricing is designed to be as all-inclusive as possible, giving you a predictable number for your budget.

We bundle everything into a single price except for the services that the show organizer bills you for directly. This typically includes just your electrical power drop and material handling (drayage).

When you get a price from us, here’s what’s already baked in:

  • All LED Panels and Processors: The complete screen and the brains behind it.
  • Custom Support Structure: The framing and rigging needed to safely build your wall.
  • Round-Trip Transportation: We handle all the logistics of getting the gear to the convention center and back.
  • Professional Labor: Our experienced crew manages the entire installation and teardown, so your team doesn’t have to lift a finger.

This approach means you have a clear financial picture right from the start, with no nasty surprises on the final invoice.


At LED Exhibit Booths, we deliver high-resolution displays and transparent pricing to make your booth the star of the show. transform your next event.

The Ultimate Guide to Portable Tradeshow Booths in 2026

Portable tradeshow booths are your ticket to a professional presence at any event without the logistical nightmares and sky-high costs of old-school custom exhibits. They’re flexible, cost-effective display systems built for easy transport, quick setup, and reuse, making them a fantastic option for businesses of all sizes.

Why Portable Tradeshow Booths Are a Game Changer

Think of a traditional trade show booth like a custom-built house—it’s expensive, permanently fixed, and moving it is a massive project. Now, think of a portable booth as a high-end modular home. It’s stylish, efficient, and ready to go wherever your business takes you. This is the big shift in event marketing, moving away from clunky setups to smarter, more agile solutions.

The mantra for today’s exhibitor is simple: “work smarter, not harder.” Portable trade show booths let you do just that by getting rid of the operational headaches. Instead of spending your time and energy wrestling with heavy, complicated structures, your team can focus on what really counts—connecting with potential customers.

The Financial and Operational Edge

The upside of going portable is about more than just convenience. For small to medium-sized businesses, these systems completely level the playing field. You can project a powerful, professional brand image without needing a six-figure budget.

This shift is making waves in the market. The global market for portable exhibition stands is expected to jump from an estimated $2.5 billion USD in 2023 to a projected $3.2 billion USD by 2028. The reason is simple: businesses want solutions that slash setup times and transportation costs, which can be 30-50% lower than with traditional booths.

This financial savings is in Portable Trade Show Booths is a huge deal. It frees up your marketing budget for other crucial tasks like promoting your presence before the show and, most importantly, following up with the leads you generate.

Achieving High Impact with Portable Trade Show Booths

But does “portable” mean you have to sacrifice looks? Absolutely not. Modern portable displays, especially advanced options like LED video wall booths, can create stunning, high-impact experiences that stop people in their tracks.

The key is superior technology. For example, our video walls use a 1.9mm pixel pitch, which is a measure of how close the pixels are to each other. Many competitors use a 2.5mm pitch, but our screens deliver noticeably higher-resolution, crisper, and more vibrant visuals that grab attention from all the way across the hall.

This technical advantage guarantees your brand looks its absolute best. Plus, with all-inclusive pricing, your budgeting becomes refreshingly straightforward. We include everything in our price except for the expenses the show bills you for directly, such as electricity. This transparency gets rid of surprise costs and makes planning a breeze. You can pop-up display.

Ultimately, portable tradeshow booths give you a dynamic, reusable way to create brand experiences that pull in your audience while cutting down on the operational stress. They represent a smart move toward efficiency, agility, and powerful visual storytelling on the modern show floor.

Choosing Your Perfect Portable Booth Type

Trying to pick the right portable booth can feel a lot like picking out a car. What you need for a quick trip across town isn’t what you’d take on a cross-country family vacation. It’s all about matching the booth to the job at hand. This is where we stop talking about why you need a booth and start digging into what kind of booth will actually get the job done.

This decision is a big one. It directly impacts how much time you’ll spend setting up, how good your booth looks, and how much you’ll end up spending. It’s the difference between being just another booth on the floor and being the one everyone remembers.

This infographic lays out just how far portable booths have come, moving away from the old, heavy setups to the new, lighter systems we use today.

Infographic comparing old vs. new portable booth features, highlighting the evolution towards lighter, modular designs.

The main thing to notice is the move toward total flexibility. Modern booths let you adapt and change your setup on the fly. Think of it like playing with building blocks instead of being stuck with a single, unchangeable structure.

To make sense of the options, let’s break them down. Each type has its own strengths and is best suited for different goals, spaces, and budgets.

Here’s a quick look at how the main portable trade show booths types stack up against each other.

Portable Booth Type Comparison

Booth Type Best For Setup Time Visual Impact Avg. Cost Range
Pop-Up Displays First-timers & small budgets 5-15 mins Good $800 – $3,000
Fabric Tension Systems A sleek, professional look 15-30 mins Better $1,500 – $5,000
Modular Exhibits Growing brands needing flexibility 30-90 mins Great $5,000 – $15,000+
Portable LED Video Walls Maximum attention & engagement 2-4 hours Best $15,000 – $50,000+

This table gives you a ballpark idea, but let’s get into the specifics of what makes each of these systems tick.

Pop-Up Displays The Quick and Easy Solution

Pop-up displays are the classic, no-fuss workhorses of the trade show world. Imagine an accordion-style frame that you simply expand and lock into place. Then, you attach your graphics to create a backdrop. It’s straightforward.

Their biggest selling point is speed. One person can usually have a pop-up display ready to go in under 10 minutes. This makes them a great choice for exhibitors who are short-staffed or just want a fast, simple setup. They are the perfect entry point for companies new to exhibiting or those working with a tight budget.

Of course, that simplicity has its limits. You don’t get a ton of creative freedom, and you can sometimes see the seams between graphic panels, which might not fit the high-end image your brand is going for.

  • Best For: First-time exhibitors, small budgets, and when setup speed is everything.
  • Limitation: They don’t have the same “wow” factor or design flexibility as the more advanced options.

Fabric Tension Systems The Sleek and Seamless Look

Fabric tension systems are the next step up from a basic pop-up. They use a lightweight aluminum tube frame that just snaps together. A single, large fabric graphic—printed with a special dye-sublimation process for rich, vibrant color—then slides over the frame like a pillowcase.

The result is a completely taut, smooth, and seamless backdrop that looks incredibly sharp and professional. Any wrinkles from packing and shipping usually just vanish as the fabric stretches tight. It’s a major visual upgrade.

While setup is still easy, it takes a little more time than a pop-up. But honestly, the extra few minutes of assembly are well worth it for the clean, modern look that makes your brand stand out.

Modular Exhibits The LEGOs of Trade Show Booths

For exhibitors who need serious flexibility, modular exhibits are the answer. These systems are basically a giant set of high-end LEGOs. They’re made of standardized parts—frames, connectors, shelves, and panels—that you can rearrange into almost any layout you can think of.

That versatility is their real power. You can build a 10×10 booth for a local show, then take those same components, add a few more, and create a 10×20 or even a 20×20 island booth for a huge national expo. This adaptability makes them a really smart long-term investment for companies that exhibit at different types of events.

Modular systems are the perfect middle ground between simple portable displays and massive, expensive custom builds. They give you a ton of design control without the high cost and hassle of a traditional exhibit.

Portable LED Video Wall Booths The Ultimate Attention-Grabber

This is where your booth stops being just a backdrop and becomes the main event. Instead of a static graphic, your entire booth structure is a living, breathing digital screen. These systems are built from individual LED panels that lock together magnetically, with no tools required.

The final product is a flawless, seamless video wall that can play motion graphics, run product demos, and tell your brand story in a way that static images just can’t. The visual impact is huge; it pulls people in from all the way across the convention hall. A key detail is that our video walls use a 1.9mm pixel pitch. This spec means the pixels are packed much closer together than the 2.5mm pitch you see from many competitors, giving you a much higher resolution and a sharper, clearer image up close.

Better yet, we’ve made our pricing totally transparent. Whether you rent or buy, we include everything in our price except for the expenses the show bills you for directly, like electricity and drayage. This all-in pricing means no surprise fees, so you can actually budget with confidence.

The Power of Next-Generation LED Video Wall Booths

So far, we’ve talked about portable booths that act as a nice backdrop. Now we’re getting into a completely different league, where the booth itself stops being a background and becomes the main attraction. This is the world of next-generation portable LED video walls, where the structure is the screen, bringing your brand’s story to life with incredible motion and color.

A large, vibrant LED video wall displaying 'FUNFUJI DESIGN' with a white stool on a gray mat.

Unlike a modular system that just holds up a printed graphic, these advanced portable tradeshow booths are actually built from individual LED panels. Think of them like high-tech Lego bricks that snap together to form one giant, seamless digital canvas. This totally changes what a booth can be, turning it from a simple display into a full-blown immersive experience.

The Technical Edge That Stops Attendees

Not all LED walls are the same. The one detail that really separates a premium display from the rest is its pixel pitch—that’s just the distance in millimeters between the center of each tiny pixel. A smaller pixel pitch means the pixels are packed tighter, which gives you a much higher-resolution, sharper picture.

Many providers will rent you an LED wall with a standard 2.5mm pixel pitch. From a distance, it looks okay. But up close, where your prospects are standing, it can start to look grainy and pixelated. That’s a huge deal on a trade show floor.

Our video walls are built with a 1.9mm pixel pitch. That tiny difference makes a massive impact, creating a visual that’s dramatically crisper and more detailed. Your product videos and graphics will look razor-sharp, even to someone standing right in your booth.

That higher resolution means you can show off detailed product designs or sharp text without it turning into a blurry mess. It’s like the difference between an old standard TV and a new 4K screen—the quality is obvious, and it says a lot about your brand. You can discover more about the impact of high-resolution video display walls and see how they can transform your presence.

Engineered for Simplicity and Speed

Building a wall out of LED panels might sound like a nightmare, but modern engineering has made it surprisingly simple. The real magic of these systems is their toolless assembly. Each panel is lightweight and comes with powerful magnets and a secure locking system.

This design lets the panels literally snap together, automatically aligning for a perfectly smooth surface. No screws, no messy wiring, and no need for a big crew of expensive technicians. Pop up trade show booths are a more affordable option.

  • Magnetic Alignment: Strong magnets pull each panel into the perfect position for a tight fit.
  • Toolless Locking: A simple latching mechanism secures the panels, making the whole structure stable and rigid.
  • Rapid Assembly: What used to take a full day can now be done by one or two people in just a couple of hours.

This is a game-changer. With over 13,000 trade shows in North America each year, exhibitors need displays that look amazing but are also efficient. These LED booths are the perfect answer. A 10×10 can be assembled in under an hour, a huge difference from old truss systems that required a whole team and days of work. You can learn more about the growing market for portable exhibition stands and what’s driving this shift.

Transparent Pricing for Confident Budgeting

One of the biggest headaches for any exhibitor is hidden costs. You get a quote, and then suddenly you’re getting slammed with extra fees for shipping, support, or other surprises. We don’t operate that way. We believe in being upfront so you can actually plan your budget.

Our pricing is designed to be totally transparent. When we give you a quote, it includes everything you need to have a successful show.

What’s Included in Our Price:

  • The complete LED video wall hardware.
  • All the cables and processing gear.
  • Tough, custom shipping cases for transport.
  • Round-trip freight shipping to the venue.
  • On-site support to make sure setup and teardown go smoothly.

The only things not included are the costs billed directly by the show organizer, like electricity for your booth, internet, and drayage (the fee to move your stuff from the loading dock to your booth space). By bundling everything else into one clear price, we get rid of the surprises so you can focus on your event, not on trying to figure out a complicated invoice.

Calculating the True Cost and ROI of Your Booth

It’s easy to look at the sticker price of a portable tradeshow booth and think that’s the whole story. But that number is just the beginning. The real cost—and the actual return on your investment—shows up when you look at the total expense over a full year of shows. Savvy exhibitors know the secret isn’t in the purchase price; it’s in cutting the hidden costs.

Two black road cases on wheels and a large wooden shipping crate on a pallet.

When you switch from old-school, heavy exhibits to a modern portable system, the entire financial game changes. The biggest expenses for any show are usually buried in the operational costs that add up every single time you exhibit. This is exactly where lightweight, modern booths create huge value.

Uncovering the Hidden Savings

The three things that absolutely kill a trade show budget are shipping, drayage (the fee to move your stuff from the loading dock to your booth space), and labor. Traditional booths are notorious for driving these costs sky-high with their heavy panels and complicated truss structures. A portable booth, especially a modern LED video wall system, is designed to bring those costs way down.

In fact, exhibitors who switch to lightweight, tool-free systems are seeing 20-40% reductions in these overheads. Think about it: a modern booth can weigh 70% less than an old setup with bulky monitors and truss. That means one person can often handle setup in 30-60 minutes, instead of needing a whole team for 4-8 hours.

These aren’t small savings. This is a complete shift in how you can use your event budget. Every dollar you don’t spend on shipping and labor is a dollar you can put toward promoting your booth before the show, creating better experiences on-site, or following up with leads afterward.

The idea is simple: every dollar you don’t spend on moving and building your booth is a dollar you can spend on attracting and converting customers. Over a year with three or four shows, these operational savings can easily equal or exceed the initial cost of the booth itself.

The Power of Transparent Pricing

One of the biggest headaches for exhibitors is trying to budget for a show when they don’t know all the costs. A low initial quote can be a trap when you start getting hit with extra fees for shipping, support, and hardware. That’s why we believe in transparent, all-inclusive pricing. It’s the only way to plan your finances accurately.

When we give you a quote, it’s meant to be straightforward and complete. We bundle all the essential services into one clear number so you can budget with confidence.

Our All-Inclusive Price Covers:

  • The complete LED video wall hardware for your booth.
  • Durable, custom-built shipping cases for safe transport.
  • Round-trip freight shipping directly to the convention center.
  • On-site expert supervision for setup and teardown.

This approach takes the guesswork out of the equation. The only other costs you’ll have are the ones billed directly by the show itself, like electricity, internet, and any rigging you might need. You know exactly what you’re paying us, with no surprise invoices after the show is over.

Maximizing ROI Through Visual Excellence

Finally, the ROI of your booth isn’t just about saving money; it’s about making money. A booth that grabs attention brings more people in, starts more conversations, and generates more qualified leads. This is where the technical quality of our displays makes a real financial difference.

Our video walls use a 1.9mm pixel pitch. This means the pixels are much closer together than the 2.5mm pitch you’ll find on many competing walls, creating a dramatically sharper and higher-resolution image. Your brand message looks crisp and professional, drawing people in and holding their attention.

A better-looking booth simply performs better. You can learn more about how LED exhibit booths can increase ROI at trade shows in our detailed guide. By combining huge operational savings with a top-tier visual experience, a portable LED booth delivers a return on investment that’s hard to beat.

A Practical Guide to Selecting the Right Booth

Choosing the right portable tradeshow booth isn’t about buying the most expensive one you can find. It’s about making a smart choice that lines up with your business goals, the actual space you have, and your real, all-in budget. Get this right, and your booth stops being an expense and starts becoming a machine for driving results.

A person reviews portable tradeshow booth options and planning details on a digital tablet.

Before you even glance at a product catalog, you need to answer a few critical questions. Honestly, stepping back to figure out your objectives is the most important part of this whole process. It ensures every dollar you spend is working toward something you can actually measure.

Define Your Primary Goal

First things first: what’s your number one reason for being at this show? Most companies want to do a bit of everything, but you need to pick a top priority. Your answer will immediately point you toward certain kinds of booths and away from others. Additionally, we offer lightweight trade show booths.

  • Lead Generation: If your main goal is to walk away with a list of qualified leads, you need a booth built for interaction. Think open layouts with demo stations, little nooks for meetings, and interactive tech that pulls people in for a real conversation.
  • Brand Awareness: If you’re there to make a huge splash and get your name on everyone’s lips, your focus shifts to pure visual impact. You need a booth that’s impossible to ignore—something with massive, bold graphics, structures that tower over the floor, or dynamic video that literally stops people in their tracks.

Assess Your Space and Budget

Once your goal is clear, it’s time for a reality check on your constraints. Your booth space and your budget are the two practical things that will really narrow down your options.

A 10×10 inline space is a completely different world from a 20×20 island booth. Your design has to work within the footprint you paid for, making the most of it without feeling cramped or, even worse, empty. This is where the industry’s massive growth—projected to expand by USD 14.90 billion through 2032—is really helping exhibitors. The big trend is toward toolless, reconfigurable systems that can adapt from a 10×10 to a 20×20 setup, giving you flexibility for your whole show schedule. You can find more on the future of exhibition design and see just how important this modularity has become.

Your budget is just as critical. Make sure you’re thinking about the “all-in” cost. That includes shipping, drayage (the fee to move your stuff from the dock to your booth), labor, and electricity. When you’re talking to vendors, ask them exactly what’s in their price.

We include everything in our price except the bills you get directly from the show organizer. This all-inclusive approach provides budget clarity, eliminating surprise fees for hardware, shipping, or support, so you know your true cost upfront.

Rent Versus Buy: A Simple Framework

One of the last big decisions is whether to rent or buy your portable booth. This choice has some serious long-term consequences for your wallet and your sanity. Here’s a simple rule of thumb we give our clients.

  • Rent if you exhibit 1-2 times per year: Renting is the perfect solution for companies just dipping their toes into exhibiting, trying out a new show, or who just don’t have a packed event calendar. It gives you that high-end, professional look without the big upfront investment or the headaches of storage and upkeep.
  • Buy if you exhibit 3 or more times per year: If you have a busy show schedule, buying a system quickly starts to make more financial sense. The cost of ownership pays for itself over a few events because you’re not paying rental fees over and over again. Plus, you can deeply customize it to be exactly what you want.

Key Evaluation Checklist

As you start comparing different portable booths, use this checklist to make sure you’re looking at the whole picture. The best option is always a balance of stunning looks and practical, real-world function.

  • Visual Quality: Does the booth make your brand look premium and professional? If you’re looking at video walls, check the specs. Our 1.9mm pixel pitch delivers a significantly sharper, higher-resolution image compared to the more common 2.5mm pitch you see out there. This means your content looks crisp and clean, even when people are standing right next to it.
  • Ease of Assembly: How fast and easy is it to set up? A toolless, lightweight system will save you an absolute fortune on show-site labor costs.
  • Scalability: Can you reconfigure the booth for different space sizes? A modular design is a long-term asset that grows with you.
  • Portability: What does it weigh and how small does it pack down for shipping? Lower weight and smaller cases directly translate to lower shipping and drayage bills. It’s as simple as that.

Common Questions About Portable Tradeshow Booths

When you’re thinking about investing in a portable tradeshow booth, it’s only natural to have a few questions. This is a big step, and you need straight answers to feel good about your decision. Here are the most common questions we get from exhibitors about everything from setup and content to durability and cost.

How Long Does It Really Take to Set Up a Portable LED Video Wall Booth?

This is one of the first questions we hear, and for a good reason—on the show floor, time is money. Forget about the old days of needing a full day and a specialized labor crew. Today’s portable LED video wall booths are designed for speed.

Our systems are engineered with a toolless magnetic locking mechanism. This smart design means a standard 10×10 foot booth can be fully put together by just one or two people in about an hour. A larger 10×20 foot booth might take two to four hours. This isn’t just a small time-saver; it dramatically slashes your labor costs and gets your team focused on what really matters: getting ready to talk to customers.

What Is Included in Your Booth Rental Price?

Trade show budgeting can feel like navigating a minefield of surprise fees. We hate that. That’s why we believe in transparent, all-inclusive pricing so you can budget with total confidence and no nasty surprises.

When you rent a turnkey video wall booth from us, our quote covers the entire LED wall structure, all the hardware you need, round-trip freight shipping right to the venue, and our expert on-site support for both setup and teardown.

The only things our price doesn’t cover are the items the show organizer bills directly to you. This usually includes:

  • Electricity for your booth
  • Internet service
  • Drayage (their material handling fees)

With our approach, you won’t get any hidden fee emails from us. You’ll know exactly what you’re paying for from the start, which makes your financial planning a whole lot easier.

Can I Use My Own Video Content on the LED Walls?

Absolutely. In fact, we encourage it! Our systems are built for total flexibility so your brand’s message can shine. You can easily run your existing videos, slick motion graphics, or even interactive presentations. We’ll give you clear guidelines on the best formats and resolutions to make sure your content looks absolutely spectacular.

The key is to optimize your visuals for our high-resolution screens. Our video walls feature a 1.9mm pixel pitch, which is much finer than the 2.5mm pitch many competitors use. This means your content will look significantly sharper and more vibrant, so it’s best to start with high-quality source files. If you need a hand creating something new, our parent company is a full-service advertising agency that can help with everything from strategy to final production to make sure your message lands with a punch.

Is a Portable Booth Durable Enough for a Multi-Show Schedule?

Yes, our portable booths are built for the road. We know that whether you’re renting for one event or buying a system for a national tour, durability is not something you can compromise on.

Our portable LED panels are protected by durable, lightweight casings to guard the sensitive electronics inside. For shipping, they’re packed in custom-built, rugged crates designed to handle the bumps and bruises of freight travel. Plus, that toolless magnetic assembly we mentioned earlier minimizes wear and tear on connection points—a huge improvement over old-fashioned hardware that can bend or break over time. These booths are engineered for reliability, ensuring you have a professional-looking setup at every single show.


Ready to stop blending in and start standing out? The team at LED Exhibit Booths can help you create an unforgettable experience with a high-impact, easy-to-assemble video wall display. Explore our solutions and get a quote today.

Custom Trade Show Booths: Elevate Your Exhibit with custom trade show booths

Imagine walking onto a trade show floor. What if your brand’s story wasn’t just on a banner, but was told through the very architecture, light, and interactive elements of your space? That’s the real power of custom trade show booths.

It’s the difference between buying a suit off the rack and getting one custom-tailored. One might fit, but the other is made just for you, ensuring every single detail makes the right impression.

Why a Custom Booth Is Your Ultimate Brand Stage

In a sea of competitors, a standard rental booth just fades into the background. A custom trade show booth, on the other hand, becomes a destination. It’s a physical brand experience, built from the ground up to hit your specific goals—whether you’re launching a new product, hunting for high-value leads, or just need to make a statement no one will forget.

Think of it like building a temporary home for your brand right on the show floor. It doesn’t just pull people in; it makes them want to kick back and stay a while.

This isn’t just a nice idea; it’s a strategic move in a booming market. The global trade show industry is on track to hit $50 billion in revenue by 2026. With companies pouring up to 40% of their B2B marketing budgets into events, a unique and memorable environment is no longer a luxury. It’s a necessity. You can discover more about these powerful trade show statistics and see how they directly affect your bottom line.

A quick look at the options makes the choice to use custom trade show booths pretty clear.

Custom vs. Standard Booths At a Glance

Here’s a simple breakdown of how a custom-built exhibit stacks up against the standard rental or modular options you often see.

Feature Custom Trade Show Booths Standard/Rental Booths
Design Unique, one-of-a-kind, built to your exact brand specifications. Pre-designed, generic structures with limited customization.
Brand Expression Fully integrated. The booth is the brand message. Limited to graphics applied to a standard frame.
Technology Seamlessly integrated (e.g., LED walls as structural elements). Often added on, feeling like an afterthought.
Layout & Function Designed around your specific sales process and engagement goals. Fixed layouts that may not fit your operational needs.
“Wow” Factor High. Creates a memorable destination on the show floor. Low. Tends to blend in with other booths.
Initial Investment Higher upfront cost, but offers greater long-term ROI. Lower initial cost, but can feel cheap and disposable.

As you can see, if you’re looking to make a serious impact and control the entire visitor experience, a custom build is the only way to go.

Moving Beyond Generic Displays to Custom Trade Show Booths

A custom booth is so much more than a unique shape or a splash of brand color; it’s a strategic weapon. It lets you weave in technology and messaging in ways a standard rental simply can’t match. Plus, we have plenty of lightweight trade show booths. Naturally, lighter weight saves you on shipping and material handling.

For instance, you’ll see plenty of competitors using video walls with a standard 2.5-pixel pitch. Our advanced displays, however, feature a 1.9 pitch. What does that mean for you? Your videos and graphics have a much higher resolution, creating a premium look that grabs attention from clear across the hall.

This level of detail carries through to every part of the experience, including:

  • Architectural Storytelling: The physical structure of the booth tells a story. We can use arches, private meeting rooms, and interactive stations to guide visitors on a journey you’ve planned out.
  • Integrated Technology: Instead of tacking screens onto a wall, we make technology part of the architecture itself. Seamless LED walls can become the actual walls and structures of your exhibit, creating a living, breathing canvas for your brand.
  • Purpose-Driven Layouts: Every square foot has a job to do. Whether you need hands-on demo stations, a comfy lounge for serious talks, or a stage for presentations, we build the layout around your exact goals.

Transparent and Strategic Investment

One of the biggest headaches with custom projects is the fear of hidden costs. That’s why our approach is built on transparent, all-in pricing.

When you get a quote from us, we include everything in our price except for the services the show bills you for directly, like electricity or internet hookups. This clear approach means no surprises and you can budget with confidence.

A truly effective custom trade show booth doesn’t just attract attention; it functions as a finely tuned machine for engagement and lead generation. It turns passive attendees into active participants in your brand’s narrative.

Ultimately, investing in a custom exhibit is about taking control. You control the story, the visitor experience, and the impression you leave long after the show is over. It’s how you make sure every handshake counts and turn your presence from just another booth into the main event.

Bringing Your Booth From Concept to Reality

So, how does a sketch on a napkin actually become a real, physical structure that stops people in the aisle? Taking your core marketing goals and turning them into a three-dimensional experience is a hands-on journey. It all starts with a simple conversation.

Let’s walk through it with a hypothetical company, “InnovateTech,” who’s gearing up for a big product launch. Their goal isn’t just to display a new gadget. They need to create an entire atmosphere where buyers feel the buzz and really get the product’s value. That main goal is what guides every single decision from here on out.

It all kicks off with a discovery call. This isn’t a quick check-in; it’s where we get into the weeds. InnovateTech shares their vision, who they’re trying to reach, their budget, and what a “win” looks like for them. The booth partner’s job is to listen, ask the right questions, and start translating those business goals into something you can actually build.

Visualizing Custom Trade Show Booths with 3D Renderings

Once the strategy is locked in, the creative part really begins. The design team takes everything InnovateTech wants to achieve and starts building the booth—virtually. This is where 3D renderings are a game-changer, giving you a photorealistic preview of what you’ll get on the show floor.

For InnovateTech, this means they can see exactly how their product demo stations will feel, where they can tuck away a private meeting room, and how the foot traffic will naturally flow through their brand story. They can make tweaks long before anyone picks up a hammer. “Can we raise this wall a bit?” or “What if we shifted the reception desk over here?” This single step saves a fortune in surprises and makes sure the final booth is exactly what they imagined.

Infographic illustrating the three-step custom booth manufacturing process: Generic, Standard, and Custom.

As you can see, the process is all about moving past generic, off-the-shelf options to create a truly one-of-a-kind build that’s made just for you.

Selecting the Right Materials and Technology

With the 3D design signed off, we switch gears to materials and tech. This is where the booth comes to life, and it’s about more than just looking good—it has to work perfectly. The materials you choose affect everything: the look, how well it holds up, shipping costs, and how long it takes to set up.

InnovateTech’s design calls for a big, eye-catching video wall to show their new product in action. The technical details here are what separates an okay booth from a great one. A lot of exhibitors use video walls with a standard 2.5 pixel pitch. To give InnovateTech an edge, we’d go with a superior 1.9 pitch. The smaller gap between pixels creates a much higher resolution, so their videos look incredibly sharp and professional, even when people are standing right in front of it.

On top of the tech, our all-in-one pricing gives you total peace of mind. We include everything in our price except for the services the show bills you for directly, like electricity or rigging. This way, companies like InnovateTech know their budget is locked in, with no hidden fees. To learn more about the nuts and bolts, check out our guide on the essentials of exhibition stand building.

The transformation from concept to reality isn’t just about building walls; it’s about crafting a purpose-built environment where every element, from the layout to the pixel pitch of a screen, is aligned with a single goal: creating meaningful connections.

When it’s all said and done, this detailed process ensures that when the show doors open, InnovateTech’s custom booth isn’t just a structure. It’s a powerful sales tool, ready to make a serious impression.

Immersive LED Walls Are The Future Of Booth Design

Let’s be honest, static displays and printed banners just don’t cut it anymore. On a crowded show floor, they’re easy to walk past. The real game-changer in custom trade show booths isn’t about slapping some tech onto a wall; it’s about building the entire booth from the technology. Your booth stops being a static backdrop and becomes a living, breathing canvas for your brand.

Two men observing a large, curved LED display screen showcasing a vibrant tropical beach scene at a trade show booth.

Think about it: walls that aren’t drywall, but are made entirely of light and motion. We construct our exhibits from seamless LED video wall panels. These aren’t just screens; they’re lightweight modules that click together with powerful magnets. There are no tools, just a perfect, uninterrupted visual surface that can become walls, arches, columns, or even your reception counter.

The result is a totally immersive space where your brand story is literally all around your visitors. You can switch from a product demo to a stunning brand video to a simple, ambient background with a single click. It keeps the experience fresh for everyone who steps inside.

Pixel Pitch: The Tiny Detail That Makes a Huge Difference

Of course, not all LED video walls are the same. The real secret to a professional, high-end look comes down to a technical detail called pixel pitch. This is just the distance, in millimeters, between the center of each tiny pixel on the screen. The smaller the pitch, the closer the pixels are, and the sharper your image looks up close.

A lot of companies out there are still using video walls with a 2.5mm pixel pitch, which used to be the standard. But technology moves fast, and that standard is getting old.

We raised the bar by using a 1.9mm pixel pitch for our video walls. It might not sound like a big deal, but the visual impact is massive. It’s the difference between watching in standard definition versus high definition. The image is significantly sharper, smoother, and more vibrant because our screens have a higher resolution.

That superior resolution means your videos and graphics look absolutely crisp, whether someone is watching from across the aisle or standing right in front of the wall. This kind of quality says “professional” before your team even has a chance to say hello.

More Than Just a Screen: Our Full-Service Approach

Putting this much tech into a custom booth might sound like a headache, but the right partner makes it simple. We believe in providing a complete, stress-free solution that covers everything.

That’s why our pricing is transparent and all-inclusive. We include everything in our price except for the services the show bills you for directly. This covers:

  • Custom Design and 3D Renderings: We’ll work with you to design the perfect booth and show you exactly what it will look like with photorealistic previews.
  • High-Resolution LED Hardware: All the 1.9mm pitch video wall panels, controllers, and tech are included.
  • Logistics and Shipping: We handle getting the booth to and from the event. No need for you to coordinate freight.
  • On-Site Setup and Teardown: Our expert technicians manage the entire installation and dismantle. You just show up.
  • Full Technical Support: You’ll have one of our techs on-site to manage the video content and handle any issues, so your team can focus on what they do best—talking to customers.

With us, there are no hidden fees or surprise bills. This approach lets you budget with confidence and avoid the logistical nightmare of juggling multiple vendors. If you want to dive into the nitty-gritty, you can learn more about the components inside a professional video display wall and how it all works.

When you build your booth with immersive LED technology and partner with someone who handles all the details, you’re not just exhibiting. You’re creating an unforgettable experience that will be the talk of the show floor.

What Does a Custom Booth Really Cost? Let’s Talk ROI.

Let’s cut through the noise and talk about the real numbers. When you’re budgeting for a custom trade show booth, the price on the proposal is just the beginning. The true cost is what really matters—that includes everything from the build itself to shipping, material handling (drayage), and the labor to put it all together.

With old-school custom builds, those costs can get out of hand fast. You know the story: heavy, complicated structures that rack up hidden fees and logistical nightmares, slowly draining your budget and your sanity. We saw this happen over and over, which is why we switched to a completely transparent, all-in-one pricing model.

Our All-Inclusive Rental Pricing

We think you should know exactly what you’re paying for from day one. No surprises, no “gotchas.” When we give you a price, it covers everything you need to show up and steal the show.

This approach makes your life a whole lot easier. Your quote includes:

  • Custom Design & 3D Renderings: You’ll see a complete virtual model of your booth before we build a thing.
  • High-Resolution LED Hardware: You get our brilliant 1.9 pitch video walls. That’s a much higher resolution than the 2.5 pitch screens many competitors use, so your visuals look sharper and more professional up close.
  • Complete Logistics: We handle all the shipping and transportation to and from the convention center.
  • Expert On-Site Labor: Our crew manages the entire setup and teardown process.
  • Dedicated Tech Support: You’ll have a technician on-site to manage your content and handle any issues, freeing up your team to do what they do best—talk to customers.

We include everything in our price except for the services the show bills you for directly, like electricity or internet hookups. This straightforward model gets rid of the hidden costs common with traditional builds, so you can actually stick to your budget.

Sample Custom Booth Cost Breakdown (20×20 Space)

To give you a clearer picture, here’s a rough comparison of what you might expect to pay for a 20×20 booth. Notice how the all-inclusive model bundles many of the line items that can quickly add up in a traditional build.

Cost Component Traditional Custom Build Modern LED Booth (All-Inclusive Rental)
Design & Fabrication $25,000 – $60,000+ Included
AV Hardware (Video Walls) $10,000 – $20,000 (Rental) Included (1.9 Pitch)
Shipping & Drayage $5,000 – $15,000 Included
Install & Dismantle Labor $8,000 – $20,000 Included
On-Site Support $3,000 – $6,000 Included
Furniture & Flooring $2,000 – $5,000 Included
Total Estimated Cost $53,000 – $126,000+ $35,000 – $45,000 (Typical Range)

This table shows how quickly the “smaller” costs of a traditional build can eclipse the initial fabrication price. An all-inclusive rental not only simplifies your budget but often provides a much more powerful and modern exhibit for a fraction of the total ownership cost.

Cutting the Hidden Costs That Kill Your ROI

The cost to design and build a booth is just one piece of the puzzle. The real budget-killers are often the operational costs that come with older, heavier exhibits. This is where modern, lightweight LED booths give you a huge financial edge.

Traditional booths are often made with heavy materials like wood and metal. That weight translates directly into sky-high shipping and drayage fees. Drayage, which is just the fee to move your crates from the loading dock to your booth space, is based on weight and can easily run into thousands of dollars. It’s one of the most frustrating and unavoidable costs in the industry.

By using lightweight, tool-less LED panels, we slash the weight and the number of crates needed for your exhibit. That change alone results in massive savings on both shipping and drayage, freeing up your budget for things that actually matter. And because the panels assemble magnetically without tools, setup and teardown are much faster, which cuts down on expensive union labor hours.

Even after the pandemic, exhibitor numbers are back to just 5% below 2019 levels, which proves that nothing beats a face-to-face event. In this crowded space, you have to invest wisely. A separate AV rental can easily cost $500-$1,000 per day, and just shipping a traditional booth can run anywhere from $2,000-$5,000. Our integrated LED systems get rid of those extra line items and headaches, delivering a much faster return.

Get the Most Value From Your Custom Exhibit Booths

These savings make a high-impact, custom-looking booth more affordable than you might think. To see how these numbers add up, check out our detailed guide on how LED exhibit booths can increase ROI at trade shows.

Picking the right partner for your custom trade show booth is one of the most important decisions you’ll make. It’s not just about hiring someone to build a structure. The right partner becomes an extension of your own marketing team, making sure your investment actually pays off. The wrong one? Well, that’s a fast track to budget overruns, logistical headaches, and a booth that just falls flat.

Your first step should be a deep dive into their portfolio. Don’t just get wowed by pretty pictures; look for the strategy behind the design. Can you see how they tell a brand’s story? Are there dedicated spaces for demos or private meetings? A good portfolio shows they can do more than build walls—it shows they can build experiences for all kinds of different brands.

Look for In-House Technical and Design Expertise

A huge difference-maker is finding a partner who has their own in-house teams. When the same company handles design, fabrication, and all the tech, the whole process just works better. You avoid the classic finger-pointing game that happens when you’ve got three different vendors blaming each other for a problem.

This is especially true when you’re talking about advanced tech like LED video walls. A partner who just hires a third-party A/V company might not really understand what the technology can and can’t do.

We believe in owning the technology we provide. That’s why our video walls feature a superior 1.9mm pixel pitch, delivering a significantly higher resolution than the 2.5mm pitch many competitors use. This in-house expertise means we can guarantee a crisp, professional look for your content every time.

When your partner has this kind of integrated know-how, what you see in the 3D rendering is exactly what you get on the show floor. No surprises, just a flawless display that grabs people’s attention.

Demand All-Inclusive and Transparent Pricing

Let’s be honest, one of the biggest headaches in the trade show world is the surprise invoice. You get a bill with hidden fees for shipping, labor, or some “on-site adjustment” you never approved, and suddenly your budget is blown. A partner you can trust will give you a clear, all-in-one price right from the start.

Our pricing is built to be completely transparent. We include everything in our price except for the services the show bills you for directly, like electricity or rigging. Our all-inclusive approach covers:

  • Custom design and 3D renderings
  • All high-resolution LED hardware
  • Complete logistics and transportation
  • Full installation and dismantle labor
  • On-site technical support throughout the show

This way, you can actually budget with confidence. The price we quote is the price you pay, period. It takes the financial guesswork out of the equation so you can focus on your actual event goals.

Partner with a Strategist, Not Just a Builder

At the end of the day, you don’t just want a hardware supplier. You want a partner who acts more like a full-service agency. They should be genuinely invested in your success, asking the tough questions about your goals, who you’re trying to reach, and what a “win” really looks like for your team. That’s what separates a good booth from a great one.

A true partner helps you think through the whole plan—from pre-show marketing to what happens on the floor and how you follow up afterward. They handle all the complicated logistics, freeing up your people to do what they’re there to do: build relationships and close business. When they take care of the heavy lifting, you’re empowered to maximize your ROI and make every single moment of the show count.

Measuring the Success of Your Trade show Investment

A person analyzes business data on a laptop and tablet, displaying leads, CPL, and ROI charts.

The show is over, the last crate is packed, and the lights are out. But your job isn’t done. In fact, the most important part has just started: proving it was all worth it.

A big investment in a custom trade show booth needs to show a return. You have to go way beyond just counting the number of people who walked by. You need to connect the dots between your booth and actual business results.

Think about it. A gorgeous booth that doesn’t bring in good leads is just expensive art. The whole point of using dazzling visuals—like our super-sharp 1.9 pitch video walls—is to turn heads and then turn those people into customers. This means you have to focus on the metrics that really count, starting with the quality of your leads, not just the quantity.

Tracking Leads and Calculating Your True Cost-Per-Lead

Your most critical number is the cost-per-lead (CPL). This tells you exactly what you paid to get each qualified prospect at the show. To get this right, you have to be honest and look at every single dollar you spent.

You might remember our all-inclusive pricing. We make this part a lot easier for you because we include everything in our price except the bills you get directly from the show. This gives you one clear, solid number for your main booth cost.

To figure out your true CPL, here’s what you do:

  1. Add up all your costs. This includes your booth rental, all the show service fees (like electricity and internet), your team’s travel and hotels, and any marketing you did before the show.
  2. Count your qualified leads. Don’t just count every business card you collected. Only tally the leads who were a good fit, showed real interest, and match your ideal customer profile.
  3. Do the math. Divide your total costs by your number of qualified leads. That final number is your true CPL.

This one number is incredibly powerful. You can use it to compare how well different shows perform and to justify your trade show budget year after year.

A low cost-per-lead shows that your custom booth isn’t just a line item expense; it’s an efficient machine for generating revenue. It proves that creating the right environment attracts the right kind of people, making every dollar you spend work that much harder.

Measuring Brand Lift and Pipeline Contribution

Beyond just the leads you gather on the floor, a great custom booth boosts how people see your brand. This “brand lift” is a little harder to pin down with a simple number, but it’s a huge part of your return on investment.

A few things can help you measure it. Keep an eye on your social media during and after the show. Are people mentioning you, tagging your booth, or sharing photos of it? A big jump in positive chatter is a clear signal that you’ve made an impression. You can also send out post-show surveys to attendees to get direct feedback on how your booth stacked up against the competition.

Ultimately, though, it all comes back to sales. By tagging the leads from the event in your CRM, you can watch their journey from that first handshake all the way to a closed deal. This lets you calculate the final, undeniable ROI by comparing the revenue you brought in against what you spent.

This gives you the hard data you need to walk into your boss’s office and prove that a strategic custom trade show booth isn’t just a cost—it’s a powerful tool for growing the business.

Frequently Asked Questions About Custom Booths

Diving into the world of custom trade show booths is a big move, and it’s natural to have questions. Here are some quick, straight-to-the-point answers to help you figure things out.

How Far in Advance Should I Plan My Custom Booth?

To do it right without pulling your hair out, you should start the process 6-9 months before your show.

This gives everyone enough breathing room for real strategy talks, creative design, building the booth, and getting your video wall content perfect. Rushing is a recipe for stress and mistakes.

Is a Custom Booth Worth It for a Smaller Company?

Absolutely. A lot of people think custom booths are just for the big corporate giants, but that’s just not true.

A smart, well-designed custom booth that tells a great story will always do better than a huge, boring rental. It’s not about being the biggest; it’s about making a real connection and being the booth people remember.

What’s Included in the Price?

This is a huge one, because hidden fees are a massive problem in this industry. We keep it simple and transparent.

We include everything in our price except for the services the show bills you for directly, like your electricity or internet hookup. Our quote gives you one number that covers the design, all the hardware, shipping, setup, teardown, and even an on-site technician.

A key difference in our hardware is the tech itself. Lots of competitors use standard 2.5 pitch video walls. All of our booths feature a much better 1.9 pitch, which means our video walls have a significantly higher resolution. The picture is just crisper and more professional.

What’s the Biggest Hidden Cost in Exhibiting?

Drayage. It’s also called material handling, and it’s the fee the venue charges just to move your stuff from the loading dock to your booth space. It’s almost always the biggest budget shock for new exhibitors.

Working with a partner who designs with lightweight, smart systems can literally save you thousands of dollars on drayage and shipping alone.

Can I Reuse My Custom Booth for Multiple Shows?

Yes, and you should be planning on it. Modern custom booths, especially ones built with modular LED systems like ours, are made to be used over and over.

They can easily be reconfigured to fit different booth sizes—turning a 10×20 inline into a 20×30 island is no problem. This flexibility is how you get a real long-term return on your investment across your whole event schedule.


Ready to create a booth that gets noticed for all the right reasons? LED Exhibit Booths provides turnkey video wall displays that transform your space into an immersive brand experience.

Explore our custom booth solutions today!

Your Guide to Flooring for Trade Shows in 2026

When you’re planning your trade show booth, it’s easy to get caught up in the big, flashy elements like video walls and hanging signs. But what about what’s under your feet? Choosing the right flooring for trade shows is way more important than most people think. In fact, it’s probably the first decision you should make.

Why Booth Flooring Is Your Most Important First Decision

Think about your trade show booth like you’re building a house. The flooring is the foundation. It’s not just there to cover up the ugly concrete floor of the convention center. The floor you choose sets the entire mood and function for your space before anything else even gets loaded in.

A great flooring choice does a few things all at once:

  • It screams brand identity. Are you going for a high-end, sleek look? Custom-printed vinyl might be your answer. Want to create a comfortable, quiet space for deep conversations? Plush carpet is the way to go.
  • It directs traffic. You can use different colors or even textures to create clear paths through your booth, pointing people toward your demo stations or a central focal point, like a massive video wall.
  • It handles the dirty work. Good flooring has to be tough enough for thousands of people to walk on it, safe enough to prevent slips, and smart enough to hide all the cables that power your booth. Nobody wants a trip-and-fall lawsuit.

Laying the Groundwork for High-Impact Tech

For a modern booth packed with tech, the floor becomes a critical piece of infrastructure. This is especially true if you’re using something like our seamless LED video walls. Our walls feature a super-tight 1.9mm pixel pitch, which delivers a much sharper, higher-resolution image than the 2.5mm pitch you’ll find with most competitors. To keep that premium look clean and free of ugly, messy cables, you often need a raised floor.

This is where planning ahead really pays off. Our rental price is all-inclusive, covering the necessary raised flooring and all setup components. The only extra costs are what the show bills you for directly. This way, you get a crystal-clear budget for a flawless, high-tech booth from the ground up.

Comparing the Top Trade Show Flooring Options

When you’re planning a trade show booth, the flooring isn’t just something to cover up the ugly convention center concrete. Think of it as the welcome mat for your brand. It’s the first physical thing attendees interact with, and the right choice is a careful balance of how it looks, how you get it there, and how much it costs.

Before you pick a material, you have to nail down your strategy. You’re juggling aesthetics, the real-world logistics of shipping and installation, and of course, the budget. These three things are completely tangled together, and you can’t decide on one without affecting the others.

A concept map illustrating key factors in a flooring strategy, including aesthetics, logistics, budget, and cost.

As you can see, you have to think about the total cost, not just the price tag. That includes shipping, drayage, and labor, all of which are dictated by your flooring choice.

Padded Carpet and Modular Carpet Tiles

Padded rollable carpet is the classic choice for a reason. It looks professional and feels great underfoot. After hours of walking a trade show floor, that extra cushion is a huge relief for attendees and can genuinely make them want to stay in your booth longer. The downside? That comfort comes in big, heavy rolls that are a pain to ship and often require expensive union labor to install.

This is where modular carpet tiles come in. You get a similar level of comfort but with way more flexibility. If someone spills a coffee or a tile gets scuffed up, you just pop it out and replace it. They’re also much easier to pack, ship, and store than a giant roll, making them a fantastic compromise between comfort and pure practicality.

Printed Vinyl and Interlocking Tiles

If you want your floor to be a core part of your marketing message, printed vinyl is your answer. You can print absolutely anything on it—high-res logos, product images, or even surprisingly realistic wood or stone textures. It’s a showstopper for creating an immersive brand experience. Just be aware that rollable vinyl can get punctured by sharp high heels or heavy equipment.

Interlocking tiles, whether they’re vinyl or a hard plastic, are the undisputed champions of easy setup. They literally snap together, usually without any tools. This means a much faster install and teardown, often cutting out the need for pricey show labor entirely. They’re also lightweight, tough as nails, and can be reconfigured for any booth size you might have in the future.

  • Padded Carpet: Your best bet for creating a quiet, upscale, and comfortable space that encourages longer conversations.
  • Modular Carpet Tiles: Perfect for exhibitors who do multiple shows and need a blend of comfort and dead-simple maintenance.
  • Printed Vinyl: The go-to when you want to make a huge visual splash and use every single inch of your booth for branding.
  • Interlocking Tiles: The clear winner for anyone whose top priorities are lightning-fast installation and keeping shipping and labor costs down.

Ultimately, there’s no single “best” flooring. It all comes down to what you’re trying to achieve. You have to weigh your brand’s image against your budget for shipping and labor, and decide on the kind of experience you want to create the moment someone steps into your space.

Integrating Flooring with High-Impact LED Video Walls

A modern raised floor system with an access ramp and a large LED screen, ideal for trade shows.

In today’s trade shows, your booth has to be a full-on experience, especially when you’re using high-tech gear like seamless LED video walls. When you’re going big with tech, the flooring for trade shows you pick is more important than you might think.

A simple roll of carpet or vinyl just won’t cut it. You can’t just throw it down over all the power cords, network cables, and video feeds your video wall needs. This is exactly why a raised floor system is a non-negotiable part of a professional setup.

Raised floors create a hidden space between the floor and the convention hall’s concrete. It’s the perfect spot to run all your wiring neatly and out of sight.

This isn’t just about looking good, either. It’s about safety and not looking like an amateur. Without a raised floor, you end up with a mess of cables taped down with gaffer tape. Not only does it look sloppy, but it’s a massive tripping hazard waiting to happen. A clean, flat surface shows everyone your exhibit is buttoned-up and professional.

Better Visuals and No-Nonsense Pricing

Of course, what’s on the screen is just as important as the floor it’s sitting on. Many providers will give you video walls with a 2.5mm pixel pitch. That’s okay, but it can start to look a little grainy when people get close. We think you can do better.

Our video walls use a 1.9mm pixel pitch, and that small difference is a huge deal. A finer pitch means the pixels are packed tighter, giving you a much higher resolution. Your content looks incredibly sharp and vibrant—like a premium display should.

Pulling off this level of tech requires a smart plan for both the setup and your budget. Hidden fees and logistical nightmares can sink your show before it even starts. That’s why we’ve built a complete solution from the ground up. You can check out our whole approach to see how a turnkey LED video wall rental can change your entire exhibiting experience.

We designed our pricing to be simple and all-inclusive. It covers everything you need for a flawless show, including that all-important raised flooring system. The only bills you’ll see are the ones the show sends you directly for services like electricity. No surprise invoices for flooring, cable management, or other essentials—just one clear, predictable cost for a booth that makes a huge impact.

Decoding the True Cost of Your Flooring

When you’re budgeting for trade show flooring, that initial price tag is just the tip of the iceberg. The true cost is a mix of the material itself and three major hidden expenses that can blow up your budget in a hurry. Understanding these costs is the key to making a smart decision that doesn’t come back to bite you.

The first, and often most shocking, cost is drayage, or material handling. This is what the show organizers charge you just to move your freight from the loading dock to your booth space. Drayage is calculated by weight. That means heavy, traditional carpet rolls can cost a fortune to move, even if the material itself was a bargain.

The Big Three Hidden Costs

Beyond drayage, you have to factor in shipping and labor. Each flooring type comes with its own financial and logistical baggage.

  • Shipping: This is the cost of getting your flooring from your warehouse to the show. Lightweight, modular options like interlocking tiles pack down small and cost way less to ship than bulky, heavy rolls of carpet or vinyl.
  • Drayage (Material Handling): This is the mandatory fee for moving anything inside the convention center. A 100 lb crate can easily cost you hundreds of dollars to move just a few hundred feet, making heavy flooring a real budget-killer.
  • Installation & Dismantle (I&D): This is the labor cost to set up and tear down your floor. Many venues have strict union rules, especially for laying carpet. That means you’ll be forced to pay for expensive, specialized labor.

On the other hand, options like tool-less interlocking tiles are often so simple your own team can handle the install. This completely sidesteps those hefty I&D labor costs. You can booth construction by exploring different approaches to building an exhibition stand.

A “cheaper” roll of padded carpet can easily end up costing double or triple the price of modern interlocking tiles once you add up the heavy shipping, exorbitant drayage, and mandatory I&D labor fees.

A Practical Cost Analysis

Let’s break down two common scenarios for a 20’x20′ booth:

  1. Traditional Rolled Carpet: The upfront cost might look good. However, its massive weight means high shipping fees and even higher drayage charges. You’ll also be required to hire union labor for installation and tear-down, adding hundreds or even thousands to your final bill.
  2. Lightweight Interlocking Tiles: These might have a higher purchase price. But because they are so much lighter and more compact, shipping is cheaper and drayage fees are drastically lower. Most importantly, your team can probably install them, which wipes out the I&D labor cost entirely.

For just a single show, the total cost of owning the “more expensive” interlocking tiles is often far less. This is exactly why you have to look at the total cost, not just the sticker price, when choosing your flooring.

Navigating Safety Codes and ADA Compliance

Beyond how it looks and how much it costs, your flooring for trade shows has to meet some non-negotiable legal and safety rules. Let me be clear: overlooking these isn’t an option. It can get you fined, forced to make expensive on-site changes, or even have a Fire Marshal shut down your booth right then and there.

Think of this as your essential checklist for a safe and successful show. The two big areas you have to nail are accessibility for every attendee and fire safety. Both are strictly enforced at every major convention center, believe me.

A black accessibility ramp with a textured surface and wheelchair symbol leads to a carpeted trade show booth.

Meeting ADA Requirements

The Americans with Disabilities Act (ADA) makes sure that everyone, no matter their physical ability, can get into and around your exhibit. For your flooring, the rules are crystal clear. If your booth floor is raised at all—which is pretty common if you’re using a raised floor system to hide cables—you absolutely must have an accessible ramp.

Here’s the rule of thumb: any change in height over 1/4 inch needs a beveled edge. If that change is more than 1/2 inch, you are required to have a ramp. The ramp has to have a specific slope, usually a 1:12 ratio (that’s one inch of rise for every 12 inches of length), to be compliant.

This isn’t just about wheelchair access, either. It’s also about preventing tripping hazards for every single person who walks by. Plus, all your flooring surfaces, including the ramp itself, have to be firm and slip-resistant to make sure everyone can move around safely in your space.

Passing the Fire Marshal’s Inspection

Every single thing you bring into a convention hall, and that definitely includes your flooring, has to meet strict fire safety codes. The Fire Marshal will walk the floor inspecting booths and won’t hesitate to demand changes on the spot. To make sure you never have a problem, you must have flooring that is certified as fire-retardant.

Here are the key steps for passing inspection with flying colors:

  • Verify Certification: Only buy or rent flooring that comes with a certificate of flame resistance. Any reputable vendor will give you this documentation without you even having to ask.
  • Keep Paperwork Handy: You must have a copy of the flame-retardant certificate on-site during setup and for the entire show. If the Fire Marshal asks to see it, you need to have it ready immediately.
  • Check Venue Rules: Some convention centers have their own unique or even stricter rules. Always, always review the fire safety section in your exhibitor services manual long before the show.

Planning for ADA and fire code compliance right from the start isn’t just about following rules. It’s about creating a safe, professional, and welcoming booth that lets you focus on your customers without any stressful or costly interruptions.

How to Choose the Right Flooring for Your Brand

Picking the right flooring for your trade show booth is about a lot more than just covering up the concrete. You have to match your goals with your budget and, just as importantly, the real-world logistics of the show. Think of it as a strategic choice that sets the stage for every single person who walks into your space.

To get it right, you first need to ask what you’re trying to accomplish on the show floor. What’s your main goal?

If you want a quiet, comfortable spot for serious conversations, a plush, padded carpet is a no-brainer. But if your goal is to scream your brand from every surface, custom-printed vinyl can turn the floor itself into a massive billboard.

Balancing Goals with Practical Realities

Next, you have to be honest about your team and your setup. Do you have a professional crew to handle installation, or are you looking for something your own team can put together? This one question can narrow your choices down in a hurry.

  • For big branding and a sleek, modern look: Go with interlocking vinyl tiles that have your custom graphics printed on them. The visual pop is fantastic, and a small team can usually handle the install.
  • For tech-heavy booths with tons of cables: A raised floor system is your only real option. It’s the professional way to hide all that wiring and keep your booth clean and safe.
  • For maximum comfort and a high-end feel: Nothing beats a high-quality padded carpet. It encourages people to stick around, but you’ll need to budget more for drayage and labor.

The global commercial flooring market is set to hit $195.40 billion by 2030, and a big reason for that growth is the demand for tough, quick-to-install surfaces that can take a beating at big events. This just shows how critical it is to pick flooring that’s built for the chaos of a busy trade show. You can see more on this trend over at Businesswire.

The best flooring choice is the one that supports your specific trade show booth design and your overall strategy. Don’t just pick something because it’s trendy; pick it because it solves a problem for you—whether that’s hiding cables, making guests comfortable, or shouting your message from the ground up.

At the end of the day, the right flooring fits your brand, your total budget (including all the hidden fees), and what your team can realistically handle. When you start with these practical questions, you can choose a foundation that guarantees a much more successful show.

Got a few lingering questions about picking the right flooring for your trade show booth? Let’s clear up some of the most common ones so you can finalize your plan with confidence.

Can I Install My Own Flooring at a Trade Show?

That really depends on the show venue and the kind of flooring you have. A lot of convention centers have strict union labor rules, especially for things like laying big rolls of carpet. If you try to ignore those rules, you can get hit with some nasty surprise fees and be forced to hire on-site labor anyway.

However, some venues will let exhibitors lay their own flooring if it’s a simple, tool-free system. Think interlocking tiles. This is usually only an option for smaller booths, often under 100-200 sq. ft. The golden rule is to always, always check your exhibitor manual for the specific labor rules before you show up.

How Do I Hide Cables and Wires in My Booth?

The best, most professional way to manage your cables is with a raised floor system. It creates a hidden space underneath your walking surface that keeps all your power cords and network cables completely out of sight. This leaves your booth floor perfectly clean, flat, and safe from tripping hazards.

This is an absolute must-have for any booth that’s heavy on technology. For example, our video wall rentals use a superior 1.9mm pixel pitch, giving you a much higher resolution than the common 2.5mm pitch competitors offer. A raised floor is critical to protect all the wiring for that advanced tech while keeping your booth looking sleek and uncluttered.

We include the raised floor system in our all-inclusive rental price. This means you get a flawless, professional setup without surprise fees—the only extra costs are what the show bills you for directly, like your electricity hookup.

Should I Rent or Buy My Trade Show Flooring?

The rent-or-buy decision really just comes down to how often you’re exhibiting.

  • Buy if: You plan on attending two or more shows per year. In the long run, owning your flooring is the more cost-effective way to go. It also guarantees your branding looks perfectly consistent at every single event. Just be sure to factor in the costs of shipping and storage.
  • Rent if: You only exhibit once in a while or you’re thinking about trying a new look without a big upfront investment. Renting is a fantastic way to test-drive premium options like custom printed vinyl or a full raised floor system for a single show.

Ready to build a high-impact exhibit with a flawless foundation? LED Exhibit Booths delivers turnkey video wall solutions that come complete with professional flooring for a stunning, all-inclusive experience. Let’s transform your booth at https://ledexhibitbooths.com.

Your Ultimate Guide to an LED Panel for Video at Trade Shows

Picture this: you’re walking the floor at a massive trade show. Every booth is screaming for your attention. An LED panel for video isn’t just another TV screen; it’s your best weapon in that fight. We’re not talking about old-school static signs. We’re talking about turning your entire booth into a giant, moving canvas that tells your story.

Why an LED Video Wall Is Your Ultimate Trade Show Advantage

At a trade show, blending in is the kiss of death. Let’s be honest, those static banners and printed signs just become part of the background noise. A dynamic LED video wall is different. It turns your booth from a place people walk past into a destination they walk to. You can use motion, color, and stunning clarity to tell a story in a way a piece of vinyl simply can’t.

This isn’t just a cool trend; it’s how brands are winning the attention game now. The market for LED video walls is expected to reach USD 36.16 billion by 2026. That massive number is all about the demand for these kinds of immersive experiences. For you, the exhibitor, it means using Direct View LED (DVLED) tech is quickly becoming the standard for anyone who wants to make a real impact. You can check out the full market analysis to see how this is changing the game for event marketing.

Delivering Unmatched Visual Quality

The secret sauce to an amazing video wall is something called pixel pitch. This is just the distance between each tiny LED light. The smaller the pitch, the closer the lights are, and the sharper your image looks. A lot of our competitors will offer a 2.5mm pitch, which is okay. But our video walls use a much better 1.9mm pixel pitch, which means our video walls have a significantly higher resolution.

This isn’t just some tech spec to brag about; it’s the difference between a pretty good display and a genuinely stunning one. A finer pitch means your videos and graphics look perfect, even if someone walks right up to the screen. It gives off a high-end, professional vibe that says a lot about your brand.

All-Inclusive Pricing for LED Panel for Video Gives Total Peace of Mind

Budgeting for a trade show is a nightmare of hidden fees and surprise charges. We don’t play that game. We believe in being upfront, so our all-inclusive pricing is designed to build trust and get rid of any financial stress for you.

When you get a quote from us for an LED Panel for Video, it covers everything you actually need to have a great show:

  • High-resolution 1.9mm pitch LED panels for that crisp, premium look.
  • The actual booth structure, built to integrate the video wall perfectly.
  • All the software and pre-show testing to make sure your content runs flawlessly.
  • A dedicated on-site tech for the whole show, just in case.

The only things not included are what the show bills you for directly, like electricity and drayage (material handling). No vendor has any control over those costs. This simple, honest approach lets you worry about your customers, not about trying to figure out a complicated invoice.

What’s a Good LED Video Wall? The Specs That Actually Matter

To pick the right LED Panel for Video wall for your trade show booth, you have to know what separates a decent display from a spectacular one. While you’ll hear terms like brightness and refresh rate thrown around, the single most important number for a trade show is the pixel pitch.

Honestly, this one spec pretty much dictates the sharpness and clarity of your entire display.

Think of pixel pitch like the thread count on fancy sheets. A higher thread count means the threads are woven tighter, making the fabric feel smoother and more luxurious. It’s the same with LED panels. A smaller pixel pitch means the little LED lights (the pixels) are packed closer together. The result? A higher-resolution image that looks seamless and professional up close.

Why Pixel Pitch is Everything on the Show Floor

At a trade show, people aren’t watching your screen from across a football field. They’re walking right up to your booth. This is where pixel pitch becomes the make-or-break factor for your success. If you have a large pixel pitch, the image will look blocky or “pixelated” from a few feet away. It instantly makes your expensive video content look cheap, and that reflects right back on your brand.

A lot of companies in the event space offer a 2.5mm pixel pitch. It’s okay if you’re viewing it from a distance, but it really starts to fall apart when you get close. We’ve made a 1.9mm pixel pitch our standard for one big reason: it delivers a much, much higher resolution.

That 24% finer pitch ensures your video wall stays crisp and impressive, even when a hot lead is standing just a few feet from the screen.

This isn’t just a minor tech spec—it’s what protects your premium, high-tech brand image on the show floor. With a 1.9mm pitch, your detailed product videos, sharp text, and dynamic graphics look exactly as you intended. Every single impression is a powerful one.

This is a big deal because a captivating display is what gets people to stop, look, and engage.

Infographic detailing trade show advantages, including audience engagement, driving traffic, and message delivery.

As you can see, a powerful visual presence directly leads to more booth traffic and helps your message stick. You just can’t achieve that with a low-resolution screen.

Pixel Pitch Comparison: What It Means for Your Booth

The relationship between pixel pitch and how far away someone needs to stand to see a clear image is pretty direct. For trade shows, where viewing distances are short, this is critical.

Pixel Pitch What It Means Ideal Minimum Viewing Distance Best Use Case for Trade Shows
P1.9mm Very high resolution, pixels are packed tightly. ~6 feet The gold standard. Perfect for any booth size, ensuring a flawless image even when attendees are right up close. Protects brand image.
P2.5mm Good resolution, but noticeably less dense than 1.9mm. ~8 feet Functional for larger booths (20×20 and up) where people might be further back, but can look pixelated up close in a 10×10.
P3.9mm+ Lower resolution, pixels are visibly spaced apart. ~12+ feet Not recommended for trade show booths. Best for concerts, outdoor events, or situations where the audience is far from the screen.

Simply put, the smaller the pixel pitch number, the closer someone can be to your wall and still see a perfect picture. A 1.9mm pitch gives you the flexibility and quality you need for a crowded show floor.

Other Key Specs to Know

While pixel pitch is the star, a few other terms pop up. Knowing what they mean helps you understand what goes into a great display.

  • Brightness (Nits): This is just how bright the screen can get. For an indoor show, you need it bright enough to pop under the harsh convention center lights, but not so bright it hurts to look at. Our panels are always calibrated for that perfect indoor balance.
  • Refresh Rate: Measured in Hertz (Hz), this is how many times the screen updates the image every second. A high refresh rate, like 3840Hz, is crucial. It stops any flickering and ensures motion looks perfectly smooth, especially when people film your booth with their phones.
  • Viewing Angle: This tells you how far off to the side someone can be and still see a clear image. You need a wide viewing angle to grab the attention of people walking down the aisle, not just the ones standing directly in front of you.

Don’t worry, you don’t need to become an expert in all this. Our all-in-one approach means we’ve already spec’d out the best components for the trade show environment. The main thing to remember is that our standard 1.9mm pitch is a deliberate choice to give your brand a clear visual advantage. To see how this tech works with different booth layouts, you can video wall sizes.

What You’re Actually Paying For

Understanding the tech is one thing, but knowing your costs is another. We believe in being completely transparent. When we give you a quote, it includes everything you need for a successful show.

Your one price covers it all:

  • The high-resolution 1.9mm pitch LED video wall
  • The entire booth structure built around the screen
  • All the media servers and software to run your content
  • An on-site technical expert for the entire event

The only things not included are electricity and material handling (drayage), because those are billed directly by the show organizers. No vendor has control over those costs. This all-inclusive model takes the guesswork and stress out of budgeting, so you can focus on what matters: engaging the huge crowd your amazing display will bring in.

Straightforward Pricing With No Surprises

Let’s be honest, budgeting for a trade show can feel like you’re trying to dodge hidden fees at every turn. For any exhibitor, the biggest nightmare is getting that surprise invoice after the show, loaded with “extras” you were sure were included. It’s a common trick in the industry, and it makes planning your budget accurately almost impossible.

We just don’t believe in doing business that way. When you rent a high-impact LED video wall from us, it shouldn’t come with a side of financial anxiety. Our whole approach is built on one clear, all-inclusive price. We want to be your partner in success, not some vendor nickel-and-diming you for things you obviously need.

What “All-Inclusive” Really Means

When we give you a quote, that’s the real number. It covers everything you need to get your video wall up and running flawlessly. You won’t find any asterisks or fine print hiding extra charges for the essentials.

Our single price covers:

  • High-Resolution LED Panels: You get our top-tier 1.9mm pixel pitch video walls. These have a much higher resolution and look way more professional than the standard 2.5mm pitch panels most competitors use.
  • Integrated Booth Structure: The booth framework itself is designed from the ground up to integrate with the LED panels. This creates a clean, modern, and totally seamless look.
  • Content Management & Testing: We handle the software and make sure to test all your video content before the show. That way, you know it will run perfectly when it counts.
  • Dedicated On-Site Support: A trained technician will be on-site for the entire show. If anything comes up, they’re right there to handle it instantly.

Our goal is simple: total clarity. The price we quote is the price you pay for our complete package. This lets you stop worrying about the bill and start focusing on connecting with attendees.

The only things our price doesn’t cover are the direct service bills from the show organizer, which every single exhibitor has to pay. Our price includes everything except what the show bills you for directly.

How We Help You Avoid Budget Blowouts

These direct show bills really only come down to two things:

  1. Drayage: This is just the industry term for the material handling fee. It’s what the show charges to move your booth from the loading dock to your spot on the floor.
  2. Electricity: This is the cost for the power outlet needed to run your booth, your video wall, and everything else.

While we can’t pay these for you, we absolutely will help you figure out exactly what you need and can even manage the ordering process for you. The final bill for these two items will come directly from the show itself. By keeping these separate, we stay 100% transparent. Our price covers everything we provide, so you’ll never, ever get a surprise bill from us.

Bringing Your Brand Story to Life on Screen

A brilliant LED panel for video is only half the battle. Without equally brilliant content, it’s just an expensive, bright wall. Think of your video wall as a massive digital canvas. What you put on it will either pull people in from the aisles or just add to the visual chaos of the show floor.

Drawing on our experience as a full-service advertising agency, we don’t just hand you the hardware. We help you map out a content strategy that turns your booth from a simple display into an actual destination.

Two people discussing in front of a modern LED panel trade show booth with 'BrandName' logo.

The trick is to think beyond one video playing on a loop all day. A proper content schedule, what we call a “run of show,” keeps your booth looking fresh and dynamic from start to finish. It’s about creating visuals designed for a huge, seamless LED wall, not just stretching out a video you made for your website. This is how you make sure your investment pays off.

Designing Content for a Seamless Canvas

Making content for a giant, multi-panel display is a completely different game than designing for a TV. The sheer scale and the creative shapes you can build open up some incredible possibilities, but you have to be intentional about it.

One of the coolest things you can do is create content for unique booth shapes. Our toolless, magnetic locking system lets us build stunning set-ups like corner-wrapped walls, huge arches, or even standalone islands. For a corner booth, imagine a “wraparound” video that travels smoothly from one wall to the next. It’s a jaw-dropping effect that grabs people’s attention from way down the aisle.

You can also sync up animations to play across different surfaces. Picture a product feature popping up on the main wall while key stats and graphics appear on a matching LED counter in front of it. This kind of coordinated content guides the eye and tells a more detailed story in a really clean, impressive way. You can see more about how we tackle this creative work in our video wall video production.

Balancing Ambient Loops and In-Depth Demos

A smart content plan needs a mix of content for different people. Not everyone walking by is ready for a five-minute deep dive on your product. You need something for the casual passerby and something for the person who is genuinely interested.

Here’s a practical way to break down your content:

  • Ambient Loops (15-30 seconds): These are short, visually striking videos that run most of the time. They should be all about high-contrast visuals, bold branding, and simple messages. Think of this as the “attract mode” for your booth, designed to catch the eye from across the hall with fluid motion and vibrant colors.
  • In-Depth Demos (2-3 minutes): These are the longer videos you can play on demand when someone wants to know more. This could be a detailed product walkthrough, a customer testimonial, or a case study. Having these ready means your sales team can give a rich presentation on the big screen instead of having everyone huddle around a tiny laptop.

This balance makes sure your booth is always visually active, but it also gives your team some powerful tools to use in their sales conversations.

The core principle is simple: use motion to attract and information to convert. Your ambient content grabs their attention, and your on-demand demos give your team the perfect visual aid to deepen the conversation and qualify the lead.

Best Practices for High-Impact Visuals

To really make your content pop, it needs to be designed for LED technology. The extremely high resolution of our 1.9mm pixel pitch panels—a huge step up from the 2.5mm standard you’ll find with most competitors—means your visuals will be incredibly crisp. That higher resolution gives you a lot more creative freedom.

To take full advantage of that clarity, follow these simple rules:

  • Prioritize High Contrast: Trade show floors are notoriously bright. Use bold color palettes with strong contrast to make sure your content is readable and punchy, even under all those convention center lights.
  • Use Compelling Typography: Keep your text big, clean, and to the point. Sans-serif fonts are usually the easiest to read from a distance. You can animate text to draw attention, but don’t clutter the screen with a wall of words.
  • Focus on Motion: Static images are fine, but the real power of an LED video panel is, well, video. Use subtle animations, moving backgrounds, and dynamic transitions to bring your brand to life. It makes all the difference.

Making the Smart Choice Between Renting and Buying

One of the biggest questions we get is whether it’s smarter to rent an LED video wall or buy one outright. There’s no single right answer, but it really comes down to your show schedule, budget, and long-term plans. Making the right call here can save you a ton of money and logistical headaches.

For most exhibitors, the math is pretty simple: renting is the way to go. If your company is at one to three trade shows a year, renting is almost always the more flexible and cost-effective choice. It keeps a huge capital expense off your books, freeing up that budget for other important parts of your marketing.

The Powerful Case for Renting Your Video Wall

Renting is basically a turnkey solution that gets rid of all the hassles that come with owning hardware. You get the latest and greatest technology for every single show, and you never have to worry about your expensive gear becoming obsolete in a year or two.

Here are the key advantages of renting:

  • No Capital Expenditure: You avoid a massive upfront cost. This makes it much easier to budget for a show-stopping display on an event-by-event basis.
  • Always the Newest Tech: The world of LED tech moves fast. Renting means you always have access to top-of-the-line panels, like our high-resolution 1.9mm pitch displays. They deliver a much sharper, higher-resolution image than the 2.5mm panels most competitors still use.
  • Zero Maintenance or Storage: You don’t have to deal with storing bulky road cases, managing repairs, or watching your investment lose value. The panels show up, you have a great show, and then they disappear.

There’s a reason the rental market is booming. The global market for rental LED displays is expected to hit USD 2.244 billion by 2029, driven by brands who need flexible, high-impact visuals without the long-term commitment. For B2B companies, this makes it incredibly affordable to go big for a key product launch. You can discover more insights about this growing market on LEDinside.com.

When you rent, you’re basically outsourcing the entire hardware problem. This lets your team focus 100% on their real job: creating a compelling message and talking to prospects, not managing assets. Our all-inclusive pricing makes it even simpler, covering everything except what the show bills you for directly.

When Purchasing Makes Long-Term Sense

While renting is the perfect fit for many, buying an LED video wall system can start to make sense for brands that are constantly on the road. If your event calendar is packed with more than three or four major shows per year, the ROI can begin to favor ownership.

The main benefit of buying is a lower cost-per-show over the long run. Once you’ve paid for the hardware, your only ongoing costs are shipping, drayage, and labor, which can make each show more profitable. Plus, owning your wall means you have absolute brand consistency. The look and performance of your booth will be identical everywhere you go, which helps reinforce your brand.

To dig deeper into the numbers, check out our comprehensive guide on LED video wall rentals to see what’s right for you.

Renting vs. Buying Your LED Video Wall Which Is Right for You?

To help you decide, it’s useful to see a direct comparison of what you’re signing up for, both financially and logistically.

Consideration Renting Buying
Upfront Cost Low (pay-per-show) High (significant capital investment)
Technology Access to the latest models every show. Locked into purchased tech until you upgrade.
Maintenance & Storage Zero responsibility. We handle it all. Your responsibility (storage fees, repairs).
Cost Per Show Higher on a per-event basis. Lower over the long term (after breaking even).
Flexibility High. Change size and configuration for each show. Low. Limited to the hardware you own.
Best For Exhibitors attending 1-3 shows per year. Brands with 4+ major shows annually.

Ultimately, the choice comes down to your company’s specific event strategy. Renting gives you the most flexibility and the best tech with the least amount of commitment. Buying, on the other hand, offers long-term savings and consistency for brands that live out of a suitcase.

Simplifying Your Trade Show Logistics

The hidden hurdle of every trade show isn’t the sales pitch—it’s the logistics. Shipping, setup, and on-site management can completely drain your team’s energy before the doors even open. We’ve designed our entire system to solve these backend headaches, making sure your crew arrives on the show floor refreshed and ready to engage, not exhausted from wrestling with crates.

It all starts with our lightweight LED panels and a toolless magnetic assembly. Traditional systems often involve clunky, heavy components that require specialized labor and complex trussing just to hold them up. This directly translates into higher costs at every single step.

A technician fine-tunes a vertical array of illuminated LED light tubes in an empty ballroom.

Slashing Your Hidden Costs

Every pound you ship and every hour of labor you book adds up. Our system is engineered to cut those costs, and cut them dramatically.

  • Faster Setup Times: The magnetic locking system allows our panels to just snap together, quickly and securely. This means a faster build, which can slash your on-site labor bill—one of the most unpredictable trade show expenses.
  • Reduced Shipping & Drayage: Lighter panels mean lower shipping weights. This directly cuts your freight costs and, more importantly, reduces the drayage fees the show organizer charges to move your materials from the loading dock to your booth space.

The message is simple: we’ve focused on creating a smarter led panel for video system that is not only visually superior but also logistically efficient. By minimizing weight and complexity, we help you save real money that can be reallocated to other parts of your event marketing budget.

This streamlined approach is becoming a crucial factor for exhibitors. In fact, indoor LED video walls captured over 45% of market revenue in 2022, partly because lightweight, bezel-less panels that snap together effortlessly are in high demand. This design innovation reduces setup complexity and on-floor labor costs, which is a massive win for any marketing team. You can find more industry statistics on these trends and see how efficiency is driving adoption.

Your Full-Service Partner

Beyond just providing better hardware, we act as your logistical partner. We handle all the coordination from our warehouse to the show floor, making sure everything arrives on time and is ready for a quick assembly. This removes a huge layer of stress from your team.

Our all-inclusive rental price also makes your budgeting dead simple. We include the high-resolution 1.9mm pitch panels (a significant upgrade over the common 2.5mm pitch), the integrated booth structure, and our on-site technical support.

The only costs you’ll see are the direct bills from the show organizer for services like electricity and drayage, which no vendor can control. This transparency ensures there are no surprises, just a seamless experience.

Your Top Questions About LED Video Walls Answered

Stepping into the world of large-scale digital displays for the first time usually brings up a few questions. We get it. This final section gives you clear, straightforward answers to the most common things we hear from exhibitors like you.

Our goal is to give you the confidence to make the right call and make sure your next trade show is a massive success.

How Much Power Does An LED Video Wall Booth Need?

Power needs can definitely vary, mostly depending on the size and brightness of your video wall. However, our modern LED panels are built to be very energy efficient.

As part of our service, we calculate the exact power requirements for your specific setup. We then coordinate the entire electrical order with the show organizer on your behalf.

You just approve the final order. We handle all the nitty-gritty technical details to make sure you have the right amount of power in the right spot, completely taking the guesswork out of it for you.

What Happens If A Panel Fails During The Show?

We build our systems for rock-solid reliability, but we also back them with on-site support to handle any issue that could possibly come up. Our booths are designed with redundancy in mind, and any single led panel for video can be swapped out in just a few minutes, even if it’s right in the middle of a huge wall.

Our all-inclusive pricing model means a trained technician is always on-site throughout your event. This ensures your display runs flawlessly from the moment the show opens until it closes, giving you and your team complete peace of mind.

Why Is Your Resolution Better Than Others?

The clarity of your video wall all comes down to one thing: pixel pitch. Many competitors use a standard 2.5mm pitch, which is fine from a distance but can look pixelated and blurry up close.

We provide a much finer 1.9mm pixel pitch as our standard. In simple terms, this means our walls have a significantly higher resolution. Your content will look sharp, crisp, and totally professional, even when attendees are standing right inside your booth.

How Far In Advance Do I Need To Book?

Ideally, we recommend booking your video wall booth at least three to four months before your show date. This gives us plenty of time to collaborate on the perfect booth design, map out a compelling content strategy, and manage all the logistics without any last-minute stress.

Of course, if you have a highly customized design or need complex video production, more time is always better. That said, we can often work with tighter deadlines, so it’s always worth contacting us to see what we can do for your specific event.


Ready to stand out with a display that captivates and converts? The team at LED Exhibit Booths is here to make it happen with our high-resolution, all-inclusive video wall solutions. Explore our rental options and get a quote today!

A Practical Guide to Exhibition Stand Building

Building a standout exhibition stand is about way more than just slapping some walls together. It’s the final, physical piece of a puzzle you’ve been putting together for months—a strategy designed to grab attention and, more importantly, deliver real results for your business.

Laying the Groundwork for a Winning Booth

A laptop displaying a 3D exhibition stand design next to an exhibition brief and pen.

Before you even think about materials or construction, the real work happens on paper. A solid exhibition brief is your roadmap. Without it, you’re just guessing, and that’s a recipe for a booth that falls flat.

Your whole strategy has to start with clear, measurable goals. Forget vague ideas like “getting more exposure.” What does a win actually look like for you at this show?

You need to get specific with your targets. For instance:

  • Generate 150 qualified leads from companies with over 500 employees.
  • Book 20 pre-orders for the new product you’re launching.
  • Schedule 30 follow-up demos with VPs of Marketing.
  • Boost brand recall by 25% within your target demographic.

When you have concrete goals like these, every decision about your booth—from the layout to the graphics—suddenly has a purpose.

Defining Your Audience and Budget

Once you know what you want to accomplish, you need to be crystal clear on who you’re trying to attract. Are you talking to C-suite executives, hardcore engineers, or potential resellers? Each group is completely different. An engineer will want to see a technical demo, but a CEO just wants to hear about the ROI. Your booth has to speak their language.

With your goals and audience locked in, you can finally build a realistic budget. This is a classic trip-up point for exhibitors. It’s easy to focus only on the price tag for the physical stand, but that’s just one piece of the puzzle. You have to budget for the total cost of exhibiting.

A key principle of smart budgeting is transparency. Our approach ensures your quoted price is all-inclusive for the stand itself. We include everything in our price except for the services the show bills you for directly, such as electrical hook-ups or rigging fees.

This means you won’t get hit with surprise fees for graphics, basic assembly, or other stand components from your build partner. That clarity lets you budget more effectively for those other show services that always pop up. Getting your finances straight from the beginning is the best way to avoid headaches and make sure your investment pays off.

Integrating Technology from Day One

In today’s trade show world, technology isn’t just a nice-to-have; it’s a fundamental part of the structure and strategy. Thinking about tech like an immersive LED video wall has to happen right from the start, in your initial brief. You can’t just decide later to hang a heavy video wall on a backwall that wasn’t built to hold it.

When you design with technology in mind from the get-go, you end up with a booth that works better and looks incredible. This is especially true for LED video walls, which can literally turn your entire booth into a moving, digital experience. The technical specs here are critical.

Many of our competitors use panels with a 2.5mm pixel pitch, but for a truly sharp, high-end look, you need a finer pitch. Our video walls use a 1.9mm pixel pitch, delivering a much higher resolution. This means your videos and animations will look crisp and clear, even when people are standing right up close. It makes for a far more professional and engaging experience that people will remember. You can discover more insights about trade show booth design to help sharpen your plan.

Choosing Your Build: Custom vs. Modular Designs

Two miniature exhibition stand models, one custom wooden and one modular metal truss, on a table.

Once you’ve got your strategy and budget locked in, it’s time for the fun part: deciding what your booth will actually look like. This is where you translate your goals into a physical structure that people can see, touch, and walk into. The path you take for your exhibition stand building will set the tone for your budget, your logistics, and your experience on the show floor.

Traditionally, you had two main choices: a completely custom build or a reusable modular system. But now, a third option that uses technology as the structure itself is changing the game. Each has its place, so let’s dig into which one makes the most sense for you.

The Allure of the Custom Build

A custom-built stand is like a bespoke suit—designed from the ground up just for you. It offers a totally unique footprint on the show floor. If your main goal is to make a huge splash and create a one-of-a-kind architectural statement, a custom build is tough to beat.

With this route, you have complete creative control. You can use any material you want, from reclaimed wood to polished metal, and design shapes that no one has ever seen before. For a massive product launch or a flagship event where you absolutely need to dominate the hall, the sheer impact is undeniable.

Of course, that uniqueness comes at a price. Custom builds are almost always the most expensive option. They also tend to be single-use; reusing them for another show often means a costly teardown, refurbishment, and expensive shipping. Their weight and bulk can also rack up some serious drayage fees.

The Flexibility of Modular Systems

Modular stands are the workhorses of the trade show world. Think of them like a high-end LEGO set. They’re built from pre-engineered parts that can be assembled in all sorts of configurations, giving you a great balance of custom looks and long-term value. If you exhibit more than once a year, a modular system is a smart investment.

The main advantages of modular exhibition stand building are clear:

  • Adaptability: The same kit you use for a 10×20 space can be reconfigured to fit a 10×10 or even a 20×20 booth at your next show.
  • Cost-Effectiveness: You pay more upfront, but reusing the core components across multiple events dramatically lowers your cost per show.
  • Lighter Weight: Most systems are made from aluminum, which means lower bills for shipping and material handling. Check out these lightweight booths.

And don’t think “modular” means “boring.” Modern systems, when paired with high-quality tension fabric graphics, smart lighting, and good design, can look incredibly sharp and professional.

Designing with Technology as the Structure

There’s a third way that’s quickly becoming the go-to for exhibitors who want maximum impact: the integrated LED booth. Here, instead of building walls and then hanging screens on them, the video panels are the walls. The entire structure—from walls and columns to overhead arches—is made of seamless LED tiles, turning your booth into a living, breathing digital canvas.

This approach creates an experience that static graphics just can’t touch. You can change your entire message in a second, run stunning animations that stop people in their tracks, or create an immersive environment that pulls attendees right into your world.

The technical details are what separate a good digital display from a great one. While competitors mostly have a pitch of 2.5mm, our video walls feature a much finer 1.9mm pixel pitch, delivering significantly higher resolution. This means your content remains sharp, clear, and professional, even to visitors standing directly in front of the display.

This high-resolution difference is everything. It ensures your brand looks premium and that you’re showing your products and videos with the quality they deserve.

We also believe in straightforward pricing. We include everything for the stand itself in our price. The only other bills you’ll get are directly from the show organizer for things like electricity and internet. This takes the guesswork out of budgeting and lets you focus on what really matters: making connections and closing deals.

Exhibition Stand Build Options Compared

Choosing between these options can feel overwhelming. This table breaks down the key differences between Custom, Modular, and Integrated LED Booths to help you choose the right fit for your goals and budget.

Feature Custom Build Modular System Integrated LED Booth
Primary Goal Maximum architectural impact; a one-of-a-kind statement. Reusability and flexibility across multiple shows. Ultimate visual impact and dynamic digital branding.
Cost Highest initial cost, often single-use. Higher upfront cost, but lower cost-per-show over time. Varies; can be cost-effective, especially for rentals.
Reusability Low. Difficult and expensive to reconfigure or reuse. High. Designed for reconfiguration and repeated use. High. Panels can be reconfigured into countless shapes and sizes.
Visual Impact High, based on unique design and materials. Medium to High, dependent on graphics and design quality. Highest. Full-motion video walls are impossible to ignore.
Setup Complexity High. Requires skilled labor and significant on-site time. Medium. Can often be set up with a smaller team. Medium. Requires specialized AV techs, but can be fast.
Shipping & Drayage High, due to heavy materials and custom crates. Low to Medium, due to lightweight components. Medium. Panels are compact but require careful handling.
Best For Flagship events, major product launches, brands wanting a “wow” factor. Companies exhibiting multiple times a year on varying footprints. Brands wanting to stop traffic, showcase dynamic content, and look modern.

Ultimately, the best choice depends on your specific needs. A custom build offers unparalleled uniqueness, a modular system provides unmatched practicality, and an integrated LED booth delivers a level of dynamic engagement that’s in a class of its own.

Once you’ve settled on a design direction, it’s time to get down to the brass tacks of your exhibition stand building project. This is where the rubber meets the road—turning your big ideas into a physical booth that has to be built, shipped, and set up on the show floor. Picking the right materials and, just as importantly, the right fabrication partner can make or break your entire experience.

You’ve got a lot of options when it comes to materials. Traditional choices like wood and metal can give you a classic, solid look, which is great for custom builds that need to feel substantial. But that sturdiness comes with a price—and I don’t just mean the material cost. Heavier materials mean much higher bills for shipping and drayage.

On the other hand, you have modern options like lightweight composites and tension fabrics. These are far more portable and can create those sleek, seamless visuals that look so impressive. It’s all a balancing act between the look you want, how durable it needs to be, and what your budget can handle. A heavy steel frame might seem tough, but a well-engineered aluminum or composite structure can be just as strong while saving you a bundle on logistics.

Choosing the Right Fabrication Partner

A good fabrication partner is more than just a builder; they’re part of your team. You need someone who gets your goals, respects your budget, and has the know-how to pull off your design safely and on schedule. When you’re talking to potential partners, look for a solid track record, clear communication, and a deep understanding of the show’s rules and regulations.

One of the biggest headaches in this business is hidden fees. You get a quote that looks great, only to get slammed later with extra charges for things like graphics production, crating, or pre-show assembly. It’s a common and frustrating problem.

A key thing to look for is all-inclusive pricing for the stand itself. Our philosophy is simple: we include everything in our price. This means the only extra costs you’ll see are for services billed directly by the show, like electrical, internet, or rigging.

This kind of transparency takes the guesswork out of budgeting and lets you plan with confidence. It changes the dynamic from a simple vendor transaction into a real partnership where everyone is working toward a successful show.

The Power of Smart, Toolless Systems

Beyond the materials, think about how the booth is actually put together. The complexity of the assembly has a direct impact on your labor costs and setup time. Old-school custom builds often need a skilled crew, a whole toolbox of specialized gear, and long, expensive hours on the show floor.

Modern systems are designed to make this whole process a lot simpler. For instance, our integrated LED booths are built using an advanced, toolless system. The individual LED panels are engineered to click together with powerful magnets and a simple locking mechanism. You don’t need a single screwdriver or wrench, which makes assembly and dismantle incredibly fast.

The benefits here are huge:

  • Faster Setup: A job that used to take a full day can now be done in just a few hours. That’s a massive saving on labor costs.
  • Reduced Risk of Error: The magnetic connections are foolproof. They ensure a perfect fit every time, so you don’t have to worry about ugly gaps or misaligned panels.
  • Lower Shipping Costs: Because the panels are lightweight and modular, they pack down into smaller, more efficient crates. This cuts your costs on both shipping and drayage.

This kind of smart design is a lifesaver in the fast-paced trade show world. It ensures your move-in is quick, smooth, and stress-free.

Captivating Audiences with High-Resolution Visuals

As you plan the build, never forget the main goal: grabbing people’s attention. With projections showing the global exhibition industry will draw 318 million visitors across 32,000 exhibitions in 2026, blending in is not an option. You can find more info on why this means you need an impactful design in recent market research on global exhibition trends. Imagine turning your whole booth into a jaw-dropping video wall that pulls attendees in from across the aisle.

This is where the tech specs of your partner’s equipment really matter. For LED video walls, a key number to know is pixel pitch—the distance between the center of one pixel and the next. A smaller number means the pixels are packed tighter, which gives you a higher-resolution image.

Many competitors use a standard 2.5mm pixel pitch. Our video walls, however, feature a much finer 1.9mm pitch. That small difference has a huge impact on quality. Your visuals will be noticeably sharper, clearer, and more vibrant, especially when people are standing right in your booth. For a truly professional look, that superior resolution is a must-have. It makes sure your content, whether it’s a product demo or a brand video, looks absolutely incredible. For a deeper dive into graphic options, check out our comparison of SEG graphics vs hard panel graphics.

Your Logistics Playbook for a Smooth Show

A killer booth design is a great start, but it’s completely worthless if it doesn’t get to the show floor safely, on time, and without blowing your budget. This is where logistics—think shipping, material handling, and on-site setup—become the make-or-break part of your whole plan.

Getting the logistics right is what separates the seasoned pros from the rookies. It all begins way before your crates ever leave the warehouse, starting with smart packing and detailed paperwork. Every single item needs to be inventoried and packed securely in sturdy, clearly-labeled crates built to handle the chaos of transit.

This careful prep work is your best defense against damage and confusion on the show floor. When your crates land at the marshaling yard, good labeling is what ensures they get to your specific booth space without a hitch, paving the way for a smooth move-in.

Mastering Shipping and Drayage

Shipping gets your booth to the right city, but drayage is what gets it from the convention center loading dock to your actual spot on the floor. Drayage, also called material handling, is a mandatory service run by the show’s official contractor, and the fees can be a huge shock if you’re not prepared.

These charges are usually based on weight, measured in 100-pound units (CWT), and can swing wildly depending on what you’re shipping and when it shows up. A standard pallet that arrives on time will cost way less than a late crate that needs special handling.

This is exactly where modern exhibition stands offer a massive financial leg up. Old-school, custom-built booths made of heavy wood and steel are a logistical nightmare. They’re not just expensive to ship; they also run up astronomical drayage fees.

The real magic of our lightweight, tool-less LED panel systems is how much they slash your packed volume and weight. By keeping those two numbers down, you can save a ton of money—often thousands of dollars—on shipping and drayage fees alone.

This process flow shows how your early decisions on materials and partners directly set you up for logistical success or failure.

A three-step stand fabrication process flow diagram showing materials, partner, and budget.

As you can see, choosing the right materials from the get-go has a huge impact on your budget, with logistics being one of the biggest costs. A lighter, more efficient stand simply means a more manageable budget.

Coordinating On-Site Setup

Once your materials are delivered, the clock starts ticking. To avoid stress and expensive labor overruns, you absolutely need a detailed pre-show checklist and a clear plan for your on-site crew. Whether it’s your own team or hired labor, they need to know exactly what to do and in what order.

Your setup checklist should cover a few key things:

  • Confirm Utilities: Before you do anything, double-check that your electrical drops, internet lines, and any rigging points for hanging signs are exactly where you ordered them.
  • Inspect Crates: Look over every crate for visible shipping damage before you open them. If you see any, document it immediately.
  • Follow the Plan: Lay out all your components according to the setup diagram. A tool-less system like ours, which uses magnets, makes this part incredibly fast and simple.
  • Test Your Tech: As soon as the main structure is up, the first thing you should do is test all your technology. Power up your video walls, check that your content is playing correctly, and make sure every connection is solid.

The trade show industry is bouncing back in a big way, and attendees are craving high-quality, engaging experiences. Post-pandemic, 59% of North American firms have reported a spike in activity. With a projected 32,000 global events by 2026, the pressure to have a standout booth is intense. In the UK, the trend is toward smaller, more nimble setups, which is a perfect match for efficient designs like 10-foot LED rentals that cut down on costs. You can dig into more data in the latest UFI global statistics report.

The visual quality of your booth is a huge part of that experience. While a lot of our competitors offer video walls with a 2.5mm pixel pitch, ours feature a much sharper 1.9mm pitch. This gives you a significantly higher resolution, making your content look crisp and professional even from up close—a critical detail for creating that premium feel.

On top of that, our transparent pricing makes your financial planning a breeze. We include everything for the stand itself in our price. You are only responsible for the bills the show sends you directly for things like drayage and electricity. This clarity eliminates budget surprises and lets you focus on having a flawless show.

Beyond the Show Teardown and Measuring ROI

So, the show’s over and the doors have closed. You might think the job is done, but now the other important work begins. This final part—the teardown and number-crunching—is where you protect your booth investment and actually prove the whole thing was worthwhile.

First up is the teardown. Getting this done quickly and in an organized way is the top priority. Of course, you want to get out of the expo hall, but the real goal here is to protect your expensive assets so they’re ready for the next event. If you had a plan for setup, you absolutely need one for disassembly.

The best way to do this is to simply work backward. Think of it as rewinding the setup process. Disconnect all your tech first, then start taking apart the main structure. You have to account for every single piece, from the LED panels and graphics to the furniture, as you pack it into its proper crate.

Efficient Dismantling and Inventory Management

This part is critical: you must do an inventory check. As each component gets packed away, check it off your master list. If you spot any damage, stop and take pictures right then and there. This documentation is your lifeline for any insurance claims and helps you flag what needs to be repaired or replaced before the next show.

This is where modern, lightweight systems really show their value. For instance, our toolless LED panel systems connect with magnets, which makes the teardown process incredibly fast. A job that could eat up a full day with an old-school custom build can often be done in just a few hours. That saves a ton on labor costs.

The benefits are pretty clear:

  • Reduced Labor Costs: A faster teardown means your on-site crew is on the clock for fewer hours.
  • Asset Protection: When you have a system, you dramatically reduce the risk of something getting broken during packing.
  • Future-Proofing: A perfect inventory means no surprises. You’ll know exactly what you have in storage when it’s time to plan the next event.

Once all the physical parts are packed up and on their way, your attention needs to turn to the most important question: what was the actual return on your investment?

Moving Beyond Simple Lead Counts

Just counting how many badges you scanned is the easy way out, but it doesn’t tell you much. Real ROI measurement goes way deeper. It’s all about connecting the original goals you set in your brief to what actually happened for the business. You need to look at the quality of your leads, not just the sheer number.

A great place to start is by sorting the leads your team collected. A simple A-B-C ranking system works wonders:

  • A-Leads: These are the hot ones. They’re ready for a sales call right now.
  • B-Leads: These are warm leads. They showed genuine interest but will need a bit more nurturing from marketing.
  • C-Leads: The cool leads. They stopped by for a look but probably aren’t a great fit for you right now.

Sorting your leads this way lets the sales team immediately focus their energy on the A-Leads, where they can make the biggest and fastest impact.

The ultimate goal is to connect your exhibition spend to actual revenue. The most effective way to do this is by tracking your categorized leads through your CRM and attributing post-show sales directly back to the event.

This process can take a few months, but it’s the only real way to calculate a true cost-per-acquisition and prove the financial value of the show. Plus, that data is pure gold when you’re making the case for next year’s budget. For a deeper dive, you can check out our guide on how LED exhibit booths can increase ROI at trade shows.

Finally, you can’t forget to talk to your team—the people who were actually in the booth. They have priceless insights into what worked and what fell flat. Make sure to hold a post-show debrief to get their take on everything from attendee reactions and traffic flow to how effective the booth’s design and content were. This “on the ground” feedback is just as important as the numbers when it comes to making your next exhibition stand building project an even bigger success.

Answering Your Top Exhibition Stand Building Questions

No matter how well you plan, questions are bound to pop up when you’re building an exhibition stand. It happens to everyone, from first-timers to seasoned pros. Getting straight answers can save you a ton of time, money, and headaches down the road. Here are some of the most common questions we get, with answers from our years of experience on the show floor.

What Is the Biggest Hidden Cost in Exhibition Stand Building?

Beyond the booth structure itself, the biggest and most frequently overlooked costs are for show services. These are the mandatory fees the event organizer bills you for directly. Think drayage (moving your materials from the dock to your booth space), electrical hookups, internet, and rigging for hanging signs. These can easily run into thousands of dollars if you aren’t ready for them.

This is why we provide a clear, all-inclusive price for the stand itself. We include everything in our price, so you know exactly what you’re paying us for, with zero surprise fees. The only other costs you have to budget for are those direct show bills, which makes managing your total investment much, much easier.

How Can I Make My 10×10 or 10×20 Booth Stand Out?

With a smaller footprint, the secret is to use your vertical space to create an experience that feels bigger than it is. Instead of trying to cram furniture and displays into a tight spot, you make the walls the star of the show.

This is where an integrated LED video wall booth can completely change the game. It turns a standard 10-foot space into a seamless, dynamic digital canvas. The technical specs here are incredibly important.

Many competitors use video walls with a 2.5mm pixel pitch. We exclusively use a much finer 1.9mm pitch. This delivers a dramatically higher resolution, meaning our video walls have higher resolution so your content looks incredibly sharp and clear, even when people are standing right up close.

Suddenly, your small booth isn’t just a static backdrop—it’s a powerful storytelling tool that pulls people in without needing a huge, complicated structure.

Should I Rent or Buy My Exhibition Stand?

This really comes down to how often you exhibit and whether your design needs to change.

  • Renting: If you only go to one or two shows a year, or if you want to test a new design concept, renting is the most cost-effective way to go. Our turnkey rentals are designed for maximum impact without the long-term commitment and include everything from design support to our team being on-site.
  • Buying: If you attend several shows every year with a consistent brand message, buying a system can give you a much better long-term ROI. Our lightweight, modular LED systems are built to last and designed for repeated, toolless assembly, which makes them a smart investment.

How Much Lead Time Do I Need for a Custom Stand?

For a custom build, especially one with a lot of technology, a 4-6 month lead time is what you should aim for. This gives everyone enough breathing room to do things right.

  1. Strategy & Design: 1-2 months
  2. Fabrication & Content Creation: 2-3 months
  3. Shipping & Logistics: 1 month

Of course, a simpler modular stand can be done faster. But rushing almost always leads to compromises, mistakes, and a lot of extra stress. Starting early is the best way to make sure every detail is perfect, from getting the right show permits to producing amazing video content for your LED walls.


Ready to transform your trade show presence with a booth that actually captivates and converts? The team at LED Exhibit Booths is here to help you build a stunning, seamless video wall experience.

Explore our turnkey rental and purchase solutions at ledexhibitbooths.com