Light box displays are usually on your shortlist when you’re planning a booth and realize your space has to do three jobs at once. It has to stop traffic, explain your offer fast, and make your brand look established. That’s when the options start piling up. Backlit fabric walls. SEG frames. Monitor stacks. Rental counters. Video walls. Every vendor says theirs is the smart choice.
We see the same decision point again and again. A team wants something brighter than a printed pop-up, cleaner than a banner stand, and more polished than a patchwork of screens. That makes light box displays a logical place to start. They look sharp, they’re proven, and they solve a real visibility problem on crowded show floors.
But stopping at “lighted graphic = good” is where many exhibitors make an expensive mistake. The right question isn’t whether light box displays work. They do. The real question is whether a static illuminated display is enough for your message, your booth size, and your event strategy.
Choosing Your Booth’s Visual Centerpiece with Light Box Displays
Most exhibitors don’t struggle with whether they need a focal point. They struggle with picking the right one.
A marketing manager might start with a clean idea: one illuminated back wall, one counter, one product demo station. Then reality kicks in. The booth sits between bigger brands. The aisle is noisy. Competitors are running motion content. Suddenly a static display feels safe, but maybe too safe.
That tension is why light box displays remain popular. They have history on their side. Light box displays originated in the mid-20th century, and Testrite began producing them for the photographic industry in 1952, a manufacturing milestone that helped define the format. Those early units used heavy metal frames and fluorescent bulbs, and shipping and installation costs could exceed 30% of total exhibit budgets, according to Testrite’s history of light box manufacturing.
That background matters because it explains both the appeal and the limitation. Light box displays became a staple because they grabbed attention with simple, bold illumination. They also carried baggage. Weight, logistics, and static messaging were always part of the trade-off.
What most exhibitors are really deciding regarding light box displays
You’re usually choosing between three paths:
- A static illuminated message: Best when your brand story is simple and your offer is easy to understand at a glance.
- A modular backlit booth system: Better when you want flexibility and cleaner presentation across multiple events.
- A dynamic digital surface: Best when your content needs motion, sequencing, demos, or frequent updates.
If you’re still evaluating classic backlit options, it helps to review examples of backlit trade show displays and compare them against what your booth needs to do.
Practical rule: If your main message fits in one hero image and one headline, a light box can work well. If your booth needs to tell a story, motion usually wins.
The centerpiece of your booth shouldn’t just look premium. It should match how people buy from you.
Understanding Light Box Displays
A light box display is basically a high-end illuminated frame built for branded graphics. In trade shows, the modern version usually combines an aluminum frame, a printed fabric graphic, and an internal LED lighting system. When it’s done right, the result looks clean, bright, and far more polished than a standard printed wall.
The easiest way to think about it is this: a light box is a static message with internal illumination. It isn’t a digital screen. It doesn’t play video. It makes one printed visual look better.
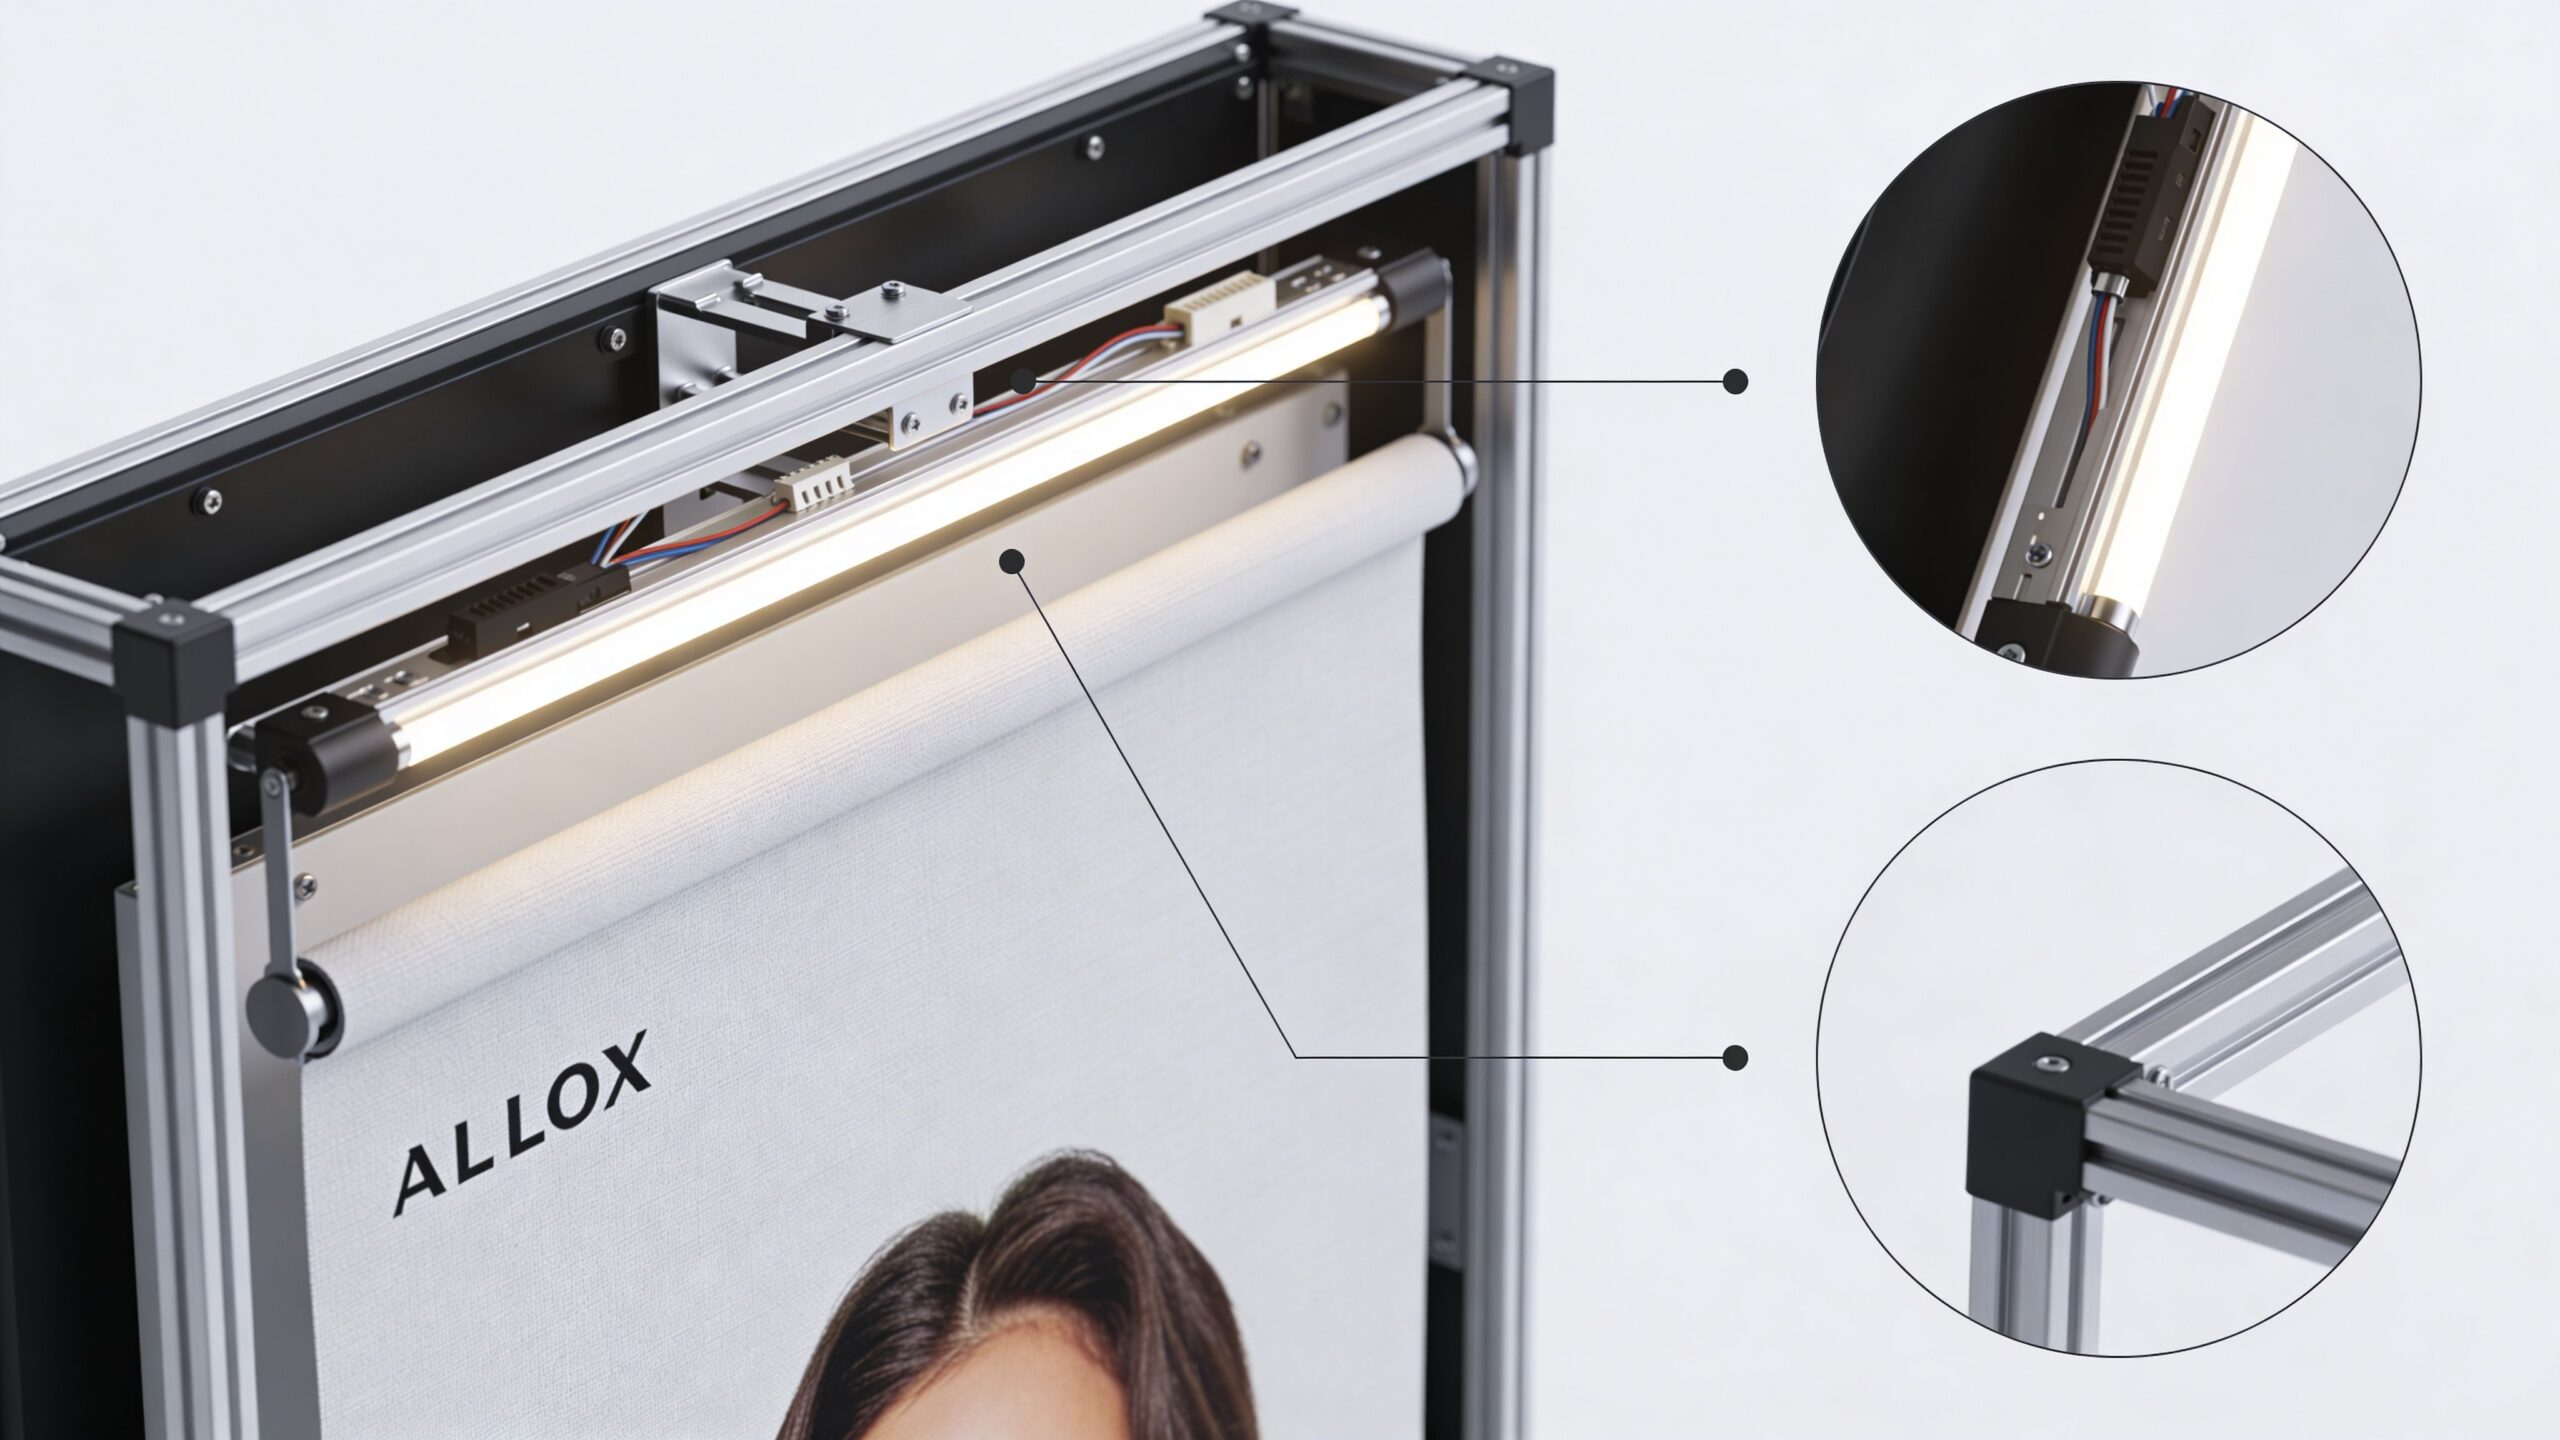
The three parts that matter
The frame is the structure. Most modern systems use modular aluminum extrusions because they’re lighter and easier to handle than older welded sign bodies. The graphic is usually a fabric print, often finished with a silicone edge bead so it tucks into the frame tightly. The lighting sits behind or along the edge of the graphic.
That fabric system matters more than many exhibitors realize. The silicone edge approach creates a taut, edge-to-edge look without the wrinkles and visible hardware that make cheaper displays look temporary. If you’re comparing products, that’s one of the first details to inspect.
Edge-lit vs backlit
This is the decision that affects visual quality the most.
Backlit systems place LEDs behind the graphic. According to LED lightbox technical specifications, backlit configurations use 30-60 LEDs per square meter with optic lenses and can achieve brightness up to 1360 cd/m². That layout is designed for more even illumination across the graphic surface.
Edge-lit systems place LEDs along the perimeter and push light inward through diffusion material. They give you a slimmer profile, but they can struggle with consistency in larger formats. That’s why some displays look great in a showroom sample and less convincing on a full event wall.
Backlit is the safer choice when visual consistency matters more than the thinnest possible frame.
Here’s the practical breakdown:
| Display type | Best use | Main advantage | Main drawback |
|---|---|---|---|
| Edge-lit | Smaller formats, tighter footprints | Slimmer profile | Can lose brightness toward the center |
| Backlit | Larger branded walls, premium booth visuals | More uniform illumination | Slightly deeper construction |
If you’re reviewing illuminated formats that add more visual interest than a basic static wall, animation light boxes are worth looking at because they sit between traditional static displays and fully dynamic digital surfaces.
Why exhibitors like SEG systems for light box displays
Modern light box displays are built for repeat use. A new campaign doesn’t require a new frame. You swap the fabric. That’s one of the strongest reasons these systems remain viable for trade shows.
Use them when you need:
- Fast graphic changes: Seasonal promotion, new product image, updated messaging.
- A polished finish: No obvious clamps, exposed hardware, or cheap-looking seams.
- Reasonable portability: Easier handling than legacy illuminated sign structures.
Use caution when you need motion, layered storytelling, live demos, or multiple messages in the same visual footprint. That’s where the category starts to run out of room.
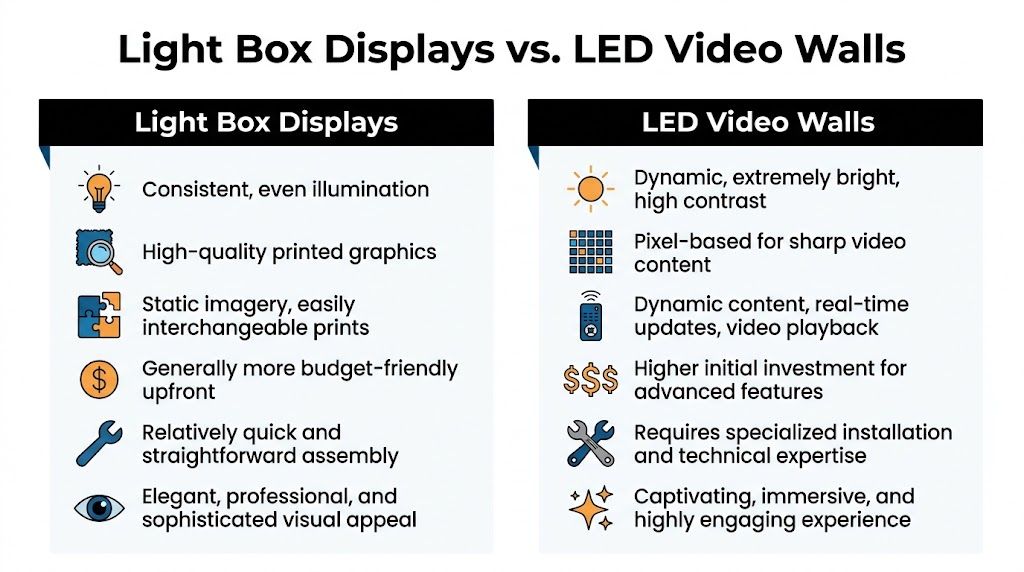
Comparing Light Box Displays and LED Video Walls
Here, exhibitors need to stop thinking in product categories and start thinking in outcomes.
A light box display gives you one illuminated printed message. An LED video wall gives you a digital canvas. Those are not small differences. They’re different communication tools.
Static impact vs dynamic impact
A strong light box can absolutely anchor a booth. For logo visibility, brand color, and a clean hero image, it does the job. If your company sells one product with one clear promise, a static illuminated wall can be enough.
But “enough” isn’t the same as “best.”
Video walls let you rotate messages, run product footage, show animations, sequence benefits, display testimonials, and adapt content throughout the day. That matters when attendees don’t all care about the same thing. One prospect wants a technical view. Another wants proof of use. Another only notices movement and walks over because the booth feels active.
Resolution matters more than most vendors admit
Not all video walls look the same up close. That’s one of the biggest traps in the category.
Many providers use a 2.5mm pitch. Our view is simple: that’s not where you want to stop if attendees will stand close to the wall. A 1.9mm pitch gives a sharper, higher-resolution image. If your booth relies on detailed visuals, premium branding, product renders, or text that people may read from short distance, finer pitch matters.
This is the same basic logic buyers use when they compare large-format viewing technologies at home. If someone is weighing screen sharpness, immersion, and room conditions, resources on best home cinema display options help illustrate why image quality specs shouldn’t be treated as afterthoughts.
Scalability changes the decision
A lot of exhibitors assume they can just scale a light box up. That’s not always true.
According to DSA Signage’s discussion of edge-lit versus backlit light boxes, edge-lit displays can grow dimmer in the center on displays over 10 feet wide. That’s a real issue on trade show floors because the larger the wall, the more obvious uneven illumination becomes.
If you’re trying to create an immersive branded environment, that limitation matters. Large trade show visuals don’t just need to be big. They need to stay visually consistent.
When a booth wall gets large enough to become architecture instead of signage, uneven illumination stops being a minor flaw and starts hurting the whole presentation.
Side-by-side decision criteria
Here’s the blunt comparison most exhibitors need:
- Choose light box displays if your message is stable, your content is primarily graphic, and you want a premium static look.
- Choose a video wall if your message changes, your booth needs motion, or you want the structure itself to become the attraction.
- Avoid cheap digital alternatives if they rely on stacked monitors, visible bezels, cable clutter, or awkward support structures.
The seamless factor with light box displays
This part gets overlooked until show day.
A lot of “digital booth” solutions are really screens bolted into a booth design. You end up with gaps, framing lines, extra hardware, and content chopped across panels. That undercuts the experience.
An integrated LED wall behaves differently. It turns walls, towers, arches, and counters into one connected visual surface. That changes how a booth feels. It looks intentional, not assembled from separate pieces.
If you want to see how that format works in exhibit design, a trade show display wall built as a continuous digital surface is the right reference point.
Our recommendation
If your brand only needs a polished backdrop, use light box displays and keep the design disciplined.
If your booth has to educate, persuade, demo, and hold attention, skip the static compromise. Go digital, and go with the finest pitch you can justify. A video wall isn’t just a prettier screen. It’s a better storytelling tool.
Trade Show Setup and Logistics
Most booth decisions look smart in a rendering and painful in a convention hall.
Shipping cases arrive late. Labor windows shrink. Material handling fees pile up. Someone realizes the booth needs tools nobody brought. Then the team that wanted to spend setup day rehearsing demos is stuck managing parts and paperwork.
That is why logistics should drive your display decision almost as much as visual impact.
Why modular systems changed the game
Older illuminated structures were heavy, awkward, and expensive to move. Modern systems improved the situation by using aluminum extrusion frames and SEG graphics. According to this overview of display light box selection factors, modular aluminum frames and tool-free SEG assembly are designed to reduce shipping weight and cut installation time from hours to minutes.
That matters because show-floor costs punish complexity. The longer a setup takes and the more physical bulk it involves, the more likely you are to feel it in drayage and labor.
The real cost centers exhibitors forget with light box displays
Booth budgets usually focus on the display itself. The smarter approach is to break the event into operational categories:
- Material handling: The show moves freight from the dock to your booth and back. Heavy systems can make this line item painful.
- Install and dismantle labor: If the build requires tools, extra hands, or longer labor windows, the cost goes up fast.
- Shipping and packing: Bulky hardware creates recurring friction, especially across multiple events.
- Failure risk: More parts and more complexity mean more chances something goes wrong on setup day.
If you want a simpler mindset for small-format event planning, even non-trade-show resources like 10 craft fair booth setup ideas are useful because they reinforce the same practical truth: the easier your booth is to transport, assemble, and present clearly, the better your event experience tends to be.
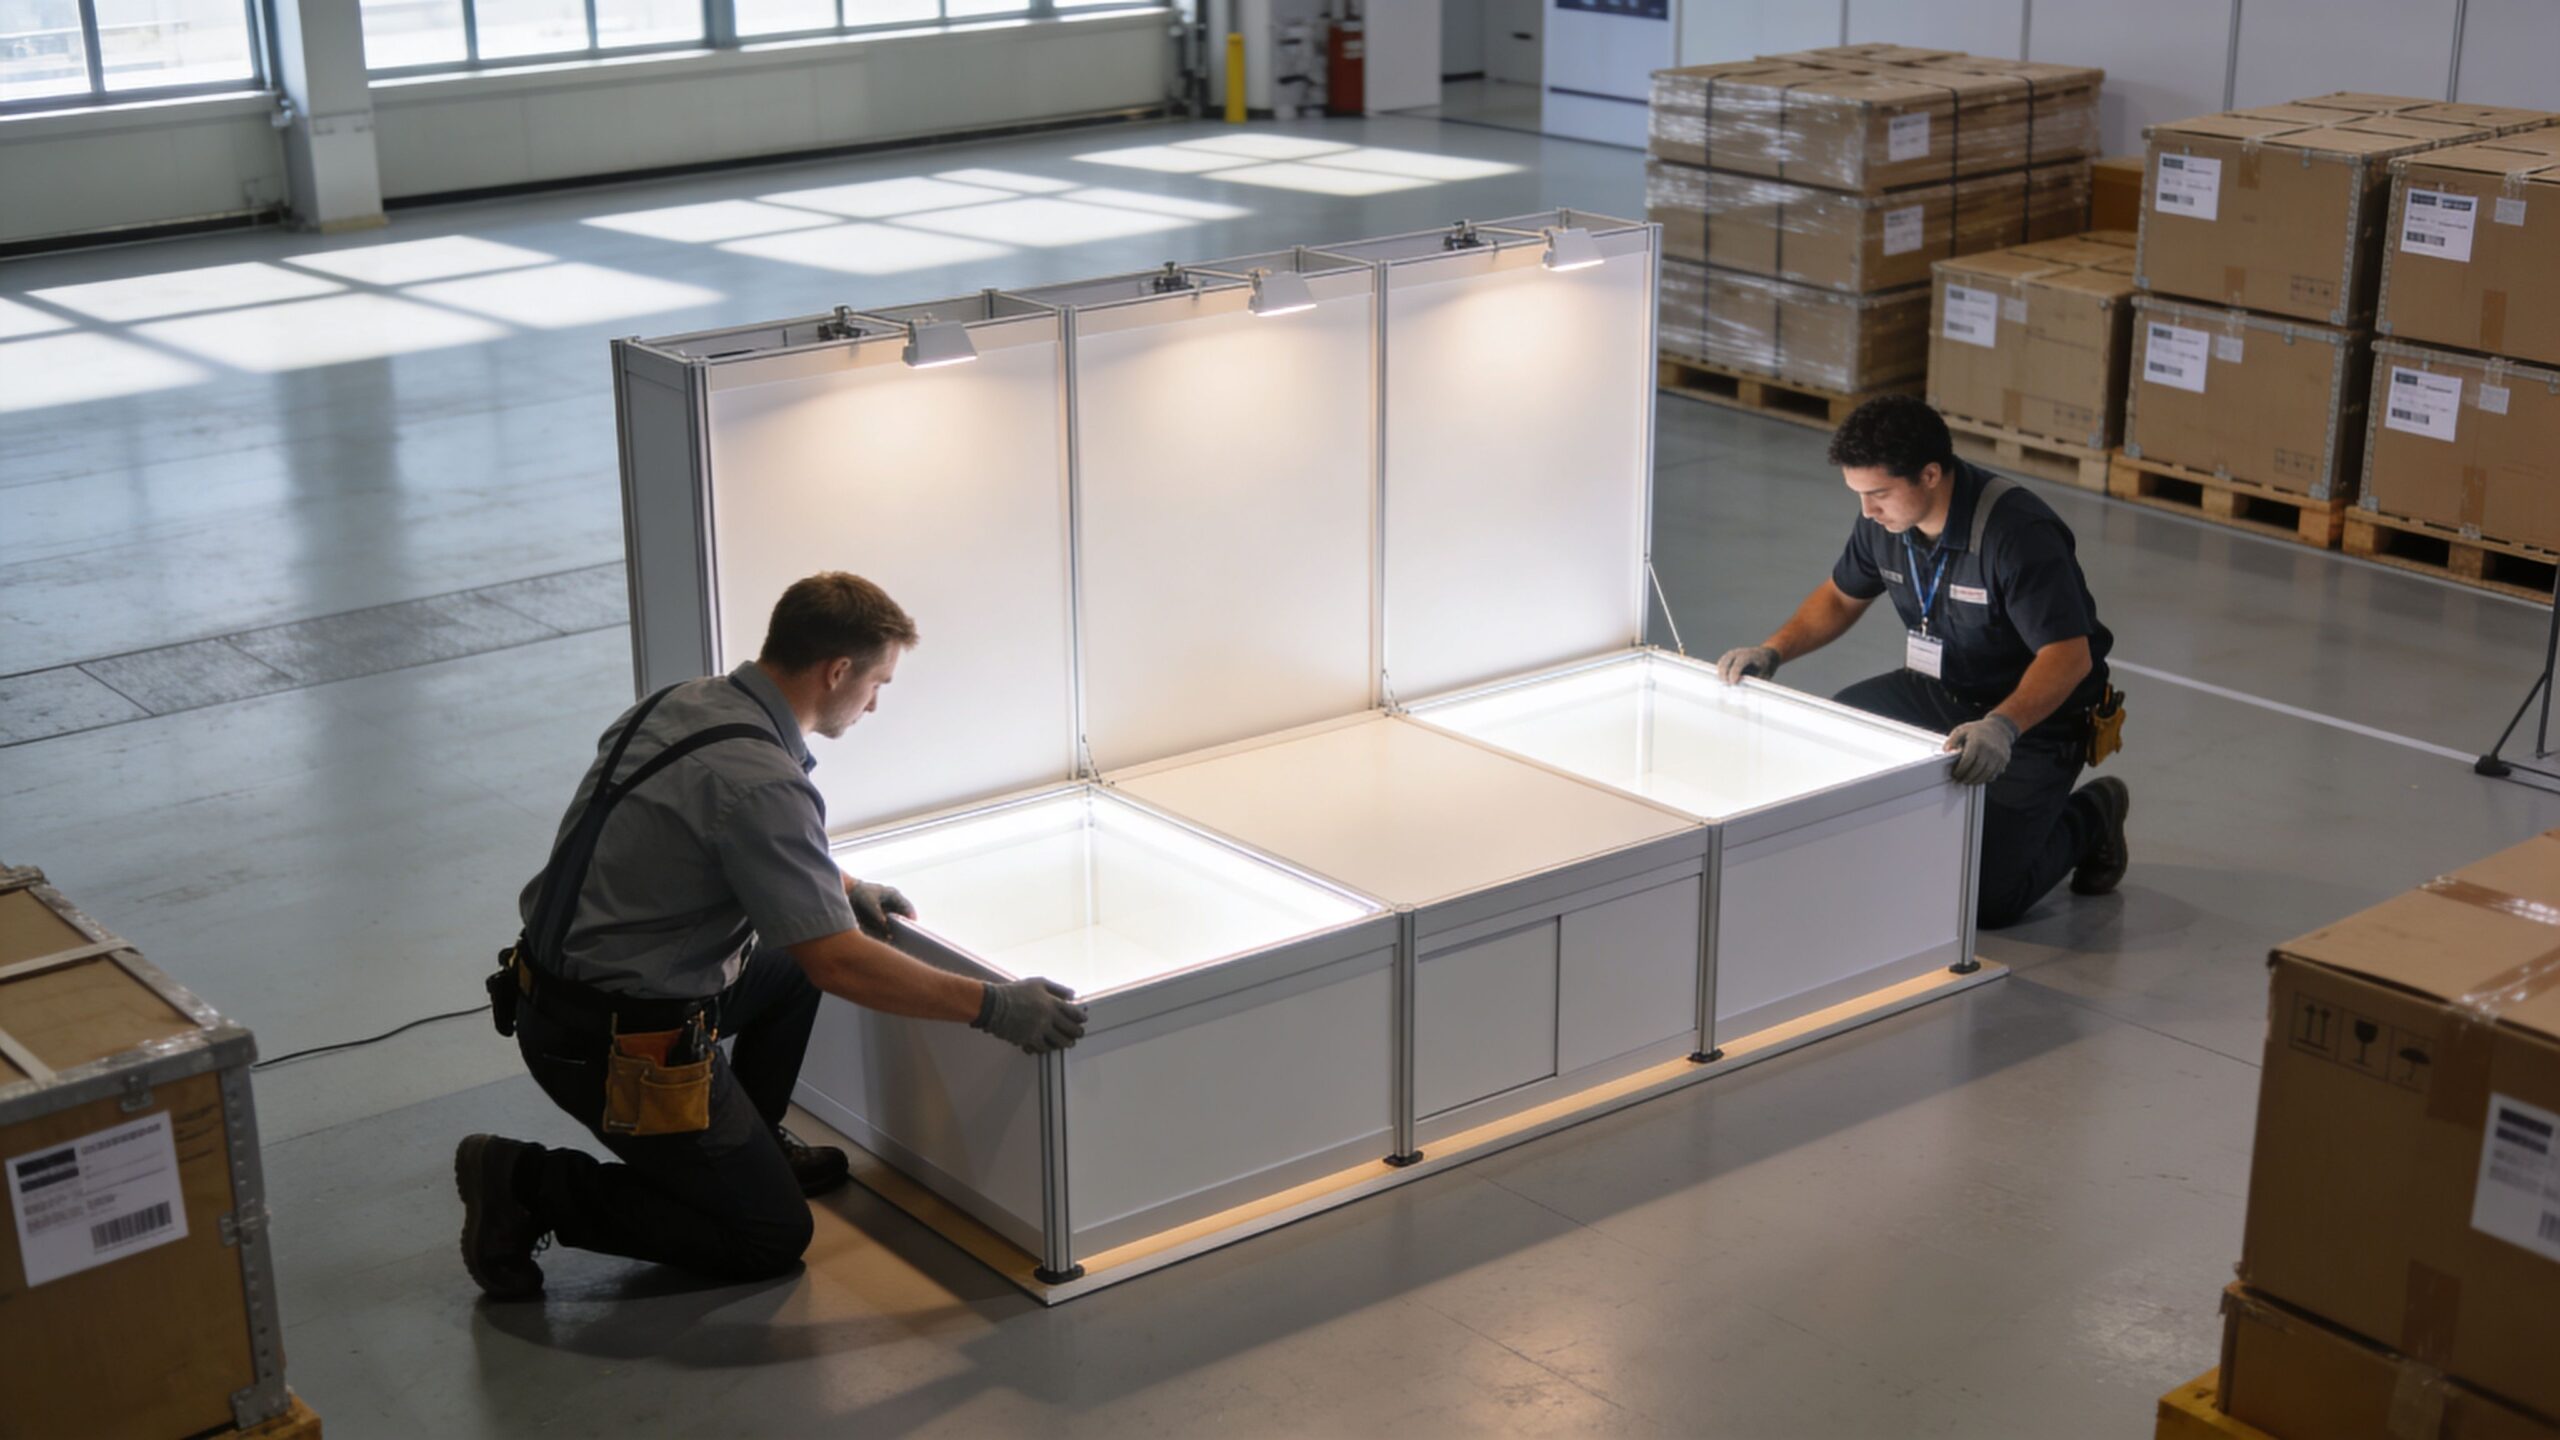
What fast setup actually looks like
The best systems remove avoidable decisions from the floor. Frames align predictably. Graphics install cleanly. Panels lock in without specialized tools. Power and connections are integrated instead of improvised.
That approach doesn’t just save labor. It reduces mistakes.
Field advice: If a display requires a long setup explanation, it will eventually fail under show pressure.
A modern setup partner should be able to tell you exactly who handles freight coordination, who supervises install, who manages dismantle, and what support exists if something misfires during live hours. If those answers are vague, the proposal is incomplete.
For exhibitors evaluating service-heavy options, it helps to compare what a true trade show set up partner handles versus what still lands on your team.
Why lightweight digital systems deserve a hard look
There’s still a misconception that digital booths automatically mean difficult setup. That used to be true when screens were treated like equipment racks and truss projects. It doesn’t have to be true now.
Lightweight LED tiles with magnetic and tool less locking systems change the equation. They can reduce physical burden, simplify assembly, and make large digital surfaces more practical than many exhibitors expect. That becomes especially important when your booth design includes walls, columns, or counters that need to look integrated rather than pieced together.
This walkthrough gives a useful visual sense of how modern modular displays come together in real life:
Our blunt recommendation on logistics
If your team is small, your event calendar is busy, or your tolerance for show-floor chaos is low, don’t choose a display system based only on the purchase or rental number. Choose the system that lowers handling, setup friction, and failure points.
A booth that looks dramatic but creates operational headaches is not a premium solution. It’s a stress generator.
Evaluating Cost ROI and Service Models
The cheapest booth proposal is often the most expensive booth decision.
Exhibitors get trapped when they compare line-item prices without comparing what the price covers. One vendor quotes the structure. Another quotes the graphics. Another adds install later. Then support becomes a separate conversation. By the time the event happens, the “lower price” wasn’t lower at all.
This is why we push people to evaluate total cost of ownership, not just purchase price.

What to include in a real ROI review
According to Displays2go’s discussion of LED light box considerations, a 3-5 year review should include purchase price, energy consumption, replacement parts, and maintenance labor. That’s the right framework because booth decisions rarely live for one event.
If you exhibit repeatedly, ask these questions:
- How often will we refresh content? Static graphics may be easy to replace, but frequent campaign changes still add cost and coordination.
- What maintenance does the system require? Older technologies create more upkeep. LED-based systems make a stronger case because of longevity and low maintenance.
- What labor does this format create every show cycle? A complicated install creates recurring cost, not a one-time inconvenience.
- What happens when something fails during show hours? When faced with this question, many proposals go silent.
Upfront price vs complete price with light box displays and LED video wall booths
Our advice is simple. Treat incomplete pricing as a warning sign.
A serious event display quote should make clear what the show bills directly and what your display partner includes. In our model, the show bills direct venue items such as electricity and material handling. Everything else is included in our price. That means the planning, the display, shipping, setup, dismantle, and support aren’t left dangling as surprise add-ons.
That pricing structure is worth more than it first appears. It lets your team budget accurately, and it removes the awkward handoff where everyone assumes someone else is handling a critical piece.
Renting vs owning
There isn’t one right answer. There is a right answer for your event cadence.
| Scenario | Better fit |
|---|---|
| You attend occasional shows and want flexibility | Renting |
| You exhibit frequently with a repeatable footprint | Owning |
| Your content changes often and booth sizes vary | Renting |
| You need consistency across many events | Owning |
If you’re weighing those paths, compare your use pattern before you compare monthly or event-specific pricing. A useful starting point is this guide on owning vs renting an LED video wall.
Service model matters more than most buyers think
Premium providers separate themselves from box shippers.
White-glove, turnkey service means your team isn’t coordinating freight, chasing labor, troubleshooting screens, or patching together missing responsibilities on show day. It means one group owns execution. That’s the only model we trust for high-stakes events.
The strongest version of that model includes on-site technical support throughout open show hours. We leave an audiovisual technician onsite the entire time the trade show is open. If anything goes wrong, your team texts or calls, and an AV technician is at the booth within minutes to resolve the problem.
A display isn’t fully supported because it arrived assembled. It’s fully supported when someone owns performance after the doors open.
Our recommendation on value
If you’re comparing a bargain display against a fully managed one, don’t ask which is cheaper. Ask which one leaves your staff free to greet customers, run demos, and close meetings.
That’s the true return. Peace of mind isn’t fluff at a trade show. It’s an operational advantage.
Tips for High-Impact Display Content
A great display with weak content is just expensive furniture.
We’ve seen booths with premium hardware fail because the message was cluttered, the imagery was generic, or the video tried to do too much. We’ve also seen simple displays perform well because the content was disciplined and built for the environment.
What works on light box displays
A static illuminated surface has one job. Deliver one message quickly.
Use a short headline, a single visual focal point, and typography people can read while walking. Don’t cram a brochure onto the wall. Light helps, but it doesn’t rescue crowded design.
A strong light box graphic usually includes:
- One hero image: Product, outcome, or brand scene. Not a collage.
- One headline: Short enough to understand in seconds.
- Minimal supporting text: A subhead if needed, but no dense copy blocks.
- High contrast: The illumination should support readability, not wash it out.
What works on video walls
Video walls give you more freedom, but they also punish bad editing.
The best content loops are built for trade show behavior. People join mid-sequence. They glance first, then stop if something is relevant. Your content has to communicate even if nobody watches from the beginning.
Use motion with purpose:
- Start with a visual hook. Product motion, transformation, or a bold opening frame.
- Follow with one idea at a time. Don’t stack every benefit at once.
- Build silent-first content. Assume many viewers won’t hear audio.
- End in a way that loops cleanly, without awkward resets.
Creative note: If a passerby only gives you five seconds, your content still has to make sense.
Match content to booth goals
Different goals need different formats.
If you’re launching a product, run short product animations and close-up detail shots. If you’re selling a complex service, use sequenced messaging that simplifies the process. If credibility is the challenge, show short testimonial clips, client logos, or proof-driven visuals.
A useful planning exercise is to assign each part of the wall a role:
- Top of wall: Brand recognition and distance visibility
- Center zone: Product or service explanation
- Near eye level: CTA, demo cue, or meeting prompt
Common mistakes we tell clients to avoid
Some problems repeat across almost every event season.
- Overloading a static wall: Too many logos, too much copy, no focal point.
- Using video that depends on sound: Trade shows are noisy and inconsistent for audio.
- Creating long-form content for short attention spans: Keep loops tight and scannable.
- Forgetting brand consistency: Booth content should match your sales deck, landing pages, and follow-up emails.
The strongest booth content doesn’t try to say everything. It starts the conversation your team can finish in person.
Your Exhibitor’s Decision Checklist
By this point, the decision usually gets clearer. You’re not choosing between “good” and “bad.” You’re choosing between a static illuminated graphic and a dynamic visual system, then deciding how much service and support you need wrapped around it.
Use this checklist the same way we do when advising exhibitors.
Ask what your message needs
If your core message can live in one image and one headline, light box displays may be enough. If your offer needs demonstration, sequencing, or multiple audience-specific messages, a video wall is the stronger fit.
Write your booth message in one sentence. Then ask whether a static visual can carry it without explanation.
Check booth scale and viewing distance
Large walls magnify weaknesses. If you’re designing a broad visual surface, pay attention to how the display technology scales and how it looks from both aisle distance and close range.
For digital, resolution matters. That is where finer pitch earns its keep. For static illuminated systems, uniformity matters just as much.
Audit the hidden cost questions
Before signing anything, ask for a plain-English list of what’s included and what isn’t.
Use this shortlist:
- Direct venue charges: What will the show bill you for directly?
- Freight and handling: Who manages it?
- Install and dismantle: Included or extra?
- On-site support: Available during live show hours or not?
- Content help: Included guidance or DIY only?
Stress-test your content plan
Your booth hardware can’t save weak content. Make sure your visuals are built for how attendees behave.
If you need stronger product imagery before committing to final graphics or motion assets, resources on how to boost conversions with AI photos can help your team think through faster creative production and cleaner visual presentation.
Decide how much operational burden you want
This is the question buyers often avoid because it sounds subjective. It isn’t.
If you want your internal team managing setup details, support calls, and technical issues, choose accordingly. If you want your staff focused on meetings and customer conversations, pay for the service model that protects that outcome.
The best booth decision is the one that still feels smart at 7 a.m. during install, not just the one that looked good in the mockup.
Our final checklist
Before you choose, make sure you can answer yes to these:
- Do we know whether our message is static or dynamic
- What do we know how close attendees will stand to the display
- Are we sure we understand the actual setup and handling burden
- Do we know what support exists during show hours
- Have we decided whether renting or owning fits our event schedule
- We have content designed for the actual medium
If you can’t answer those confidently, don’t buy yet. Get clearer first. The wrong display doesn’t just waste money. It weakens your booth performance and creates avoidable stress for your team.
If you want a booth partner that handles the details and leaves your team free to greet customers, talk with LED Exhibit Booths. We provide turnkey LED video wall trade show displays with higher-resolution 1.9 pitch tiles, while many competitors use 2.5 pitch. Our pricing includes everything except what the show bills you directly, such as electricity and material handling. We also provide white-glove service and keep an AV technician onsite for the full time the show is open, so if something needs attention, help is only a text or call away.