
Trade show shipping may seem boring but it’s very important. The show date is fixed, the booth design is approved, sales wants the team focused on meetings, and someone suddenly realizes the exhibit still has to get from your warehouse to a convention center with dock rules, move-in windows, marshaling yards, and paperwork nobody enjoys reading.
That’s when trade show shipping stops feeling like a line item and starts feeling like a risk.
For most exhibitors, the stress doesn’t come from one dramatic mistake. It comes from a stack of small ones. A crate list that doesn’t match what’s packed. A carrier that knows general freight but not show-site delivery. Labels that say your company name but not the booth number. An outbound plan that gets all the attention while return shipping gets ignored until teardown. Then the invoices show up, and the “shipping budget” turns out to be much bigger than expected.
Trade show shipping can be controlled. It just doesn’t reward improvisation. It rewards early planning, clean documentation, disciplined packing, and a booth design that doesn’t punish you with unnecessary weight. If you’re still estimating costs or trying to understand where the money really goes, this breakdown of trade show booth cost factors is a useful starting point before you lock in your logistics plan.
Your Trade Show Shipping Wake-Up Call
A lot of exhibitors approach shipping as if it’s the last operational task before the event. It isn’t. It’s part of the exhibit strategy.
The common scenario looks like this. A marketing manager has one spreadsheet for freight, another for labor, a PDF exhibitor manual with hard-to-find deadlines, and a handful of carrier quotes that don’t seem directly comparable. One quote looks cheap until you realize it doesn’t include the kind of coordination needed for show-site delivery. Another looks expensive until you understand what happens when freight misses its window and sits in limbo while setup labor waits.
That’s where things go sideways. You’re not just moving boxes. You’re moving a live environment that has to arrive intact, on schedule, and in the right sequence for installation.
Trade show shipping gets expensive when companies treat it like ordinary freight. It isn’t ordinary. The handoffs are tighter, the penalties are sharper, and the consequences land on your event team in real time.
The hidden stress is operational, not theoretical. If your booth components arrive late, your team doesn’t get more time. They get less. If your freight is misplaced on-site, the problem doesn’t stay in the freight yard. It affects labor, setup order, AV testing, and your confidence before the floor opens.
The good news is that this process becomes much more predictable when one person owns the timeline, one inventory governs the shipment, and one partner handles the details in a white glove, turnkey way. That kind of structure lets your internal team stop chasing logistics and focus on the reason you’re exhibiting in the first place, which is meeting prospects, supporting sales, and running a booth that looks ready the moment attendees walk in.
The Pre-Show Blueprint Your Shipping Timeline
Most trade show shipping problems start weeks before the truck moves. They start when nobody turns the exhibitor manual into an action plan.
The numbers make the stakes clear. The average cost to ship booth materials ranges from $2,000 to $5,000 per event, and missing targeted move-in windows can trigger a 30% surcharge for late deliveries after 4:30 p.m. or a 50% surcharge for missing the advance warehouse window entirely, according to Exhibitor Online’s trade show shipping guidance. That’s why the timeline matters more than the quote.
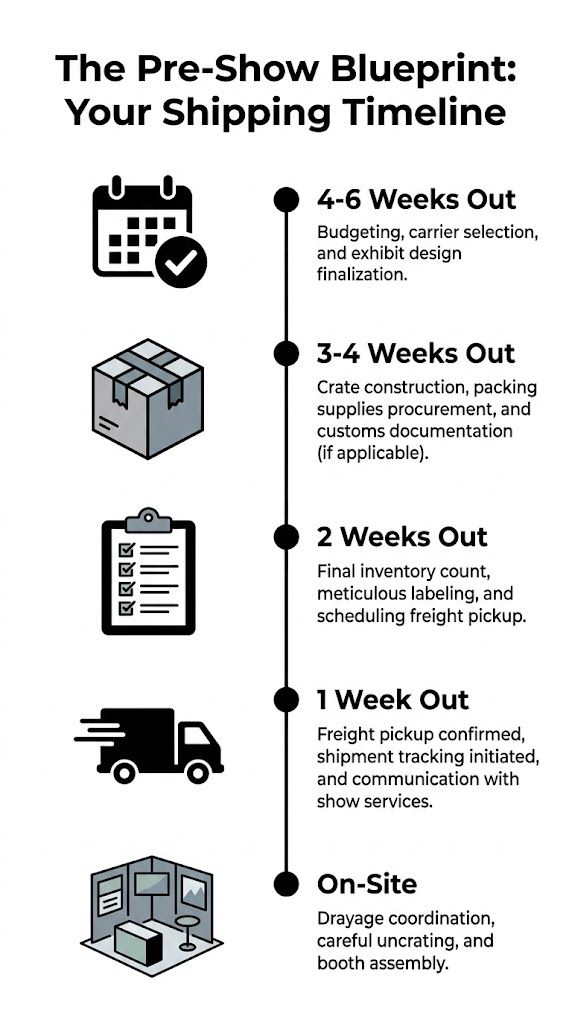
If you want a practical overview of what exhibitors usually miss, this guide on shipping trade show exhibits is a helpful companion to the schedule below.
Four to six weeks out
This is budgeting and decision time. By this point, you should know exactly what’s shipping, where it’s shipping from, and whether it’s going to the advance warehouse or direct to show site.
Handle these items early:
- Read the exhibitor manual closely: Find freight deadlines, warehouse receiving dates, move-in instructions, target floor plans, and show contractor forms.
- Choose the delivery path: Decide whether advance warehouse delivery gives you more control, or whether direct-to-show makes sense for your assigned timing.
- Review your booth design through a logistics lens: Ask what’s bulky, fragile, or unnecessarily heavy.
- Build the first real shipping budget: Include freight, material handling, labor exposure if freight is delayed, and any special handling needs.
A lot of teams skip one critical step here. They never compare the exhibit concept to the logistics cost it creates. A booth that looks efficient in a rendering can still become a shipping headache if it breaks into too many pieces or requires oversized crates.
Three to four weeks out
Estimates need to become exact enough to book.
Create a working shipment file with weights, dimensions, crate count, contact names, booth number, and destination details. Your Bill of Lading has to match reality. If the paperwork says three crates and the dock sees four, you’ve created a problem before the truck is even unloaded.
At this stage, I tell teams to finalize three documents before they celebrate being “booked”:
-
Bill of Lading
This is the carrier-facing document that defines what’s moving. It should match your actual crate count, descriptions, and destination instructions. -
Master packing list
This is your internal control document. Every crate should have a corresponding contents list. -
Material handling paperwork
Read the show forms carefully. Material handling charges aren’t just a freight issue. They affect the total cost of getting your booth from dock to space and back again.
Practical rule: If your inventory, labels, and BOL don’t all say the same thing, fix that before pickup day. Don’t assume the venue will sort it out for you.
Two weeks out
It’s important that two weeks out is not “we’ll get to it.” Naturally, two weeks out is final execution.
Do a physical verification. Open the crates if needed. Confirm the actual booth number, show name, destination address, and receiving deadlines. Print fresh labels. Make sure each crate has visible identification on multiple sides.
Use this short checklist:
- Confirm shipping method: Warehouse or direct-to-show, based on the move-in plan.
- Verify labels: Booth number, exhibitor name, event name, and handling notes should be easy to read.
- Lock down pickup: Get written confirmation from the carrier.
- Distribute contact info: Your exhibit house, booth supervisor, carrier, and on-site contact should all have each other’s details.
One week out
By now, you should be in monitoring mode, not decision mode.
Track the shipment from pickup forward. Confirm delivery timing against the show’s requirements. If anything changes, get in front of it immediately. Silence is dangerous in trade show shipping. Problems rarely improve by waiting.
A good timeline does one thing above all. It replaces frantic reactions with controlled handoffs. That’s the difference between a shipment that arrives as part of a coordinated move-in and one that becomes everybody’s problem on setup day.
Crate Pack and Label Like a Pro
The best freight plan in the world won’t save a poorly packed booth. Damage often starts with movement inside the crate, not with dramatic mishandling on the road.
That’s especially true for exhibit systems that mix structural parts, branded graphics, electronics, and accessories. Every category needs a different packing standard.
If you’re new to carrier terminology, this overview of LTL freight shipments helps clarify how shared freight moves and why packaging discipline matters when your crates won’t be the only freight on the truck.
Pack for handling, not hope
A crate has one job. It has to survive multiple touchpoints without letting the contents shift, crush, scrape, or bounce.
That means your packing approach should change based on what’s inside:
- For high-value electronics: Use fitted protective materials so each component stays immobilized. LED tiles, processors, and control gear should not rattle or lean against each other.
- For structural elements: Bundle and secure them so they don’t become internal battering rams.
- For accessories and hardware: Contain small parts in labeled cases or pouches, then secure those inside the crate.
Empty space is the enemy. If there’s room for parts to move, there’s room for damage.
For exhibitors moving LED-based environments, the safest approach is compartmentalized packing. Tiles should sit in purpose-built protection, not in improvised foam-and-blanket solutions. Magnets, locks, connectors, and cables should be grouped logically so the install crew can unload in sequence instead of hunting through mixed bins.
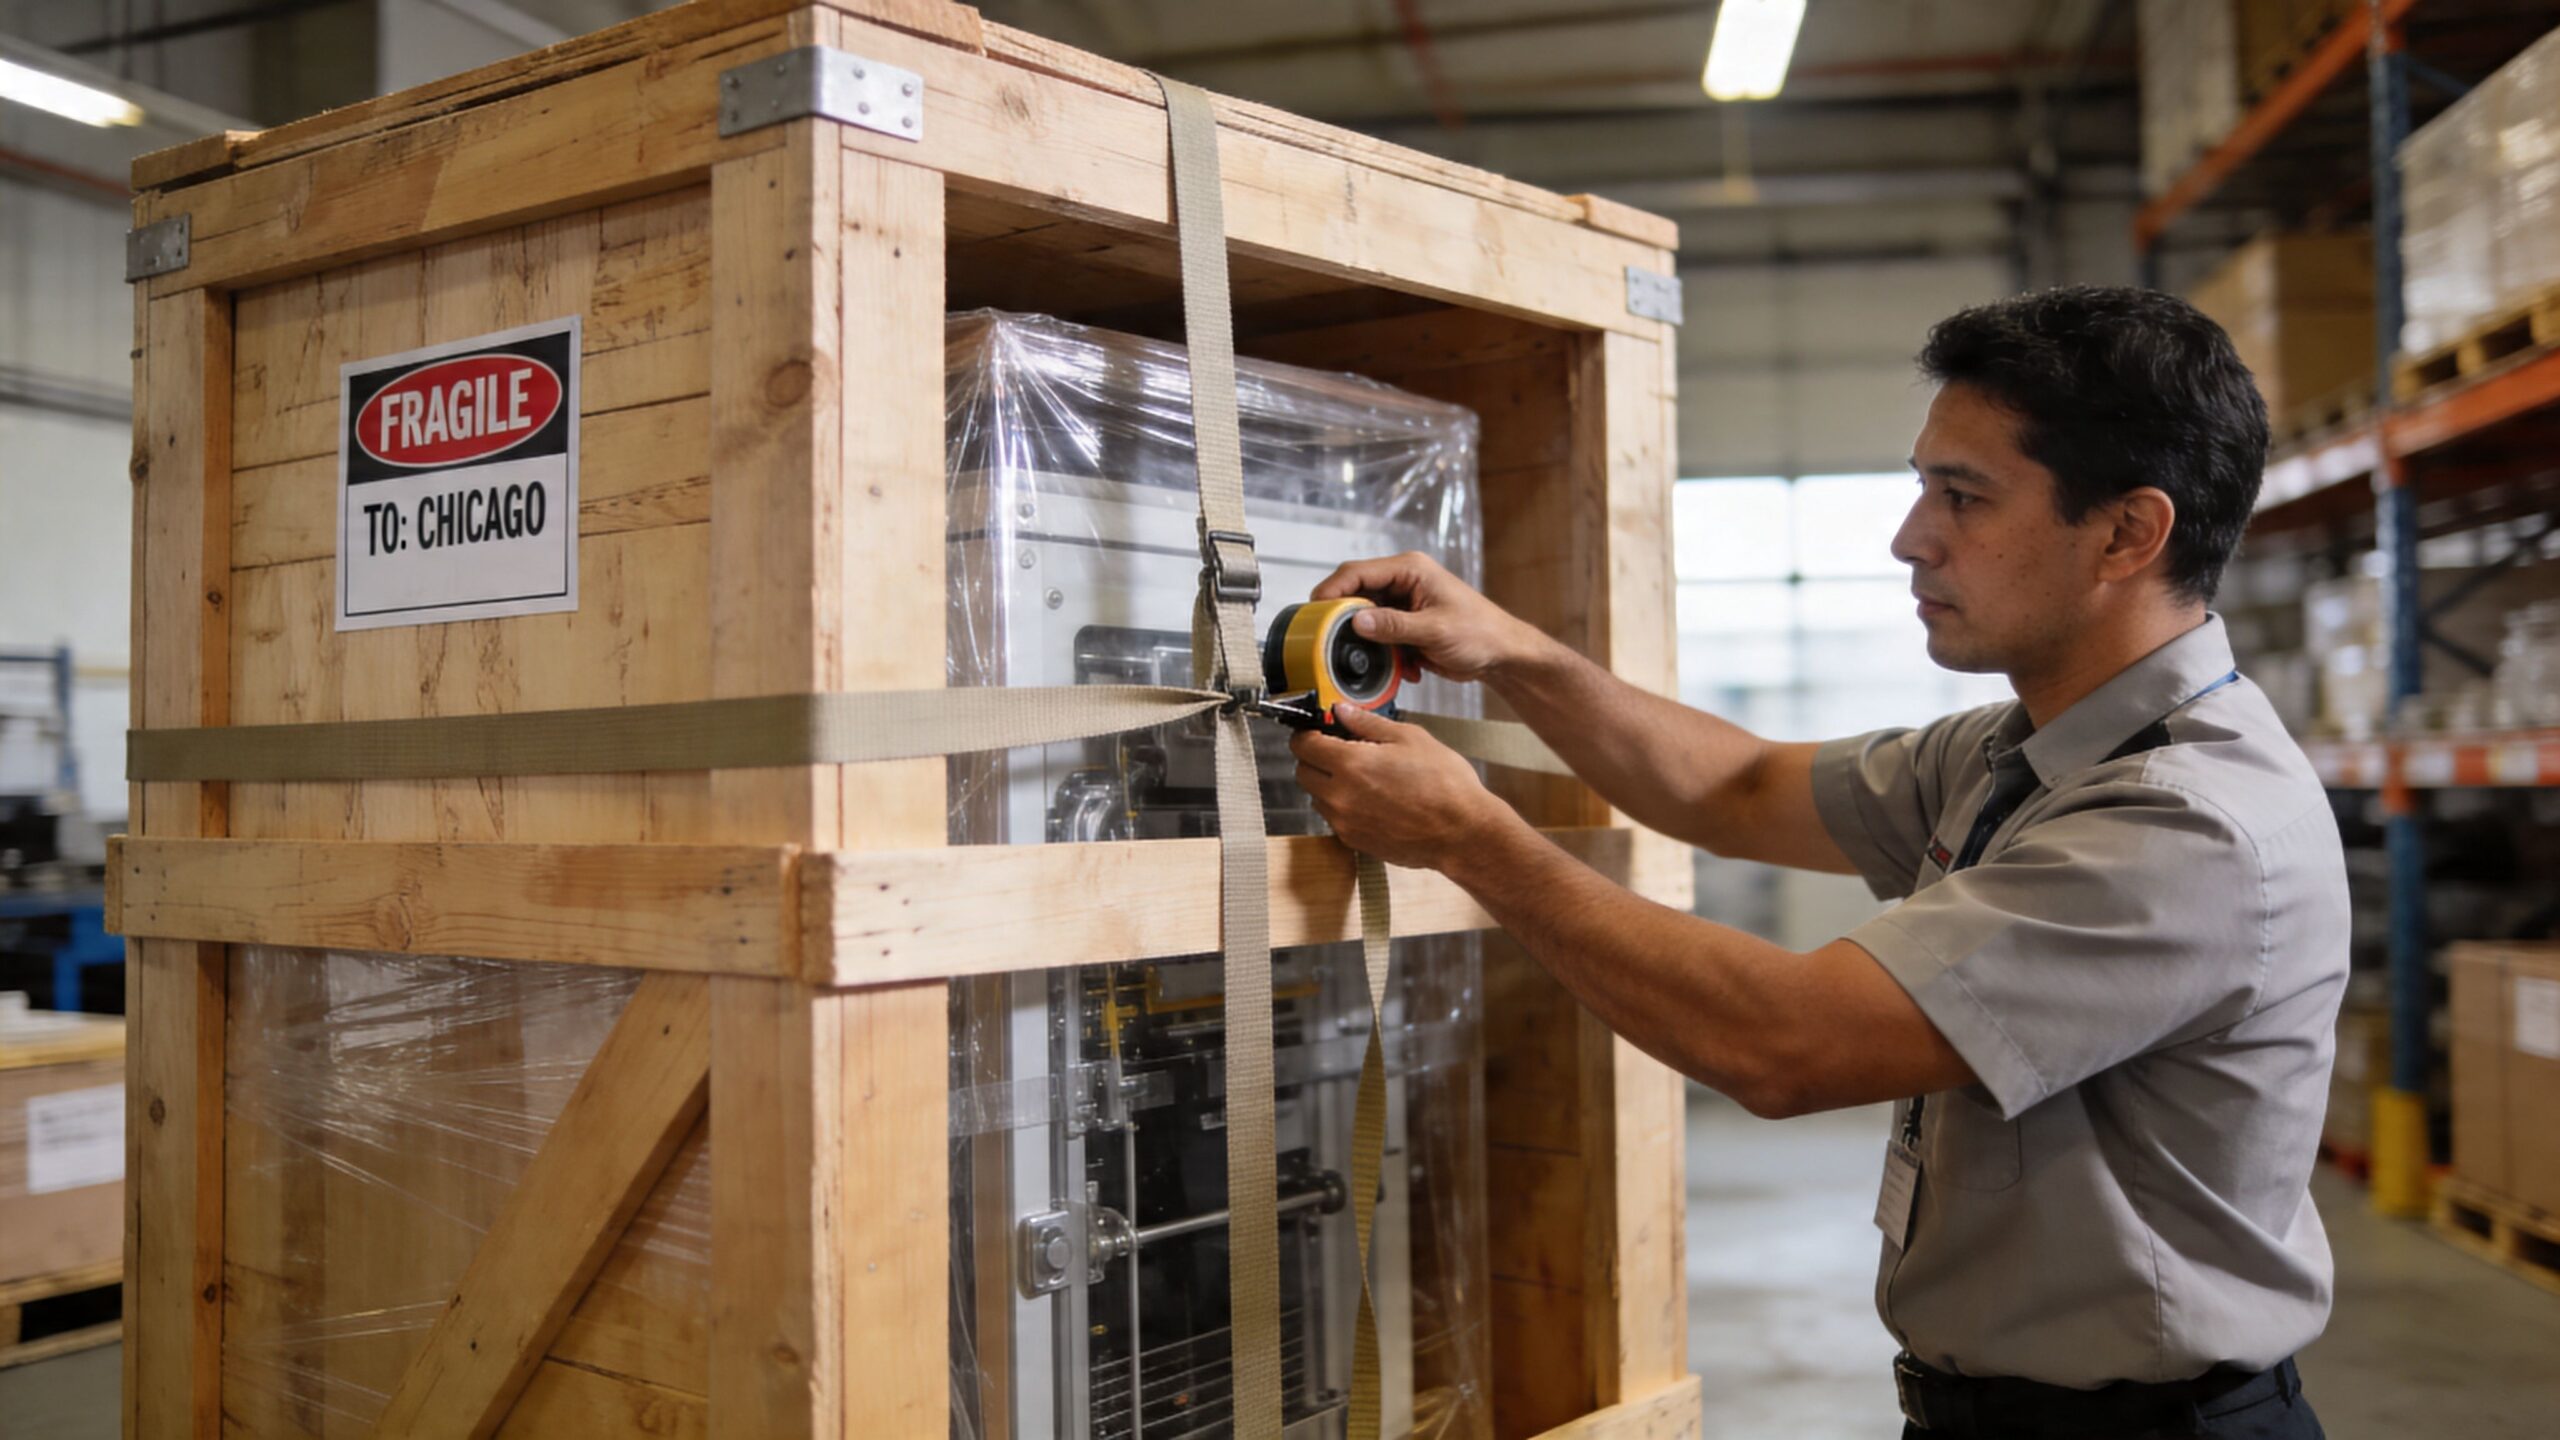
Label for humans under pressure
A label system should work for tired dock staff, rushed labor crews, and anyone scanning a freight yard quickly.
Use this method:
- Crate number first: Mark each unit as Crate 1 of X, Crate 2 of X, and so on.
- Show identity clearly: Include exhibitor name, booth number, and event name.
- Repeat labels on multiple surfaces: Put them on all four sides and the top.
- Match the master inventory: Each crate number should correspond to one contents record.
Many “lost crate” stories begin with this scenario. The freight wasn’t always lost in transit. Sometimes it wasn’t labeled in a way that made quick identification possible at the venue.
For a practical example of how fragile, high-visibility booth components are handled in the field, this trade show shipping case study shows why methodical packing matters.
A short visual can help your team standardize the process before the first crate is sealed:
A simple crate control system
If you want fewer setup surprises, keep the system boring and strict. Don’t rely on memory.
| Crate element | What to include | Why it matters |
|---|---|---|
| Exterior label | Exhibitor, booth number, event name, crate number | Speeds identification at dock and floor |
| Interior packing sheet | Detailed contents list | Helps setup crew verify fast |
| Photo record | Images before seal-up | Useful when checking condition and repacking |
| Hardware container | Fasteners, tools, adapters, cables | Prevents the classic “one missing connector” delay |
A crate should tell the installer what it is before anyone opens it, and confirm what’s inside once it is opened. That’s how you cut confusion during setup and teardown.
Choosing Your Carrier and Ensuring Safe Passage
The carrier decision is where many exhibitors either buy peace of mind or buy trouble. Cheap freight can become expensive freight fast when the shipment needs venue-specific timing, marshaling yard coordination, and careful handling for electronics.
There isn’t one right answer for every show. There is a right answer for your level of complexity.
Common carrier or specialized trade show carrier
A general freight carrier can work when the shipment is straightforward, the booth is durable, and the delivery conditions are forgiving. A specialized trade show carrier earns its keep when timing is tight and the freight is event-critical.
Here’s the practical comparison:
| Option | Where it works | Where it struggles |
|---|---|---|
| General LTL carrier | Budget-sensitive shipments, simpler exhibits, less fragile freight | Venue coordination, strict move-in timing, show-site familiarity |
| Specialized trade show carrier | High-value booths, narrow receiving windows, complex setup sequencing | Higher upfront cost in some cases |
A common carrier thinks in terms of freight movement. A trade show carrier thinks in terms of event execution. That distinction matters when the truck driver has to work through venue procedure, not just arrive at an address.
Insurance is not a checkbox
A lot of exhibitors assume the carrier’s liability has them covered. Usually, it doesn’t cover the actual value of the exhibit or the business impact of damage.
If your booth contains premium finishes, electronics, or custom fabrication, review the shipment’s protection before pickup. Ask what the carrier covers, what it excludes, and how claims are handled. Then compare that to the actual replacement cost and the consequences of having a damaged booth on opening day.
Don’t confuse “the shipment is booked” with “the risk is covered.” Those are separate decisions.
The right insurance conversation also forces a useful discipline. It makes teams define what’s in the shipment, what it’s worth, and which parts would create the biggest operational problem if damaged.
Tracking that’s good enough, and tracking that isn’t
A PRO number is useful. It is not enough for a high-value booth shipment with narrow delivery timing.
That gap has become more serious for electronics-heavy exhibits. For high-value electronics like LED video walls, lack of real-time shipment visibility is a primary risk factor. Exhibitors face at least 16 common challenges, including lost cargo and misrouted shipments. A 2025 logistics report noted that 68% of exhibitors experienced visibility issues, leading to drayage fee increases of 20-30% due to misplaced crates upon arrival, according to Tive’s analysis of trade show freight visibility.
That finding matches what operators see on the ground. A shipment can be “delivered” in a broad system sense and still be difficult to locate in a venue workflow. For trade show freight, visibility has to help you answer practical questions:
- Where is it right now
- Has it reached the correct handoff point
- Who has custody
- Can the booth team act on the update
What works in practice
The better approach is to choose a carrier and tracking method that fit the exhibit’s risk profile.
For simple branded counters or literature, standard tracking may be adequate. For modular LED walls, control gear, or custom structures that must arrive in install order, you want more than generic milestone updates. You want timely exception reporting and a contact who understands that “close enough” isn’t acceptable when labor is waiting and the floor clock is running.
Carrier choice isn’t just about transportation. It’s about reducing uncertainty at the exact moment your team can least afford it.
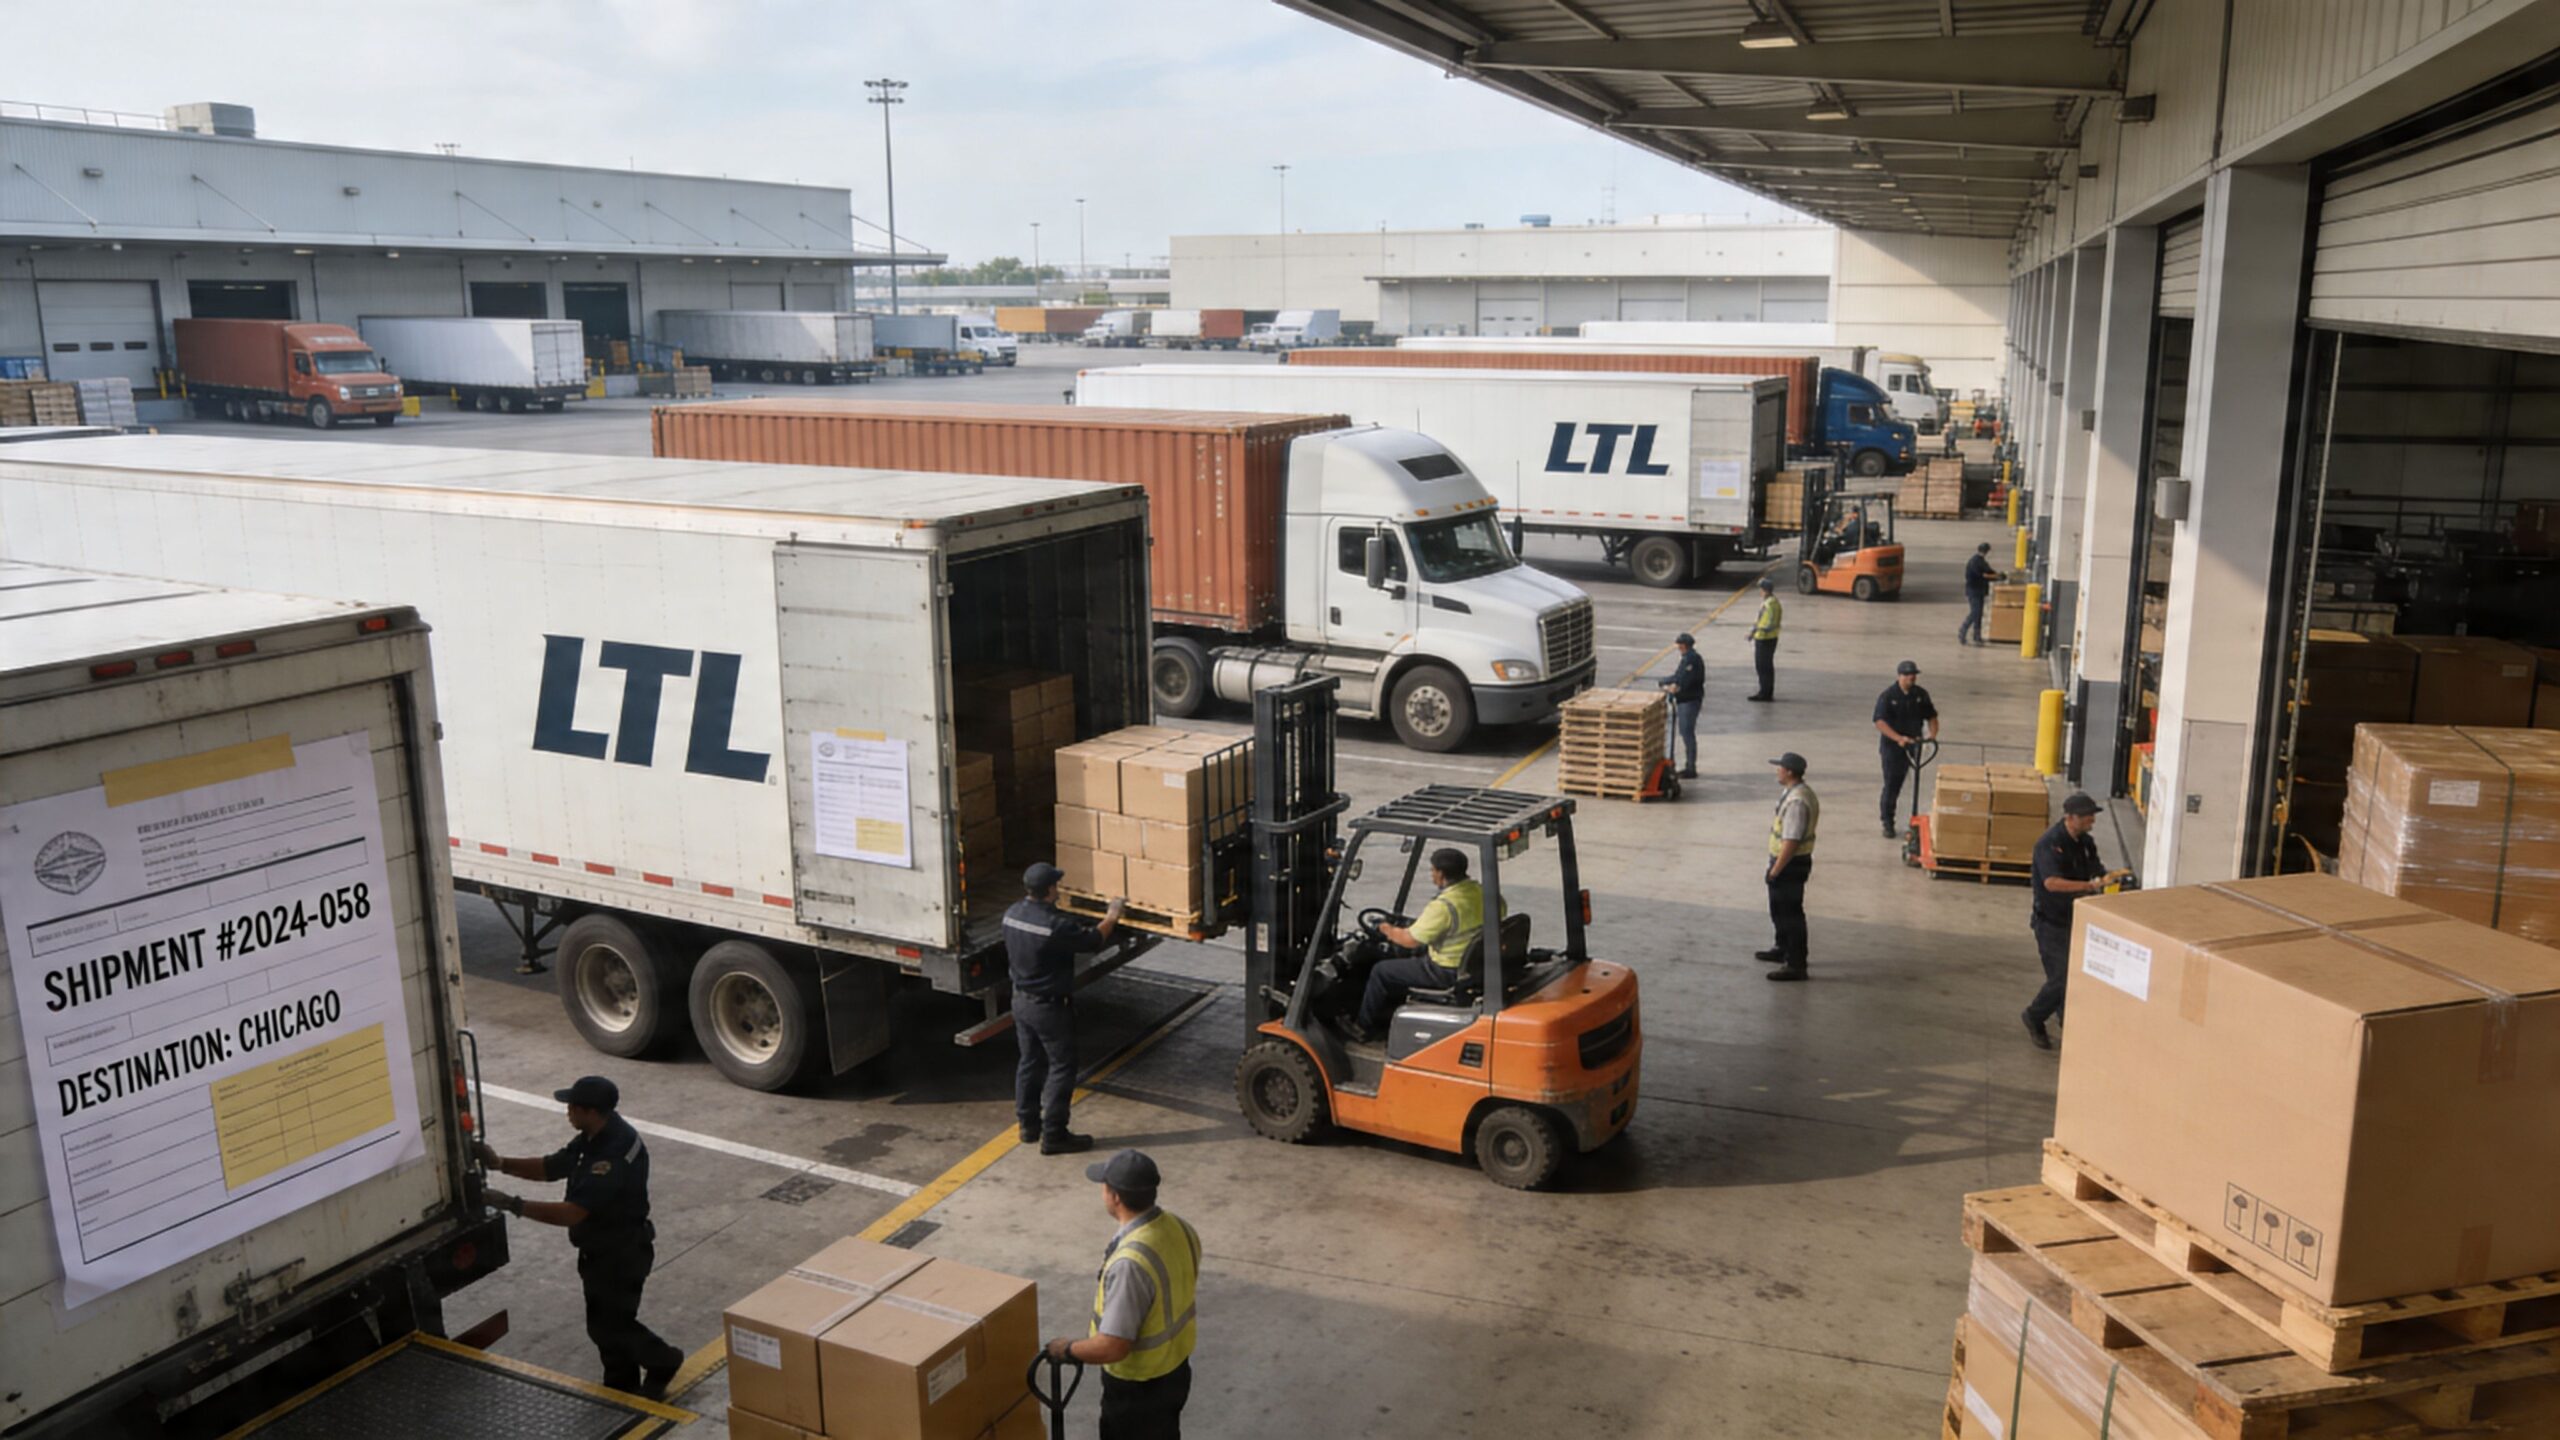
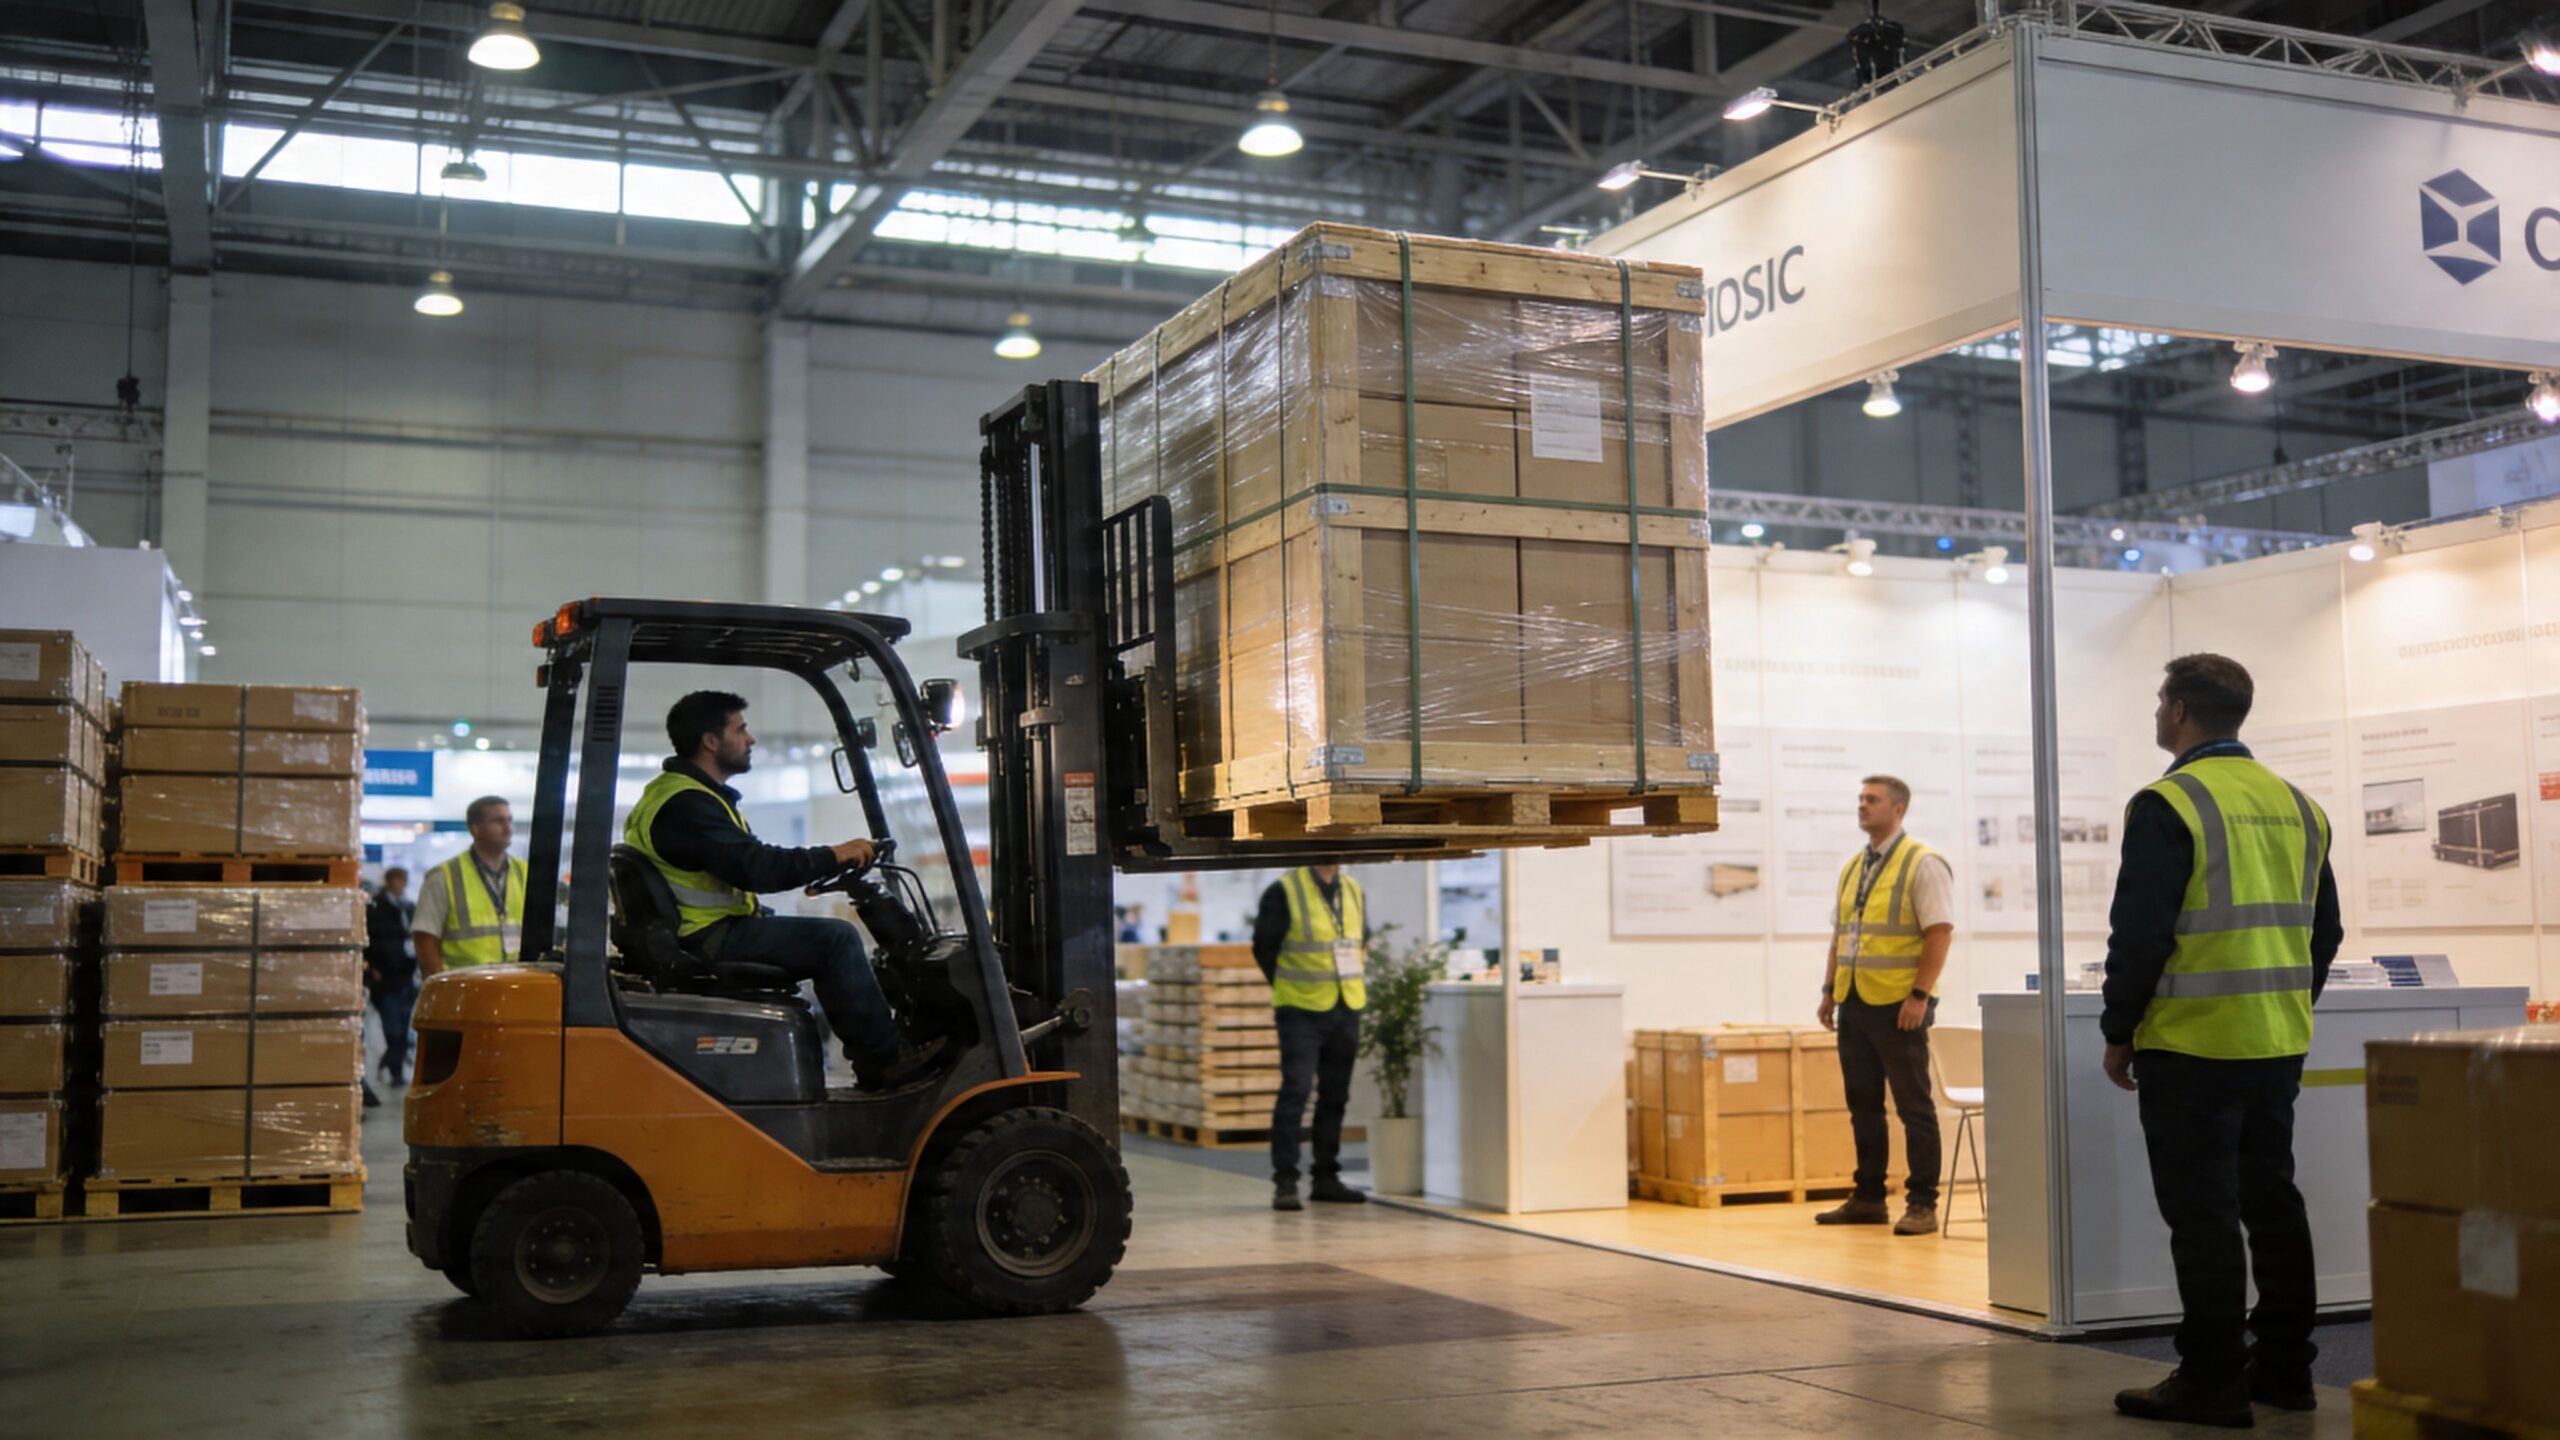
Mastering Drayage and On-Site Coordination
Ask exhibitors what surprised them most on their first major show, and drayage is usually near the top of the list. It feels expensive because it is expensive, and it feels confusing because the process involves show contractors, dock scheduling, labor rules, and freight handling that most marketing teams rarely deal with directly.
Drayage, or material handling, is the movement of your freight from receiving to your booth and then back out after the event. You don’t control much of it once the freight enters the venue ecosystem. What you can control is how efficiently your freight moves through that system.
Why targeted move-in matters
A targeted move-in is not just a scheduling detail. It’s your chance to align freight arrival with your assigned setup window.
For a Targeted Move-In, exhibitors should consolidate freight into minimal crates and adhere strictly to the show’s schedule for advance warehouse or direct-to-show deadlines. On-site, union labor for unloading can cost $100-150 per hour in major venues, and XPO Logistics reports that exhibitors who hit their targeted move-in windows have a success rate over 95%, compared to 70% for unscheduled arrivals who face significant delays, according to XPO’s trade show shipping guide.
That’s why crate count and timing are linked. Scattered freight creates more opportunities for delay. Consolidated freight is easier to track, unload, and stage.
What exhibitors should do on-site
The best on-site teams act like receiving managers, not just booth builders.
Use this checklist when freight starts moving:
- Check in with documents ready: Have manifests and booth details accessible at the freight yard or service desk.
- Verify what arrives first: Match incoming pieces against your master inventory before installation gets rolling.
- Escalate discrepancies immediately: Waiting “until later” usually makes missing items harder to trace.
- Sequence the unload: Bring in what the installation crew needs first, not just whatever crate gets dropped first.
Freight problems are easiest to solve the minute they’re discovered. Once the dock gets busy and labor starts moving, small mysteries become expensive ones.
Working with union labor instead of against it
Experienced exhibitors don’t waste energy fighting the site rules. They prepare for them.
That means understanding who can unload, who can assemble, what your EAC or install team can touch, and when labor should be called. A lot of cost overruns come from idle time. The crew is present, the clock is running, and the booth can’t move forward because a crate is late or the wrong components were staged first.
A simple operating model works best:
| On-site task | Best practice |
|---|---|
| Freight check-in | Send one informed lead with complete documents |
| Inventory review | Compare every arriving unit to the pre-shipped manifest |
| Labor coordination | Queue crews only when freight and install order are clear |
| Issue handling | Report missing or damaged items immediately through the proper desk |
Where turnkey support changes the experience
This is the moment when service quality shows up in real life. If your provider coordinates shipping, paperwork, targeted move-in, labor timing, and setup supervision, your internal team gets to focus on the event instead of becoming amateur freight managers.
That’s the difference between merely having a booth and having control of the move-in. The venue won’t simplify its process for you. Your system has to be better than the chaos around it.
The Modern Advantage How Lightweight Booths Slash Costs
Traditional booths create shipping problems long before the invoices arrive. Heavy truss, stacked monitors, separate mounts, extra cabling, and bulky support structures all add weight, crate count, and setup friction. That affects freight, drayage, labor, and the odds that something goes wrong on the floor.
Modern lightweight exhibit systems change that math.
A 2025 Exhibitor Times study found that modular, lightweight LED video wall booths can be 40-60% lighter than traditional displays, can slash drayage by up to 50%, and can cut ground shipping costs by 35%. The same source notes that a typical 10×10 booth can drop from 5,000 lbs to under 2,000 lbs when the display system shifts from a traditional setup to lightweight LED construction, according to this trade show shipping cost analysis.
That’s not just a logistics improvement. It’s a design decision with direct operational consequences.
Why the old approach costs more
A conventional booth often ships like a collection of unrelated parts. Structure in one crate. Screens in another. Mounts and cables in another. Counters and trim in another. The more pieces you create, the more handoffs you create.
Those extra handoffs usually lead to familiar problems:
- More crate volume: More items to receive, identify, move, and return
- Higher handling exposure: More opportunities for scratches, misrouting, and missing hardware
- Longer install logic: More dependencies before the booth is fully functional
That setup can still work. Plenty of companies use it. But it tends to punish teams on the show floor, especially when labor windows are short and timing is unforgiving.
What lightweight LED systems do differently
A modern LED booth collapses display and structure into one integrated system. Instead of building a booth and then hanging screens onto it, the booth itself becomes the display surface.
That changes several shipping variables at once:
| Traditional setup | Lightweight LED approach |
|---|---|
| Separate truss and monitor ecosystem | Integrated display architecture |
| Higher overall shipment weight | Reduced freight weight |
| More hardware pieces to track | Fewer critical components to manage |
| Longer install with tools and alignment | Faster assembly with modular systems |
The practical advantage isn’t only lower freight cost. It’s lower complexity.
Toolless, magnet-based systems are especially useful here because they reduce assembly friction. Fewer fasteners, fewer alignment headaches, and fewer install errors mean fewer ways to lose time during setup. For exhibitors moving from city to city, that consistency matters.
Better resolution matters too
Not all LED walls are equal once they arrive.
A 1.9 pitch wall has higher resolution than a 2.5 pitch wall. On a trade show floor, that difference affects how refined your graphics, product visuals, and motion content look at closer viewing distances. If attendees are standing near the booth, sharper pixel density helps the display feel more premium and less coarse.
That may sound like a creative issue, but it has logistics implications too. When the display itself carries more of the visual impact, brands often need fewer add-on monitors, printed panels, and support elements to create presence.
Lighter systems help before the show starts. Higher-resolution walls help once attendees are standing in front of the booth.
The pricing model exhibitors actually want
One of the biggest frustrations in trade show execution is fragmented responsibility. One vendor handles the structure. Another handles AV. Another handles setup. Another handles shipping. Then the exhibitor becomes the coordinator of everybody else’s process.
A cleaner model is bundled execution with transparent exclusions. In practical terms, that means the booth provider includes everything in its own price except the bills the show sends directly to the exhibitor. Typically, the show bills for electricity and material handling, while the provider handles the rest as part of the turnkey scope.
That kind of structure does two things:
- It reduces budgeting ambiguity.
- It cuts the number of vendors your team has to manage under deadline.
For exhibitors comparing options, it also changes the decision criteria. Don’t just compare booth price to booth price. Compare what’s included, who owns logistics, and who is still standing next to you when the floor opens.
If you’re evaluating lighter exhibit formats for repeated use, these portable trade show booth options are worth reviewing alongside your shipping model.
White glove service is not a luxury
For many teams, the key value isn’t just the booth hardware. It’s the reduction in operational stress.
White glove, turnkey service means someone else handles the planning, shipping coordination, setup, and support while your team does its real job, which is talking to customers. The strongest version of that model includes an AV technician on-site the entire time the show is open. If something goes wrong, your team texts or calls, and help reaches the booth quickly.
That support changes the emotional experience of exhibiting. Instead of hoping the display behaves for three days, you know someone owns the outcome in real time.
The modern advantage is bigger than weight savings. It’s the combination of lighter freight, simpler setup, sharper visuals, fewer failure points, and direct support when the show is live. That’s what lowers cost and raises confidence at the same time.
The Return Trip Planning Your Exit Strategy
The outbound shipment gets all the attention. The return trip is where tired teams make expensive mistakes.
By teardown, people are focused on lead capture, post-show meetings, flights home, and getting off the floor. That’s exactly why return shipping needs a written plan before the event opens. If not, you risk forced freight, missing paperwork, or freight left behind because nobody closed the loop with the carrier.
A strong move-out routine is simple and disciplined. If your operations team wants broader ideas for process discipline beyond events, this collection on logistics shipping efficiency offers useful thinking on reducing avoidable friction.
What to do before teardown starts
Don’t wait until the booth is half packed to figure out the outbound process.
Confirm these points in advance:
- Carrier pickup is scheduled: Make sure your chosen carrier knows the move-out timing and venue rules.
- Empty crates are returning properly: Know where empties will come back from and when.
- Return labels and paperwork are ready: Don’t count on rebuilding this from memory at the end of a long day.
- Booth repacking sequence is clear: Pack delicate and high-value items first, not last.
If your team needs a practical model for installation and dismantle planning, this trade show set up guide can help align teardown with the way the booth should be repacked.
The end-of-show checklist that prevents chaos
A good teardown lead should manage move-out like a controlled receiving process in reverse.
Use this checklist:
-
Inspect before repacking
Check screens, structural pieces, cables, and accessories for visible damage or missing parts. -
Pack to the original inventory
Return each component to its assigned crate or case, not just the nearest open space. -
Complete the material handling agreement carefully
Make sure the outbound destination, carrier details, and booth information are accurate. -
Leave proof inside and outside
Put the packing list in the crate and keep a separate copy with your team. -
Confirm pickup
Before anyone leaves the floor, verify that the shipment is tagged correctly for the right carrier.
The most expensive move-out mistakes are boring ones. Wrong paperwork, rushed repacking, and assumptions about who is picking up the freight.
The return trip should feel uneventful. That’s the goal. If your trade show shipping plan works only on the way in, it isn’t complete.
If you want a booth solution that reduces freight weight, simplifies setup, delivers higher-resolution 1.9 pitch LED walls, and comes with white glove, turnkey support, LED Exhibit Booths is built for exactly that. Their pricing includes everything except the show’s direct charges such as electricity and material handling, and they keep an AV technician on-site while the show is open so your team can focus on customers instead of troubleshooting.